Creating and Updating Prospect Personas
Last updated: May 27, 2026
This guide details how to create and manage prospect Personas in Nooks. It covers how to create, modify, and delete Personas, provides some example Personas as an instructive reference, and shares best practices for creating Personas that have optimal prospect coverage.
Background
Personas are named segments that group prospects together based on job title and seniority level. When prospects enter Nooks, Nooks assigns them to the first Persona whose filters match. Ultimately, Personas help ensure that the right types of prospects are surfaced to your users based on your company’s objectives and requirements.
Once configured, Personas are used across Nooks, including the following locations:
Dialer: An optional Persona column gives users visibility into who they’re calling. Battlecards can also be assigned to specific Personas to surface the right messaging when the user is connected.
Accounts Hub: Prospects are grouped in an account by Persona for account-level prospecting.
Prospects page: Prospects are displayed and filterable by Persona.
Plays: Prospects can be filtered in or out of automated Plays based on whether their assigned Persona is included in the Play’s configuration.
Reporting: Report on activity metrics by Persona.
Steps to Create a New Persona
This section outlines how to create a new Persona, including completing the Persona and Pain Points tabs in the Persona builder.
Step 1: Navigate to Persona Settings
Personas are configured on the Personas page in Nooks Settings. To navigate to this page:
Go to Settings > All Settings.
Under Dialer, click Personas.
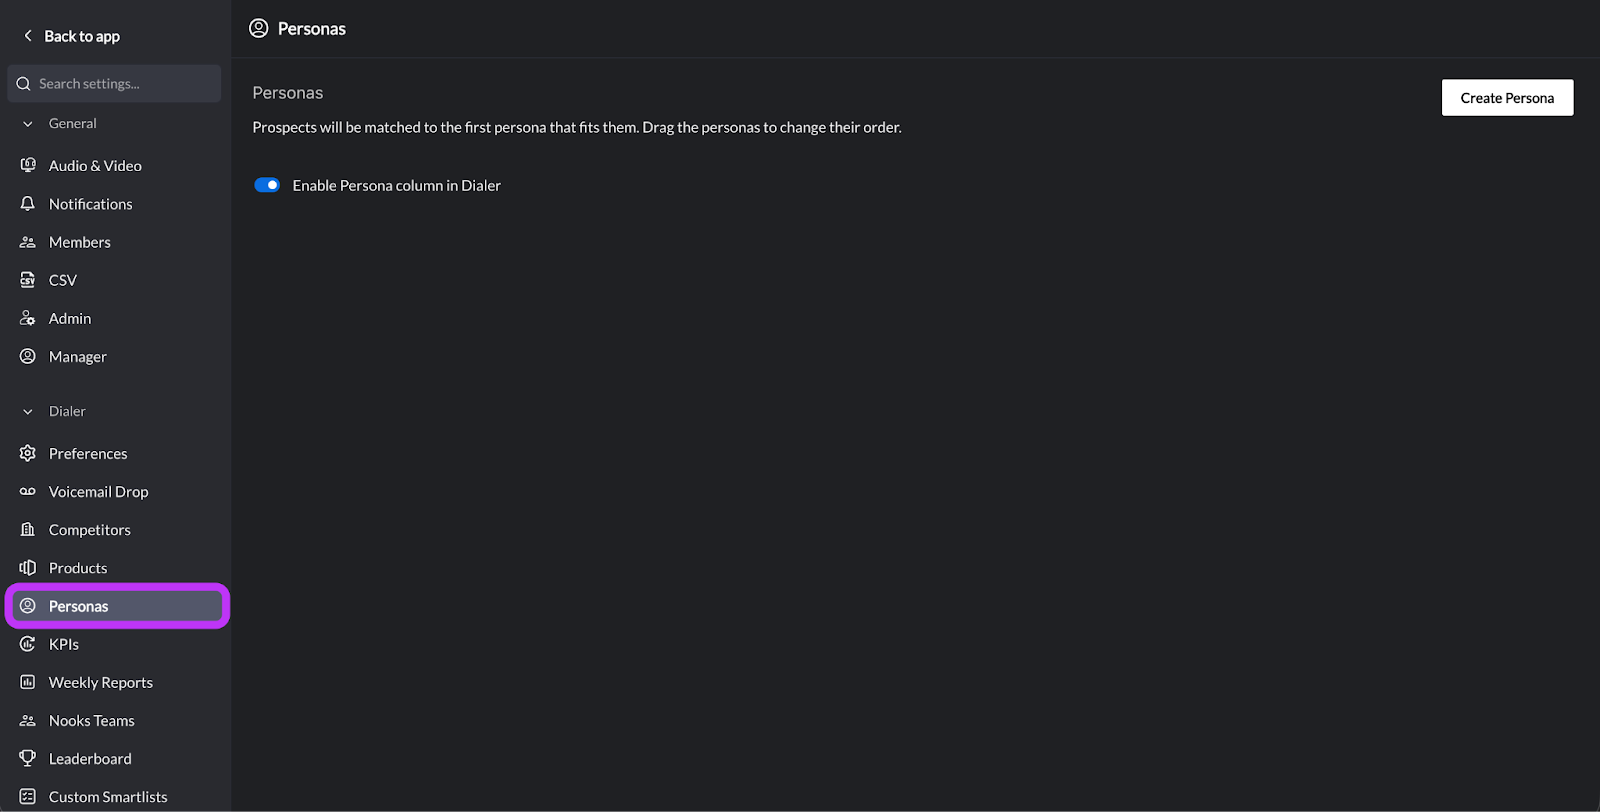
On this page, you will see a list of any Personas that are already configured for your Workspace, as well as the option to create new Personas.
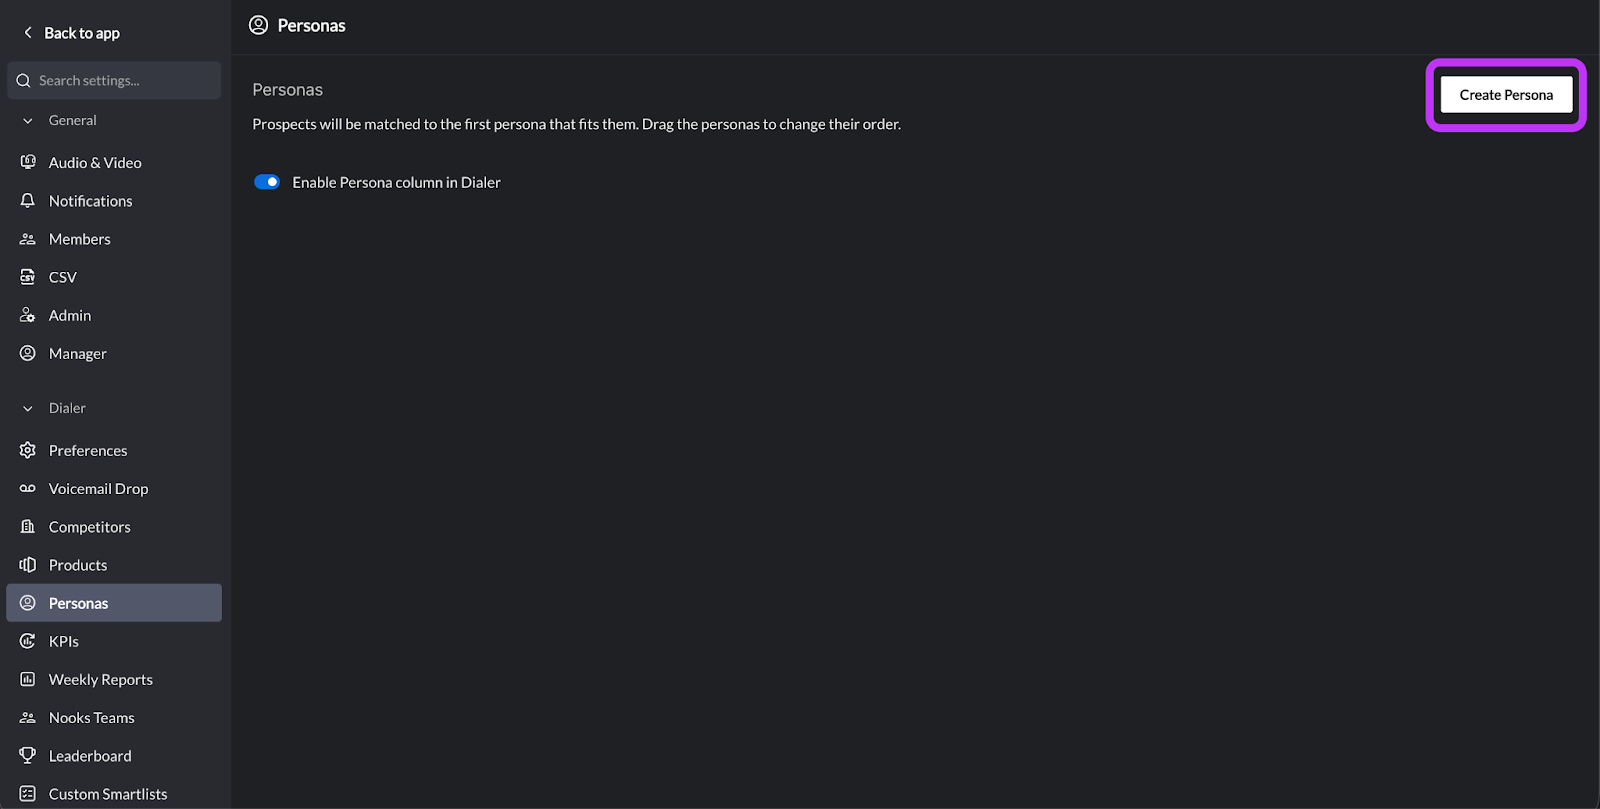
Step 2: Create a New Persona
To create a new Persona for your Workspace:
Click the Create Persona button in the upper-right corner of the screen.
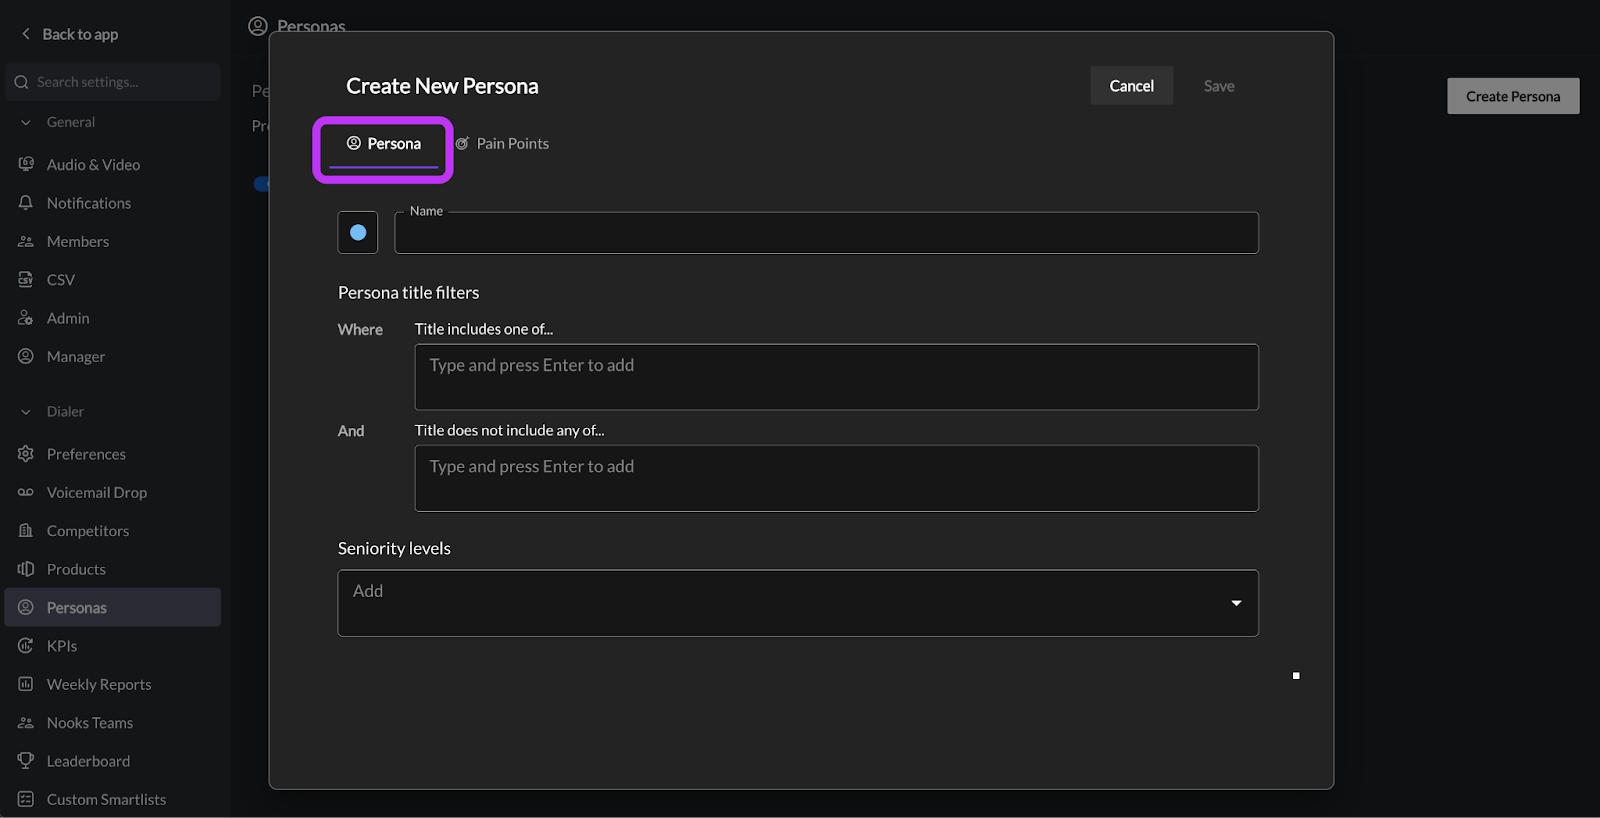
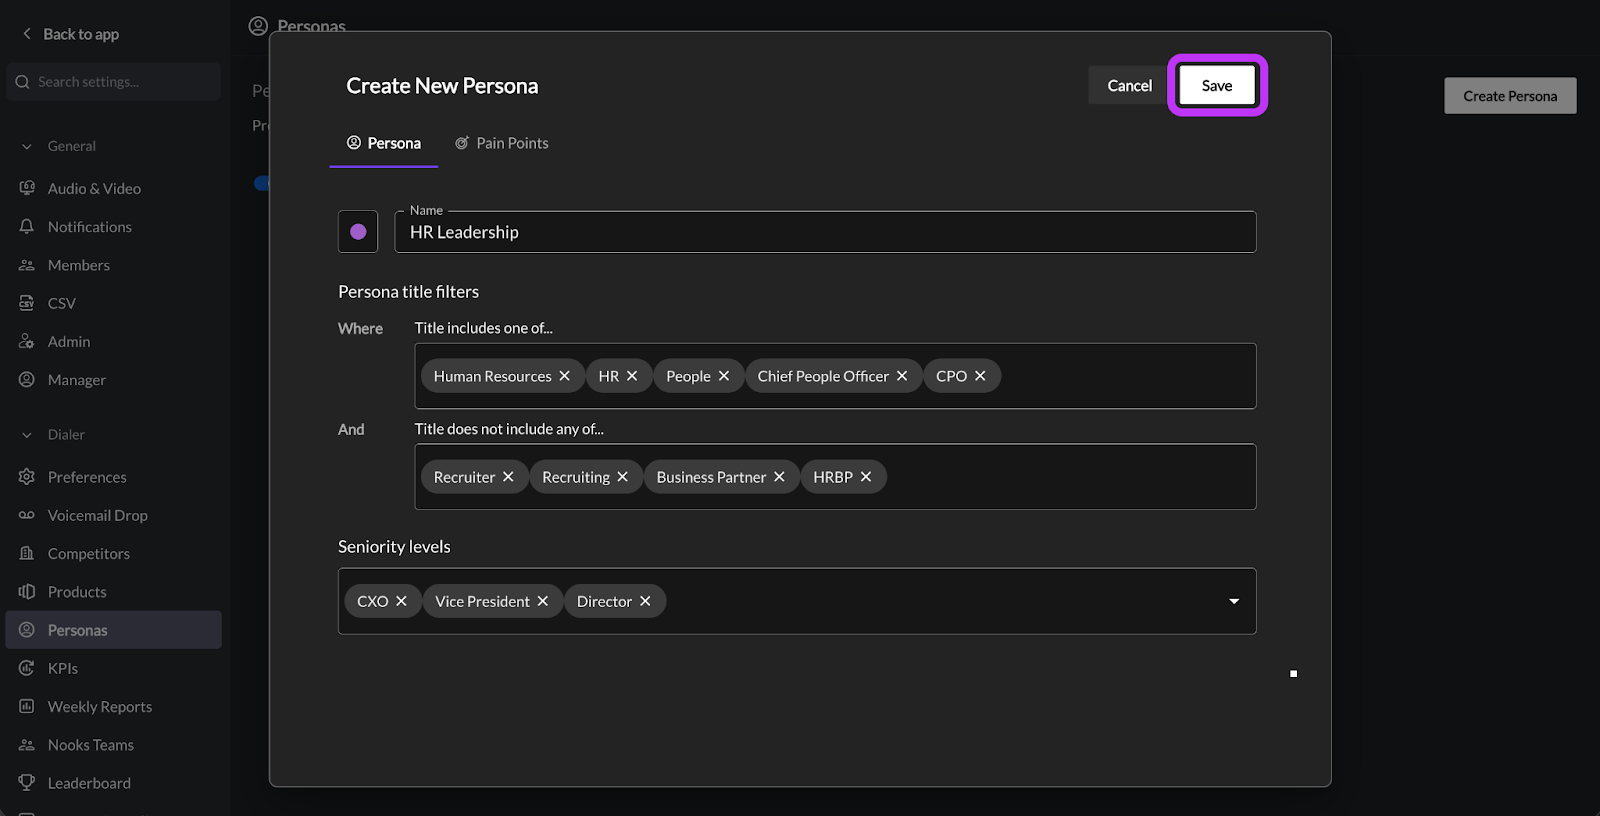
Step 3: Complete the “Personas” Tab
Next, complete the “Persona” tab. The information included in this tab is the core matching logic for the Persona. The matching logic can be thought of as a LinkedIn Sales Navigator query, using certain search terms for inclusion and exclusion.
Step 3a: Choose a Color
Click the color swatch to color code the Persona. There are 7 colors to choose from: Light Blue, Pink, Lilac, Orange, Yellow, Aqua, or Fuchsia.
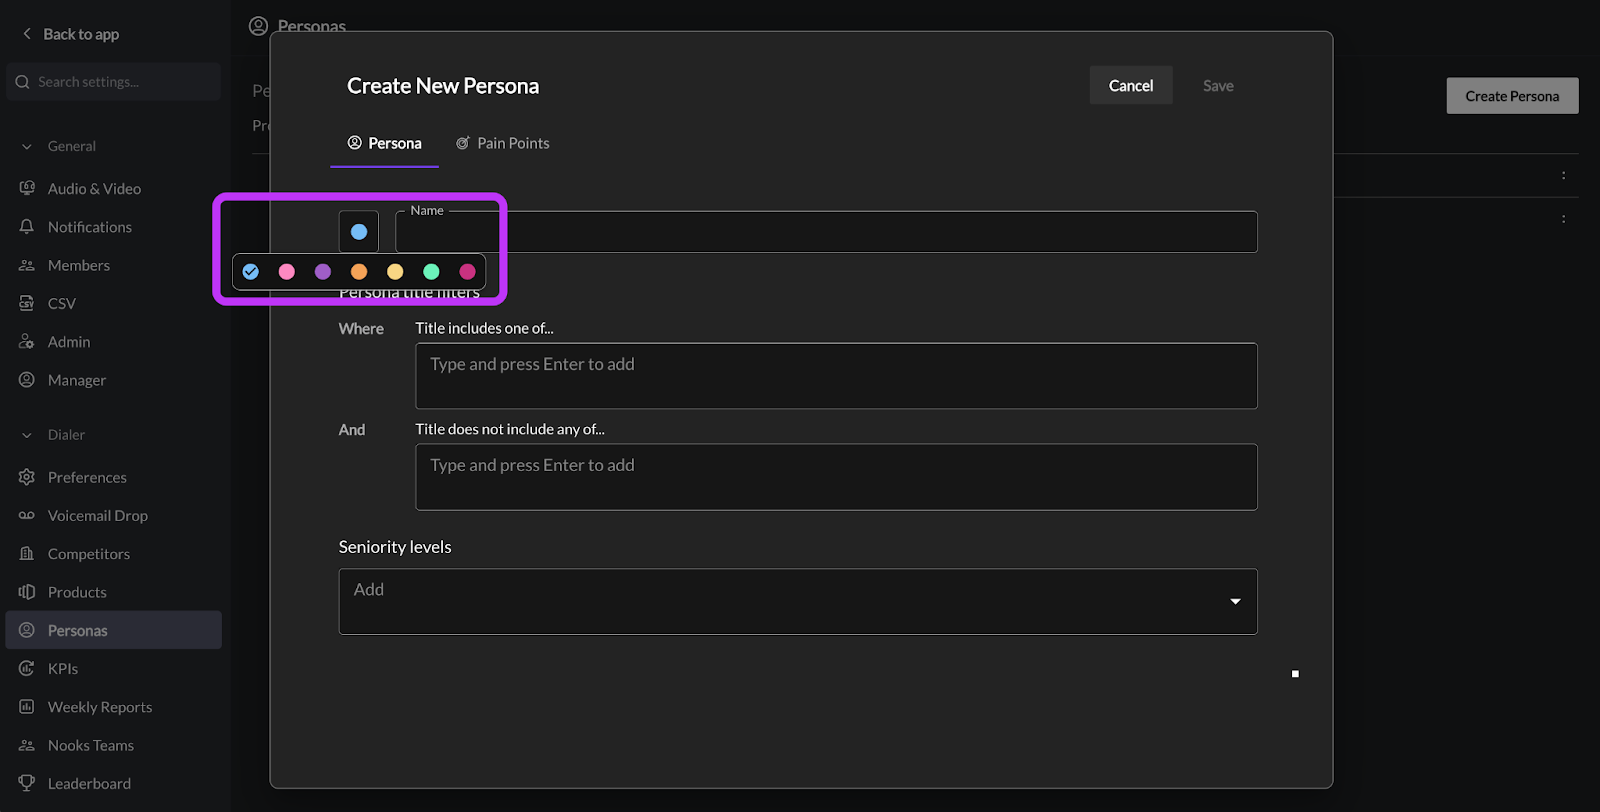
The color appears as a dot alongside the Persona name throughout the Nooks UI, helping you quickly distinguish between different Personas.
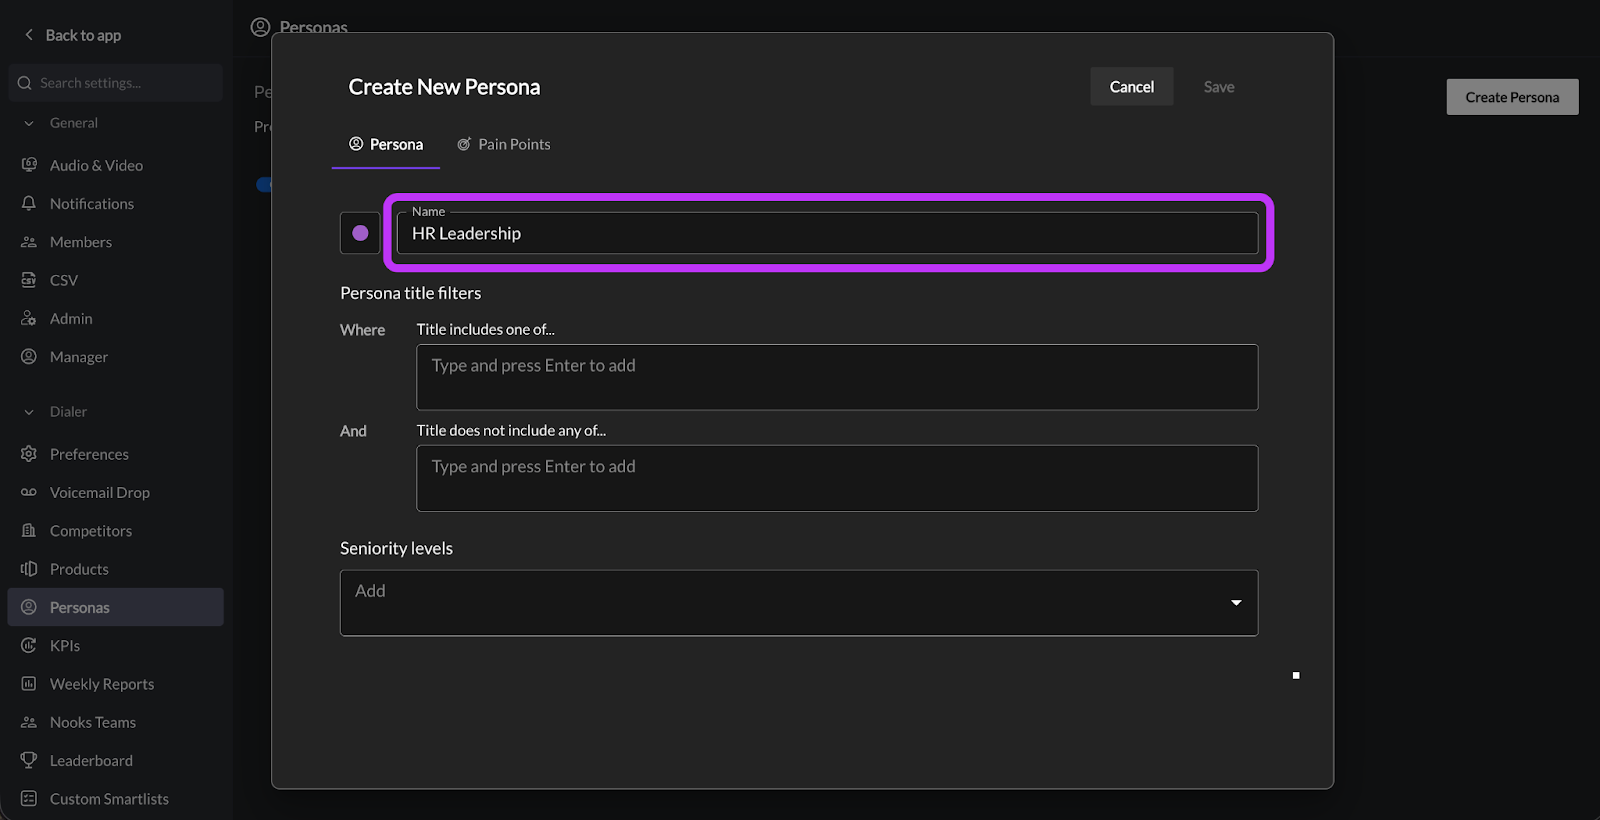
Step 3b: Name the Persona
Next, type in a descriptive name for the Persona. The name should enable team members to tell exactly who the Persona represents. Persona names must be unique in Nooks and are limited to 40 characters.
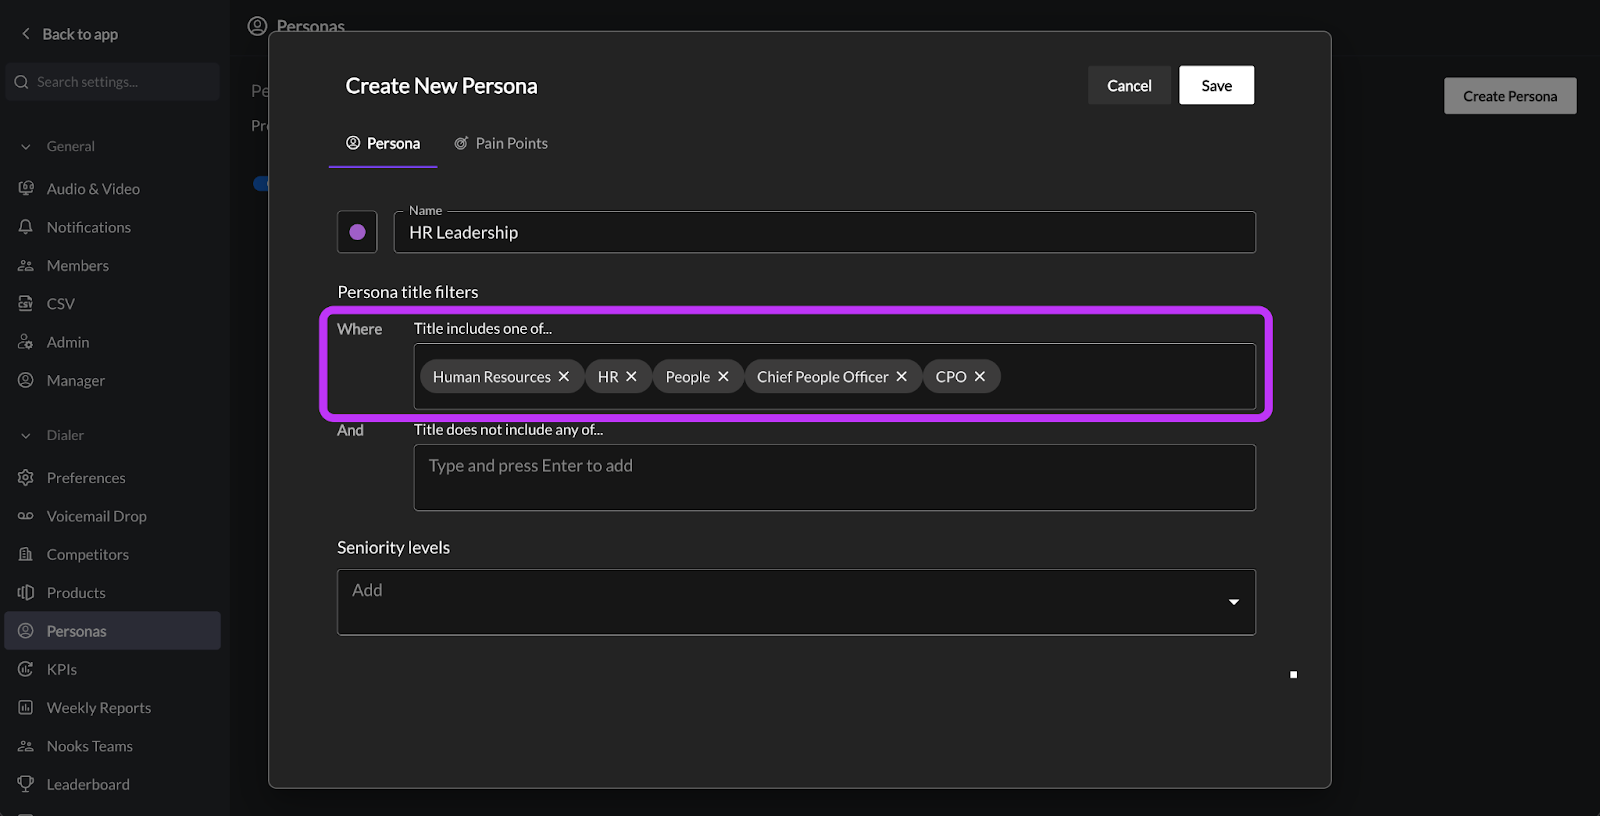
Step 3c: Add Inclusionary Filters
In the Title includes one of… section under Persona Title Filters, type in title keywords or key phrases, then press the Enter/Return key to add it. If a prospect’s title contains any of these words or phrases, they will be considered a match for this Persona.
Best Practices for the Inclusionary Filters: Follow the best practices below when configuring your inclusionary filters.
Enter core function words, not full title strings. Nooks matches prospects to Personas if they contain one of the key phrases. Shorter key phrases have broader reach. Entering full title strings may reduce the number of prospects that match the Persona. For example:
A “Finance” key phrase would match to both a “Finance Manager” and “Director of Finance” job title.
A “Finance Manager” key phrase would match to both a “Finance Manager” and “Finance Senior Manager” job title. However, it would not match to a “Director of Finance” or a “Finance” job title, as every word in a key phrase must be present in the job title (regardless of word order or separation) in order for the Persona to match.
List out title abbreviations and common variations. Nooks fuzzy matches prospects’ job titles to Personas. If each word in a Persona key phrase is at least 75 percent similar to a word in a prospect’s job title, Nooks will match the prospect to the Persona. However, Nooks does not automatically convert key phrases into abbreviations. For example:
A “Communication” key phrase would match to someone with “Communications” in their job title.
A “Sales Development” key phrase would not match to someone with “SDR” as their job title. To ensure you capture people with the “SDR” job title in this filter, include “SDR” as a separate key phrase.
Omit seniority words from the inclusionary filters. Including key phrases targeting seniority will limit the reach of the Persona. Instead of including key phrases related to seniority in the inclusionary filters section, include them in the Seniority Levels filter.
Step 3d: Add Exclusionary Filters
In the Title does not include one of… section under Persona Title Filters, type in keywords or phrases, then press the Enter/Return key to add it. Prospects will be excluded from the Persona if their title matches any of the exclusion key phrases.

Best Practices for the Exclusionary Filters: Follow the best practices below when configuring your exclusionary filters.
Add key phrases that will exclude false positives. If your inclusionary key phrases might capture similar titles that you do not want matched to the Persona, use exclusionary key phrases to disqualify them. Using exclusionary key phrases enables you to keep your inclusionary key phrases broad so that they match as many relevant titles as possible. For example:
If you have a Persona targeting salespeople, you may have “Sales” as an inclusionary key phrase. However, if you do not want to go after sales engineers, you can add “Engineer” as an exclusionary key phrase instead of modifying your inclusionary key phrases with a more specific (and, therefore, restrictive) string.
If you have a Persona targeting HR Leadership, you may have “CPO” as an inclusionary key phrase. However, you likely won’t want Chief Product Officers matched to this Persona. To exclude as many such prospects as possible, you can add “Product” as an exclusionary key phrase (although this will not exclude Chief Product Officers who list their title as “CPO” on its own).
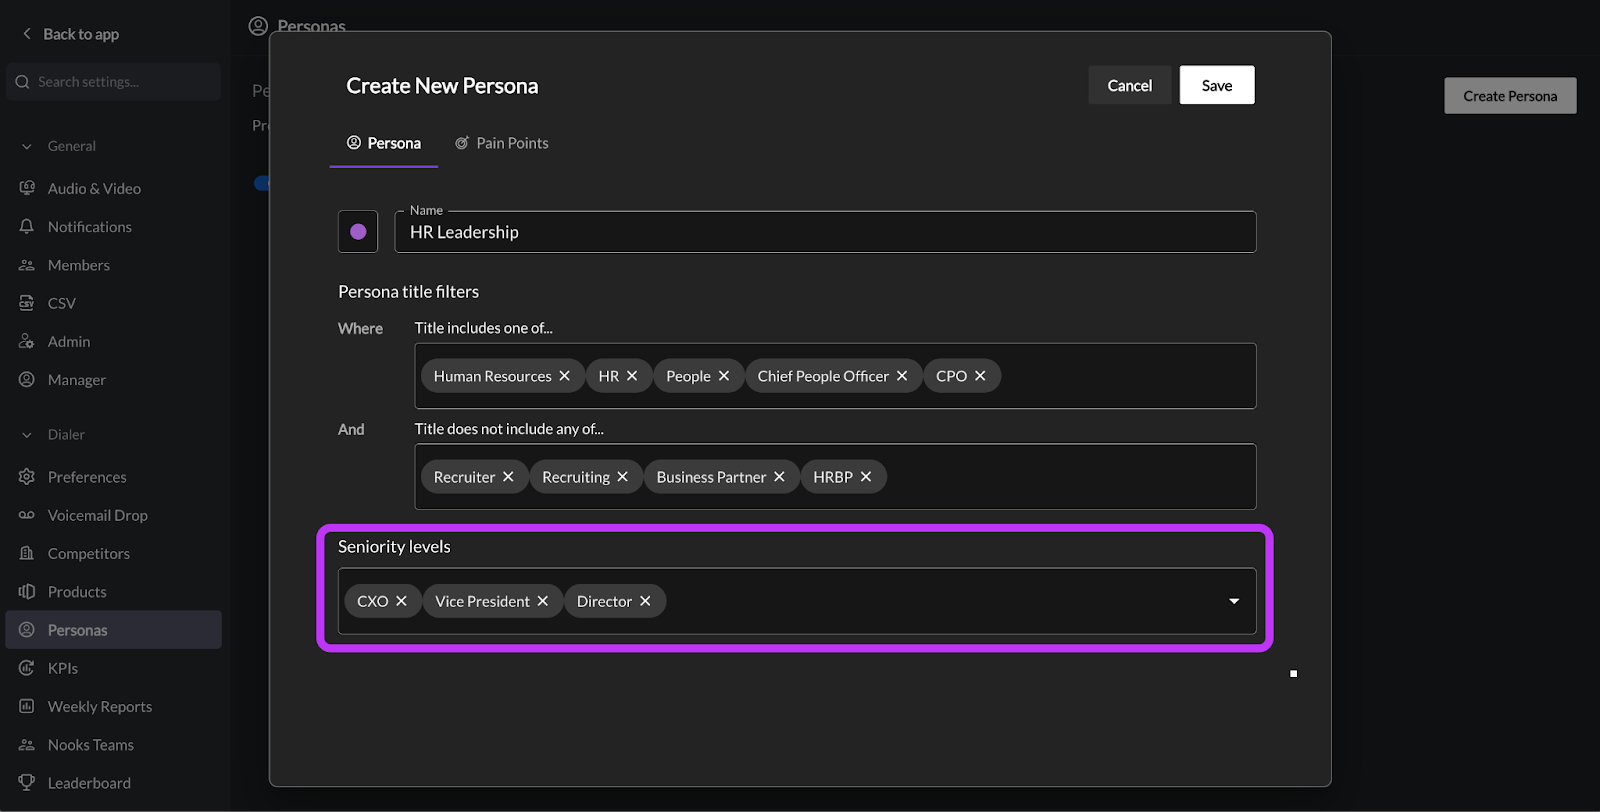
Step 3e: Add Seniority Levels
Select one or more seniority levels from the dropdown. A prospect will only match to this Persona if their detected seniority is selected from the list. Leave this field blank to match prospects of any seniority to this Persona.
The table below lists the available seniority levels and examples of titles that would match them.
Level | Example |
Owner / Partner | Founder, Managing Partner, Board Member |
CXO | CEO, CFO, CTO, CPO, CIO |
Vice President | VP of Sales, Vice President of Product |
Director | Marketing Director, Head of HR, Sales Executive |
Experienced Manager | SDR Manager, Engineering Manager, Senior Manager |
Entry Level Manager | Junior Sales Manager, Team Lead, Supervisor |
Senior | Senior Account Executive, Senior Engineer |
Entry Level | SDR, BDR, Junior Analyst |
In Training | — |
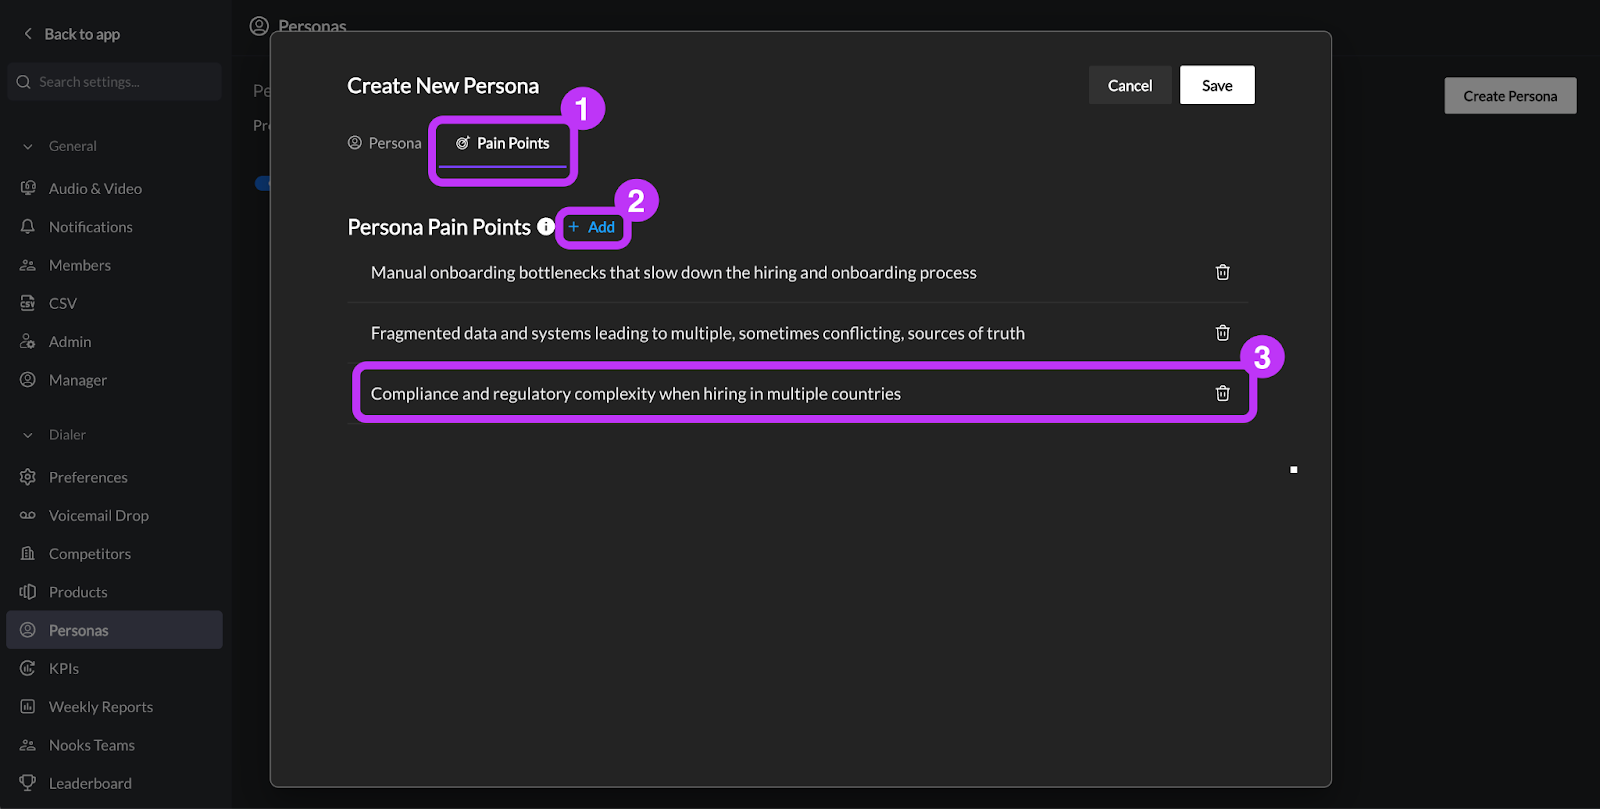
Step 4: Add Pain Points
Next, add Pain Points to the Persona. Pain points inform the email copy and call scripts the Nooks AI drafts for prospects with this Persona. More specific and accurate pain points lead to more personalized and relevant AI outputs.
Click into the Pain Points tab at the top of the Persona card.
Press the blue + Add button.
Type in a descriptive pain point for the Persona.
Press the blue + Add button to add additional pain points.
Step 5: Save and Review the Persona
Press the Save button to save the Persona once you’ve finished configuring it. In order to save the Persona, you must have minimally:
Entered a name, or
Entered either inclusionary key phrases or exclusionary key phrases.
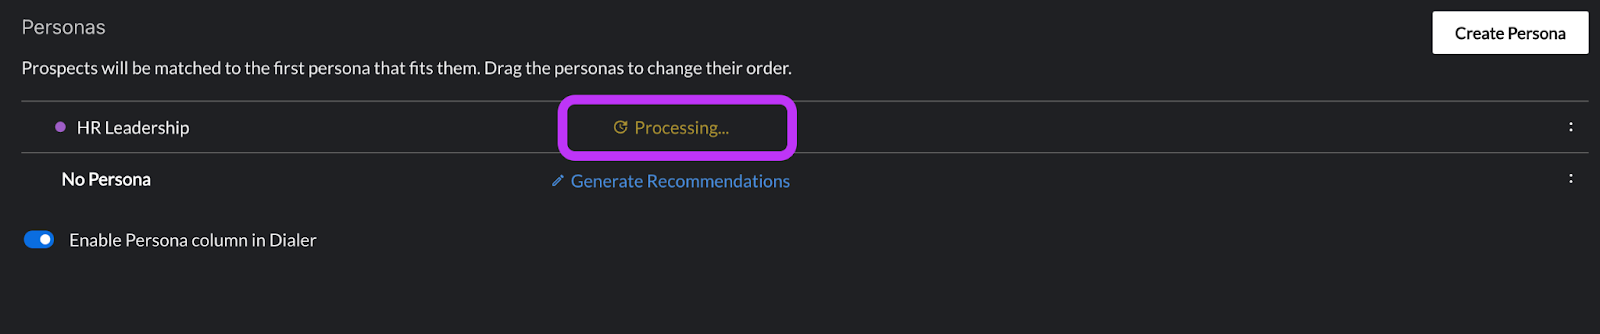
After saving, a Processing tag will appear on the Persona row. While present, Nooks is running a job to classify all of the prospects in your Workspace against the new Persona definitions.
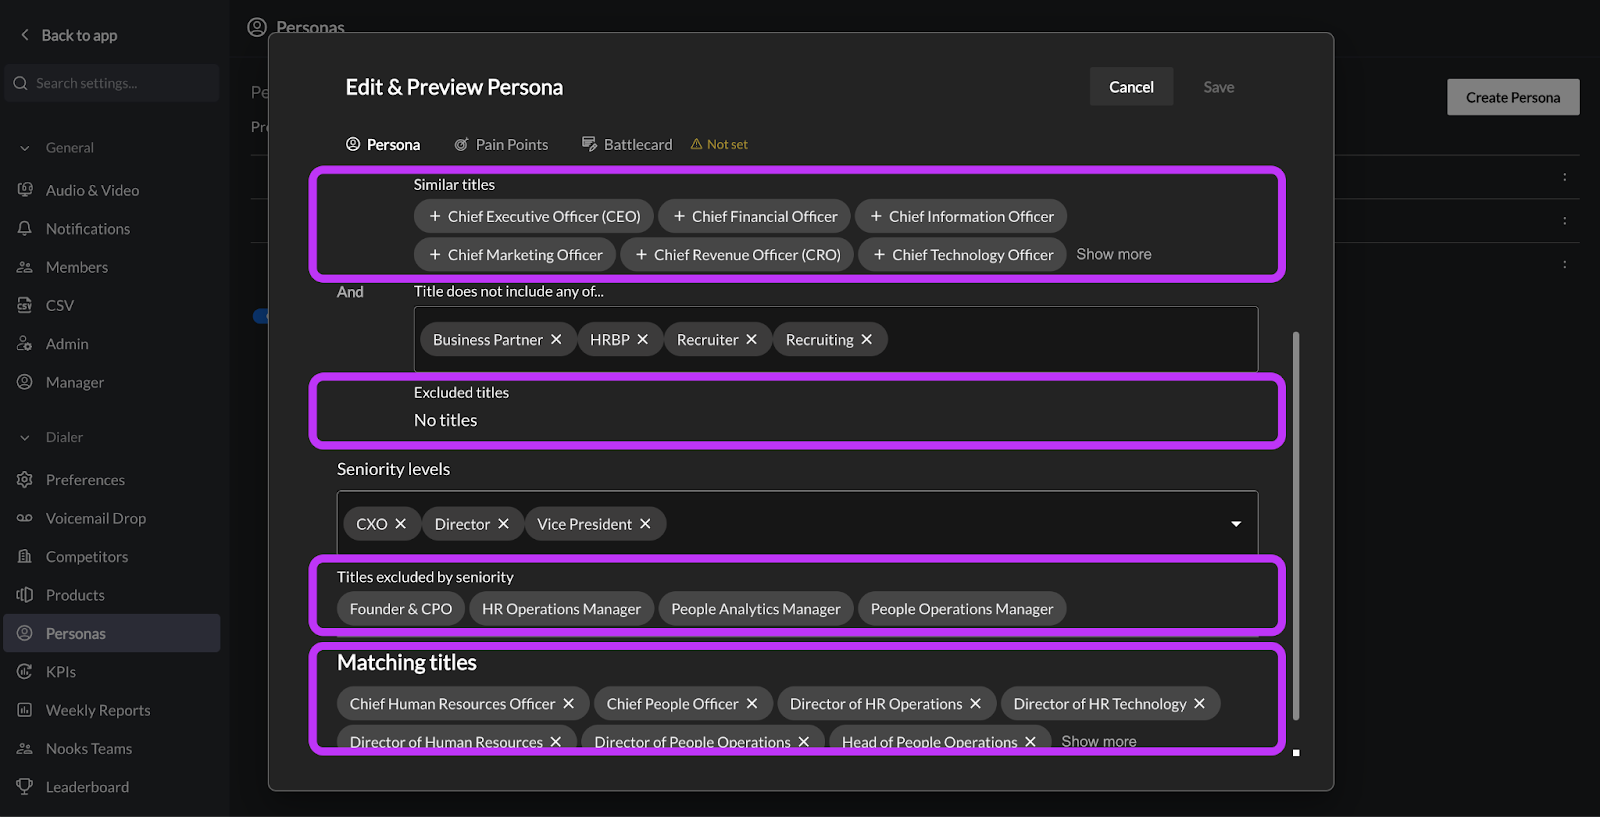
Once processing completes, click in the Persona row to open the Persona again. Nooks will display some titles from prospects in your Workspace that match, almost matched, or were excluded from your Persona’s filters, enabling you to quickly fine-tune the Persona’s filtering criteria.
Review the Matching Titles section at the bottom of the Persona pop-up. Here, you can see examples of real titles from your Workspace’s prospects that match the Persona’s filters, giving you a live preview of coverage.
Press the X next to a title that you do not want to include, which will move it to the Persona’s exclusionary filters.
Review the Similar Titles section under the “Title includes one of…” section. Here, you can see examples of real titles from your Workspace’s prospects that don’t quite match your Persona’s filters.
Press the + next to a title that you want to include, which will move the title into your inclusionary filter search terms.
Review the Excluded Titles section below the “Title does not include one of…” field. Here, you can see titles that your exclusionary filters blocked from matching to the Persona.
To match to some of these titles, remove or reword some of the key phrases in the “Title does not include one of…” field.
Review the Titles Excluded by Seniority section below the “Seniority Levels” dropdown. Here, you can see titles that your seniority level filters blocked from matching the Persona.
To match to some of these titles, adjust the seniority levels selected in the dropdown.
Step 6: Reorder Personas
Prospects can be assigned to only one Persona. Personas are evaluated in order, from top to bottom. Prospects are matched to the first Persona whose title and seniority criteria they match.
Reorder your Personas to prioritize which Persona a prospect will be assigned to if a prospect matches multiple Personas in your Workspace. For example, if you have a “Sales Leadership” persona and a general “Sales” persona, order the “Sales Leadership” above “Sales” so that a Vice President of Sales is assigned the “Sales Leadership” Persona instead of the catch-all “Sales” Persona.
Follow the steps below to reorder your Workspace’s Personas.
Hover over a Persona row to reveal a drag handle on the left.
Drag a Persona up or down to prioritize or deprioritize the Persona.
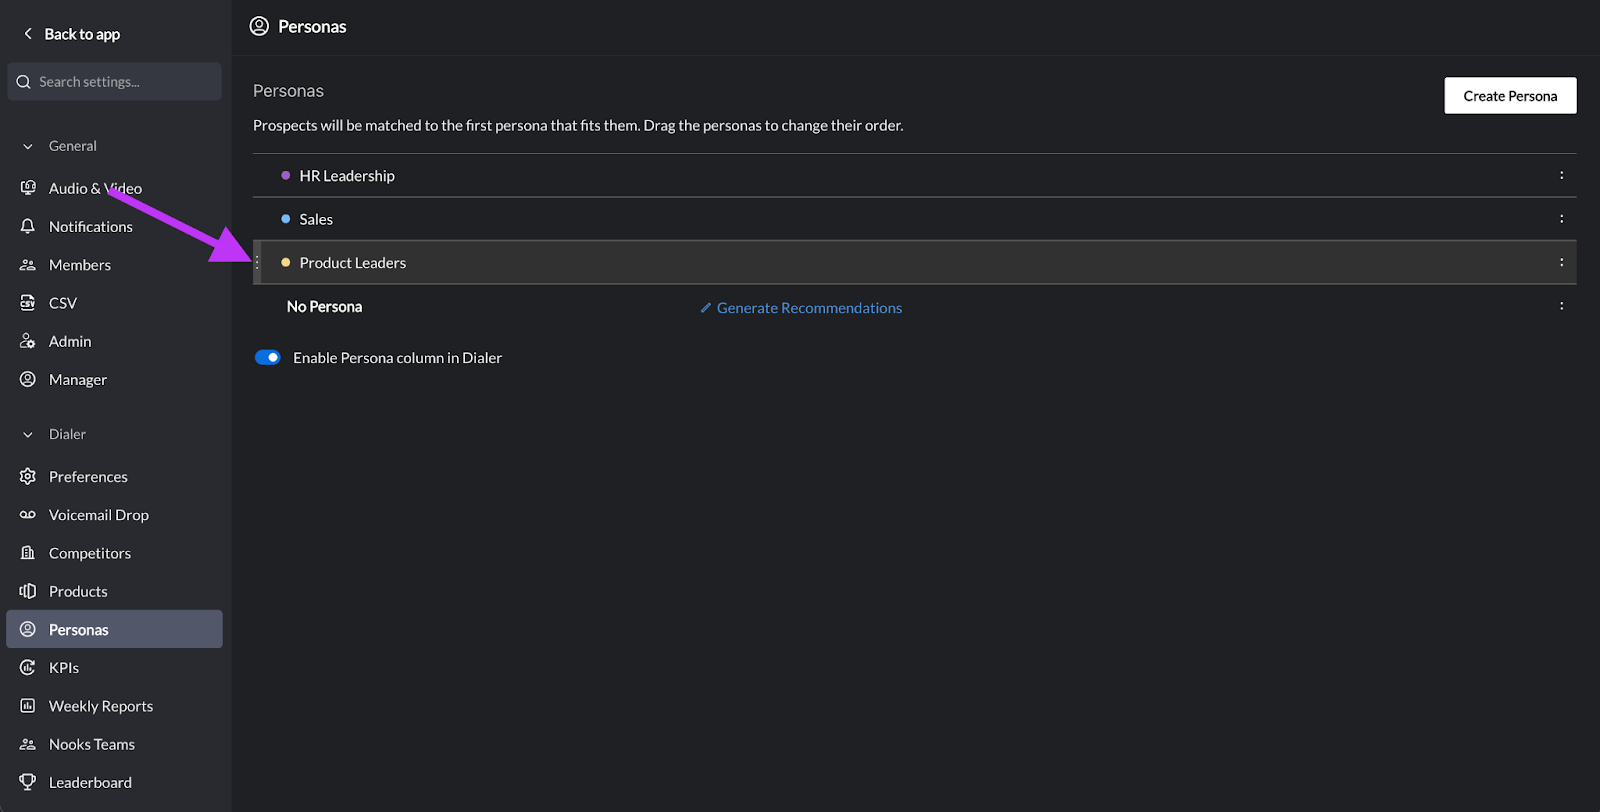
Note: The No Persona option will always be pinned at the bottom of the Persona list to catch any prospects that don’t match any of your Workspace’s configured Personas.
Steps to Edit and Delete a Persona
You can edit and delete Personas at any time from the Personas page in Nooks Settings.
Go to Settings > All Settings > Personas (under Dialer)
To Edit: Click any persona row or click Edit & Preview from the three dot menu on the right. Save your changes after editing.
To Delete: Click the three-dot menu on the right side of a Persona row, then press Delete.
Personas that are currently Processing cannot be deleted.
The No Persona group cannot be deleted.
After you edit or delete a Persona, Nooks will reclassify all the prospects in your Workspace against the updated Personas. This process can take up to a few minutes depending on the volume of prospects in your Workspace.
Best Practices
Follow the best practice recommendations below when configuring your Workspace’s Personas for ideal coverage.
Prioritize specific Personas. Nooks assigns a prospect to the first matching Persona in your Personas list. If a broad Persona (e.g., “Marketing”) is ranked above a specific one (e.g., C-Level Marketing), Chief Marketing Officers (CMOs) will be misclassified. Place the more specific Personas at the top of your Personas list to ensure prospects are most accurately classified.
Use the title and seniority filters together for better precision. Title key phrases alone are intended to match broadly. For example, an inclusionary “Product” key phrase could match “Chief Product Officer” and “Associate Product Manager”. Add seniority level filters to specify the seniority of the prospects you hope to capture with the Persona. Including seniority level filters instead of listing full titles that reference seniority helps ensure your inclusionary key phrases maintain a broad reach.
Write Pain Points as specific business problems, not product features. AI email and call script generation leverage pain points when drafting content for prospects who match the corresponding Persona. The more specific your pain points, the more relevant Nooks’ AI copy will be. Vague entries (e.g., “needs a solution”) produce weaker AI copy than specific entries (e.g., “manual data entry consumes 5+ hours per week”).
Review Personas regularly. Review your Workspace's Personas on a regular (e.g., quarterly) basis to ensure coverage. Click into the No Persona group to review the titles matching there, and create new Personas to capture them. Additionally, if your team expands your business to target new prospect segments, create additional Personas to classify them for your users.
Example Personas
The Personas your team creates should be specific to the prospects you want to go after in your business. The examples below represent a few different Personas across industries, job functions, and seniority levels. They are not necessarily intended to be copied, as they may not be relevant to your company’s business. Instead, they are meant to illustrate how to configure Personas that capture many prospects.
Example 1: VP of Sales
Field | Value |
Name | VP of Sales |
Color | Aqua |
Title includes one of... | Sales |
Title does not include one of... | Enablement, Operations, Ops, Engineer |
Seniority levels | Vice President |
Pain points |
Example 2: IT/Security Director
Field | Value |
Name | IT Director |
Color | Lilac |
Title includes one of... | IT, Information Technology, Security, Infrastructure, CISO |
Title does not include one of... | Sales, Marketing, Recruiter, Recruiting |
Seniority levels | Director, Vice President, CXO |
Pain points | Managing compliance overhead; shadow IT visibility; managing data privacy; managing legacy systems and technical debt |
Example 3: HR Leadership
Field | Value |
Name | HR Leadership |
Color | Light blue |
Title includes one of... | Human Resources, People, HR, Chief People Officer, CPO |
Title does not include one of... | Talent, Recruiter, Recruiting, Product, Performance, Business Partner, HRBP |
Seniority levels | Director, Vice President, CXO |
Pain points | Talent acquisition and retention; compliance and regulatory complexity; boosting employee engagement |
Example 4: Operations Leadership
Field | Value |
Name | Operations Leadership |
Color | Fuchsia |
Title includes one of... | COO, CCO, Operations, Operating, Support, Marketing, Customer |
Title does not include one of... | |
Seniority levels | Vice President, CXO |
Pain points | Technical debt from legacy systems that don't talk to new tools, creating a manual workload; having too much data in siloed systems but not enough actionable insight; scaling friction that require a constant re-engineering of processes and contribute to change fatigue |
Example 5: General Sales
Field | Value |
Name | Sales |
Color | Yellow |
Title includes one of... | Sales, Business Development, SDR, BDR, Account Executive, AE, Account Manager, AM, Revenue |
Title does not include one of... | Engineer, Recruiter, Recruiting |
Seniority levels | |
Pain points | Hitting call and email quotas, generating pipeline, spending time on administrative tasks, inefficient technology |
FAQs
Does Nooks support industry-based Personas?
Nooks currently only supports title-based Personas.
Are Persona key phrases case sensitive?
Key phrases are not case sensitive. Case variations between a Persona’s key phrases and a prospect’s title will not prevent a match.
If I change a Persona, will those updates apply retroactively?
Yes! When an existing Persona is updated, a new Persona is added, or an existing Persona is deleted, Nooks will run a job to reclassify all the prospects in your Workspace against the updated Personas. This process can take some time, so the updated Persona matches may not appear immediately.