Getting Started with Nooks Sequencing
Last updated: October 1, 2026
This guide is designed to help you set up your Nooks Sequencing account and configure all required integrations before your live training sessions begin. By completing these steps, you’ll ensure your account is connected to your email, your data is flowing properly to and from your CRM, the Chrome Extension is configured, and you are able to use all of the features of Nooks Sequencing.
Estimated Time to Completion: Overall, this set up process should take ~10 minutes to complete.
Video Walkthrough
If you are more of a visual learner, you can also follow along with the video below, which walks through the setup steps.
Setup Checklist
Use the checklist below to track your setup tasks.
Workspace Setup:
Update Google Chrome
Log into Nooks
Allow cookies on Nooks
Connect your CRM (if on Salesforce)
Set your nickname
Nooks Chrome Extension Setup:
Install the Nooks Chrome extension
Pin the Nooks Chrome extension
Grant permissions in the Nooks Chrome extension
Disable or remove other SEP extensions (e.g., Outreach, Salesloft, Clari Groove)
Enable Nooks Everywhere
Email Setup:
Connect your email address to Nooks
If applicable: Select your default email alias
If applicable: Connect additional mailboxes to Nooks
Configure your mailbox settings
If applicable: Set values for your Nooks Workspace's Dynamic Variables
Configure your email signature
Scheduling Settings:
Set your timezone
Choose your working hours
Nooks Booking Link Setup:
Connect your calendar to Nooks
If applicable: Connect your Zoom account to Nooks
Enable your Nooks Booking Link
LinkedIn Setup:
LinkedIn account is connected to Nooks
Notification Preferences:
Customize notification preferences
Phone Number Setup:
Nooks phone number created
Ready Your Workspace
The initial steps ensure your Chrome browser, Nooks login, and CRM connection are all in place before you start sequencing.
Task 1: Update Google Chrome
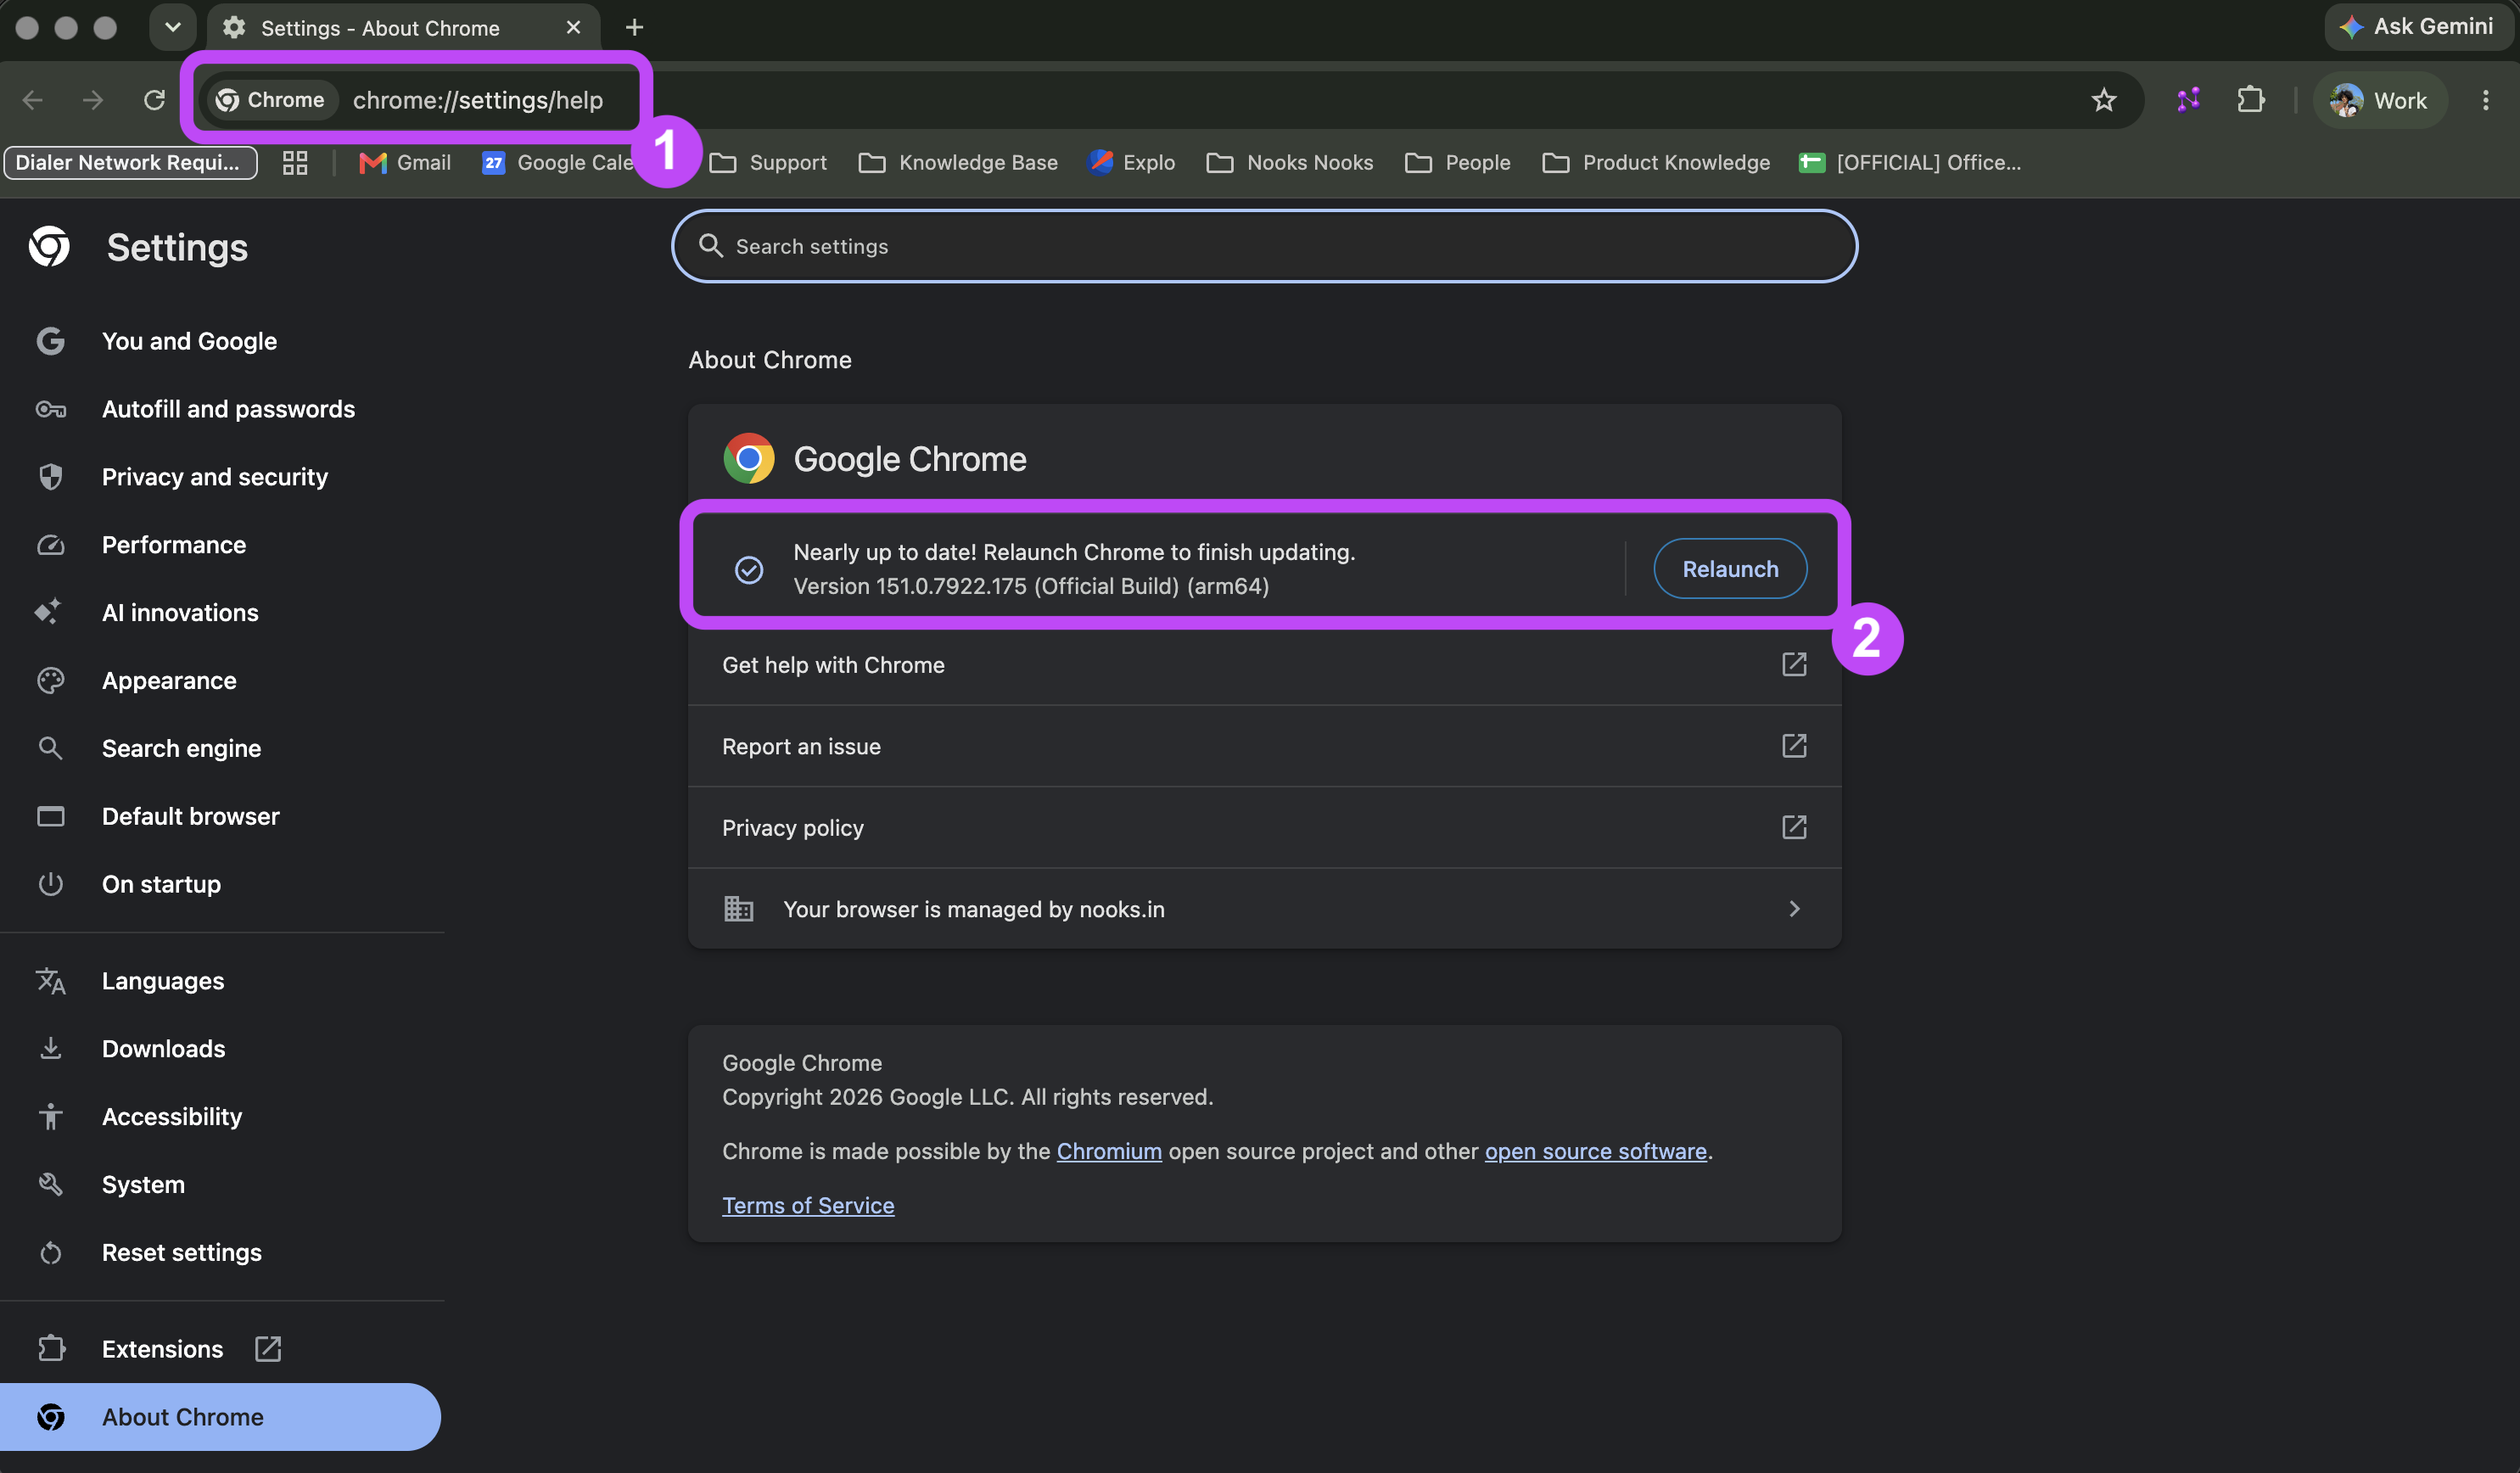
To optimize your experience with Nooks Sequencing, make sure you are on the latest version of Google Chrome. To check whether Chrome is up to date:
Enter chrome://settings/help into your Chrome address bar. Click the Return or Enter key.
If your Chrome version is outdated: Chrome will automatically check for and download any available updates. Click Relaunch to restart Chrome once the update has installed.
If you are already on the latest Chrome version: You will see a message that says "Chrome is up to date".
Task 2: Log Into Nooks
Next, log into Nooks.
Navigate to https://app.nooks.in/login.
Sign in with your email address or Single Sign-on (SSO) tool.
Task 3: Allow Cookies on Nooks
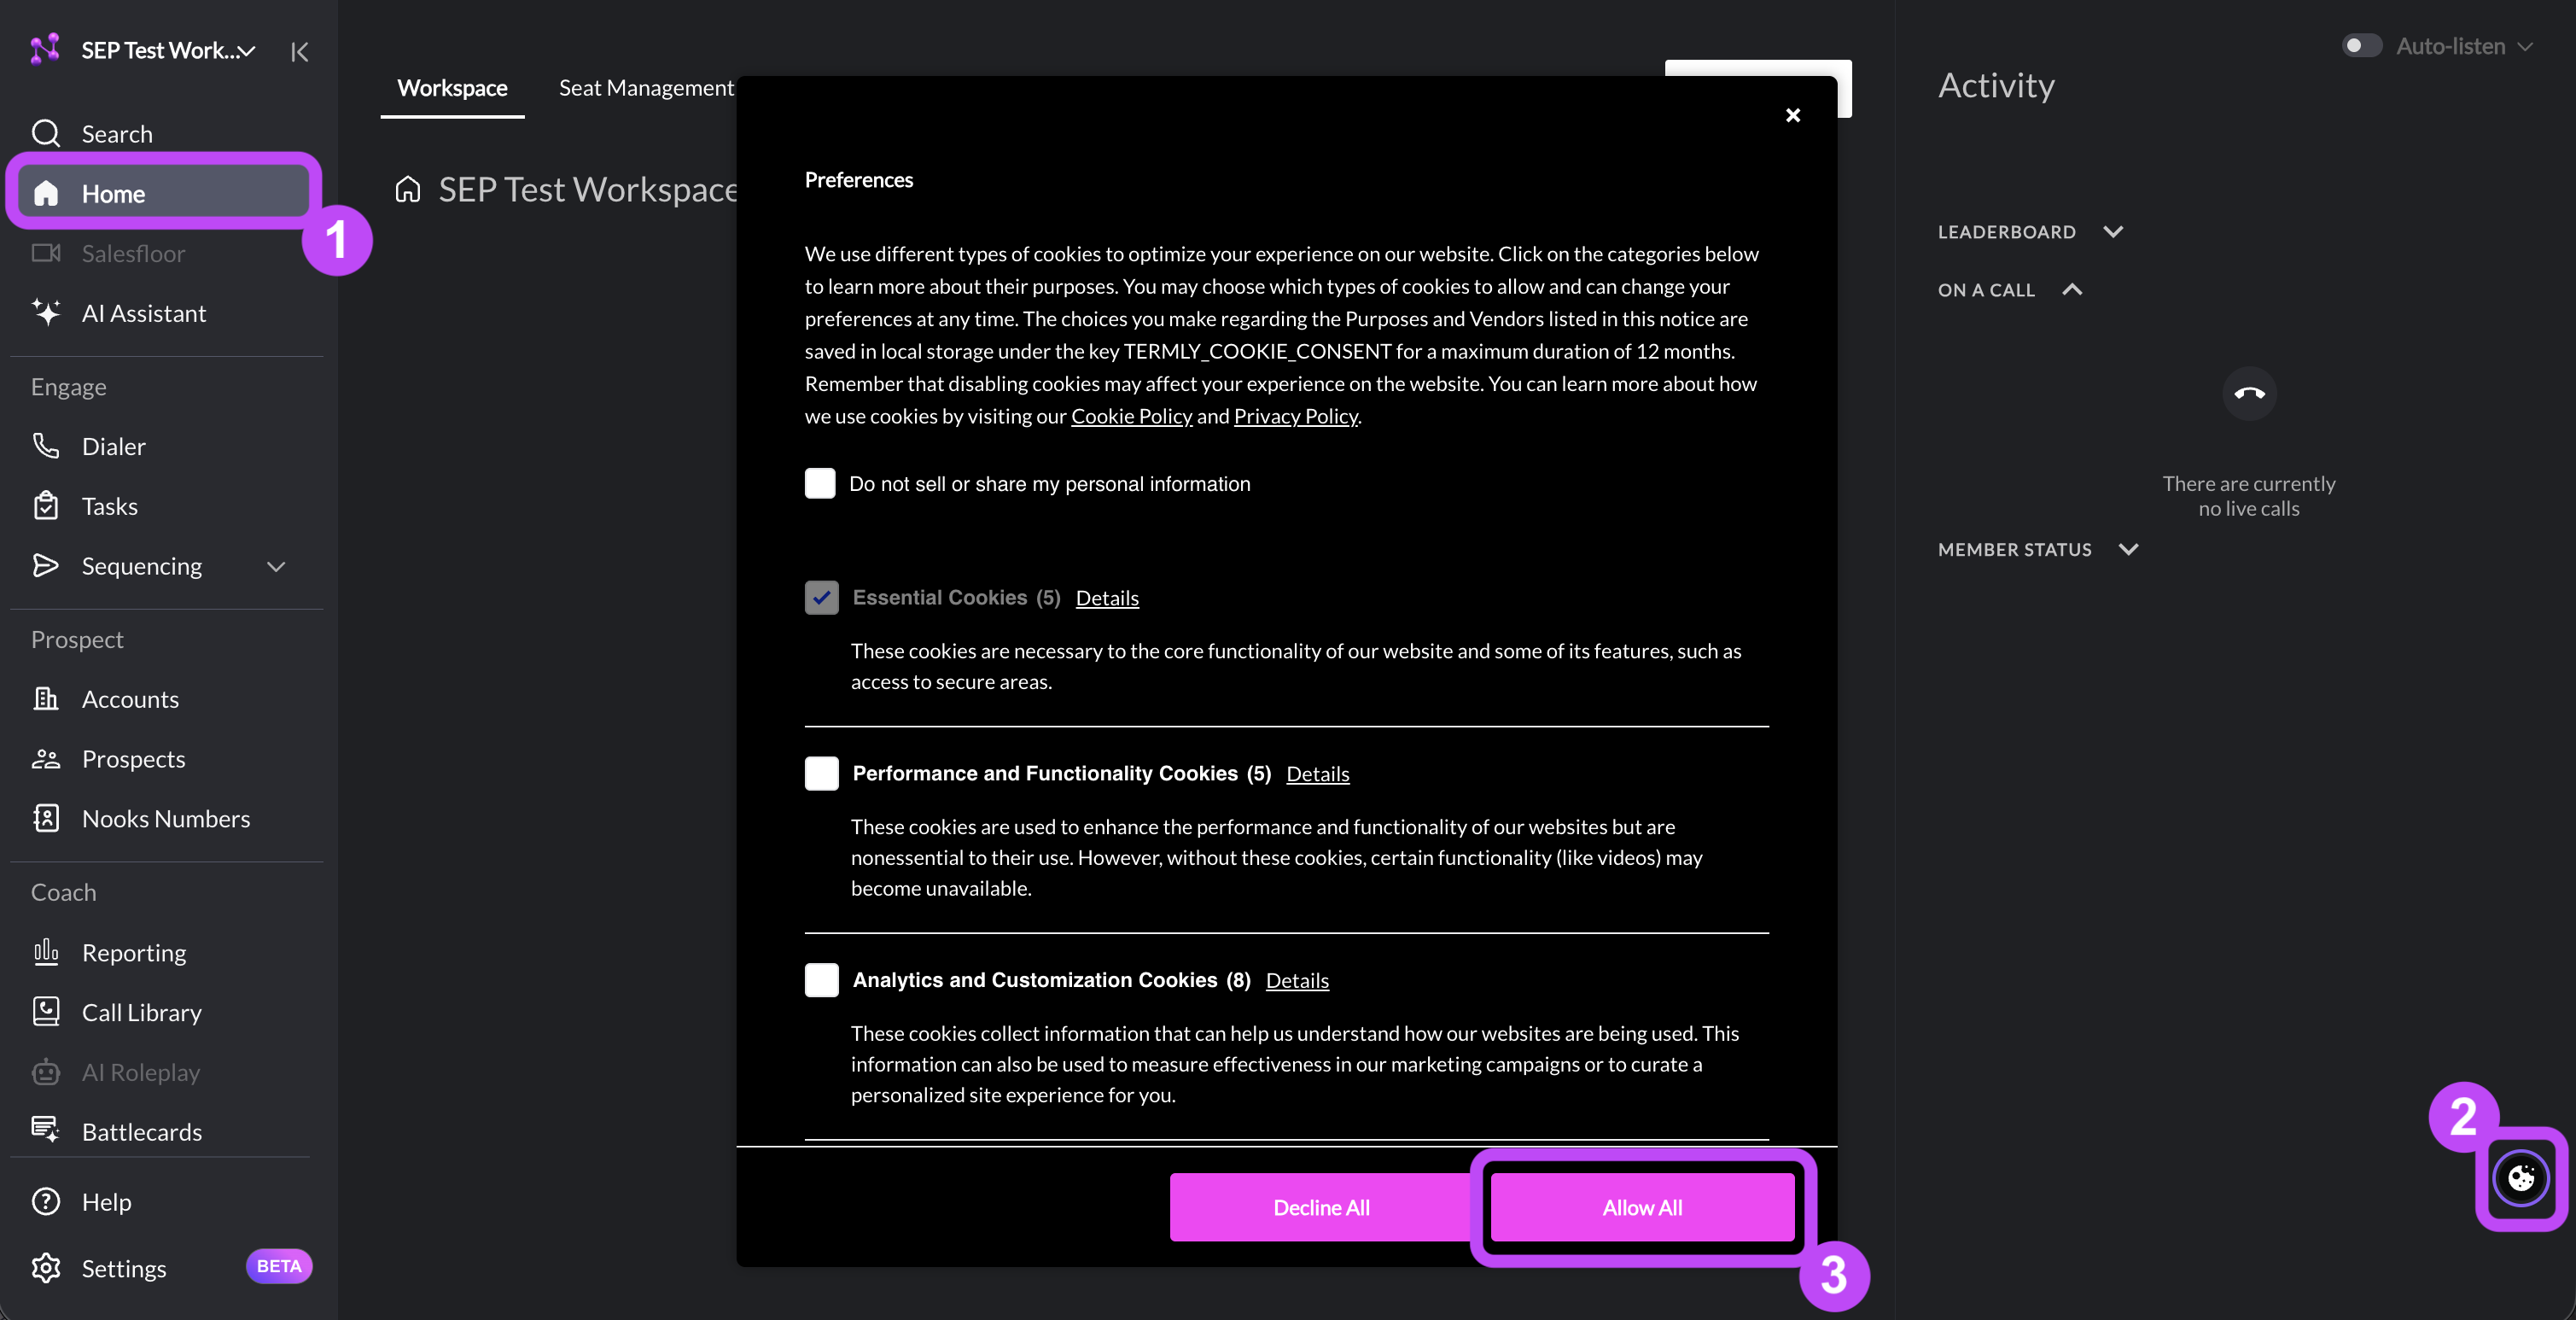
Enabling Nooks to store cookies allows images to render properly across Nooks, including on the Accounts page and your email signature. To enable cookies for your environment:
From the Home page, click the cookies icon in the lower-right corner.
Click Allow All.
Task 4: Confirm Your CRM Is Connected (Salesforce only)
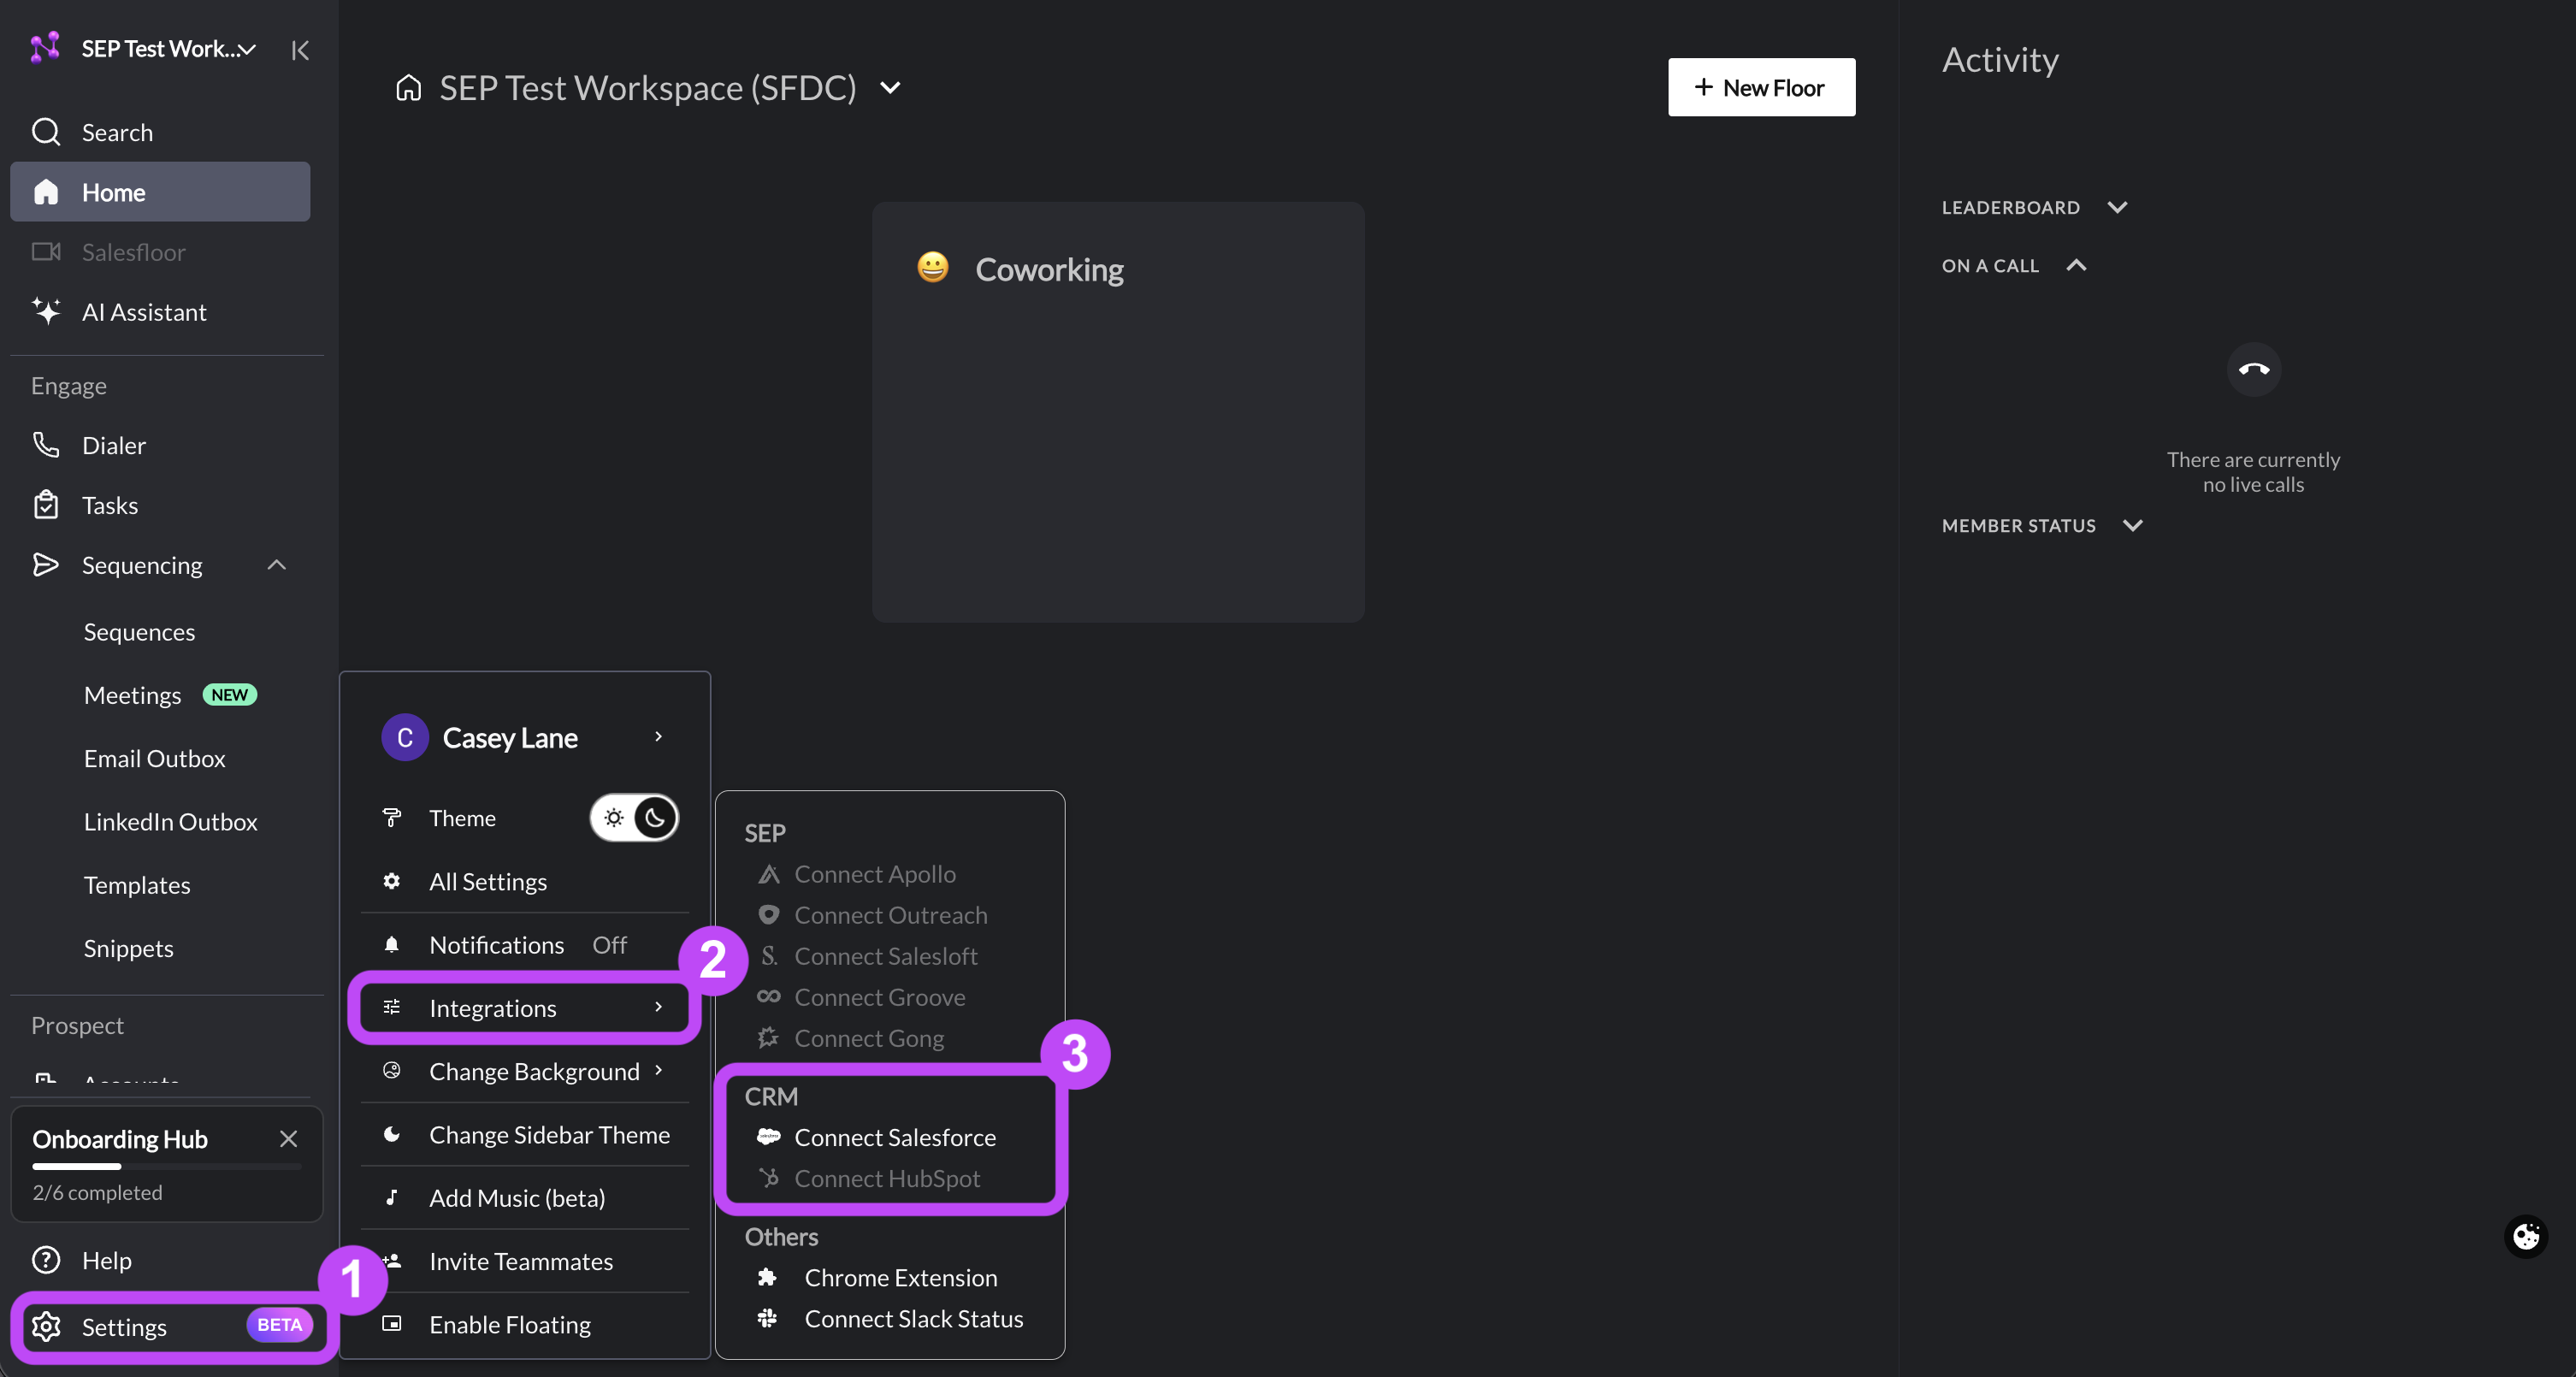
After signing into Nooks, confirm your CRM is connected. An active CRM connection is required for data to flow properly between Nooks and your CRM.
Click Settings in the lower-left corner.
Click Integrations.
Check for a green dot (🟢) next on the right-hand side of your CRM's name.
If you see a green dot: Your CRM is properly connected. Proceed to the next step.
If you do not see a green dot: Follow the steps below depending on which CRM your team uses.
Salesforce: Click on Connect Salesforce and log in with OAuth. Once you have logged in, refresh your Nooks tab. You will know the integration is successfully connected when you see a green dot by the CRM name.
Task 5: Set Your Nickname
Your Nickname in Nooks is more than just your account's display name. It is also the value Nooks uses to replace any sender name personalization variables in your Workspace's email templates.
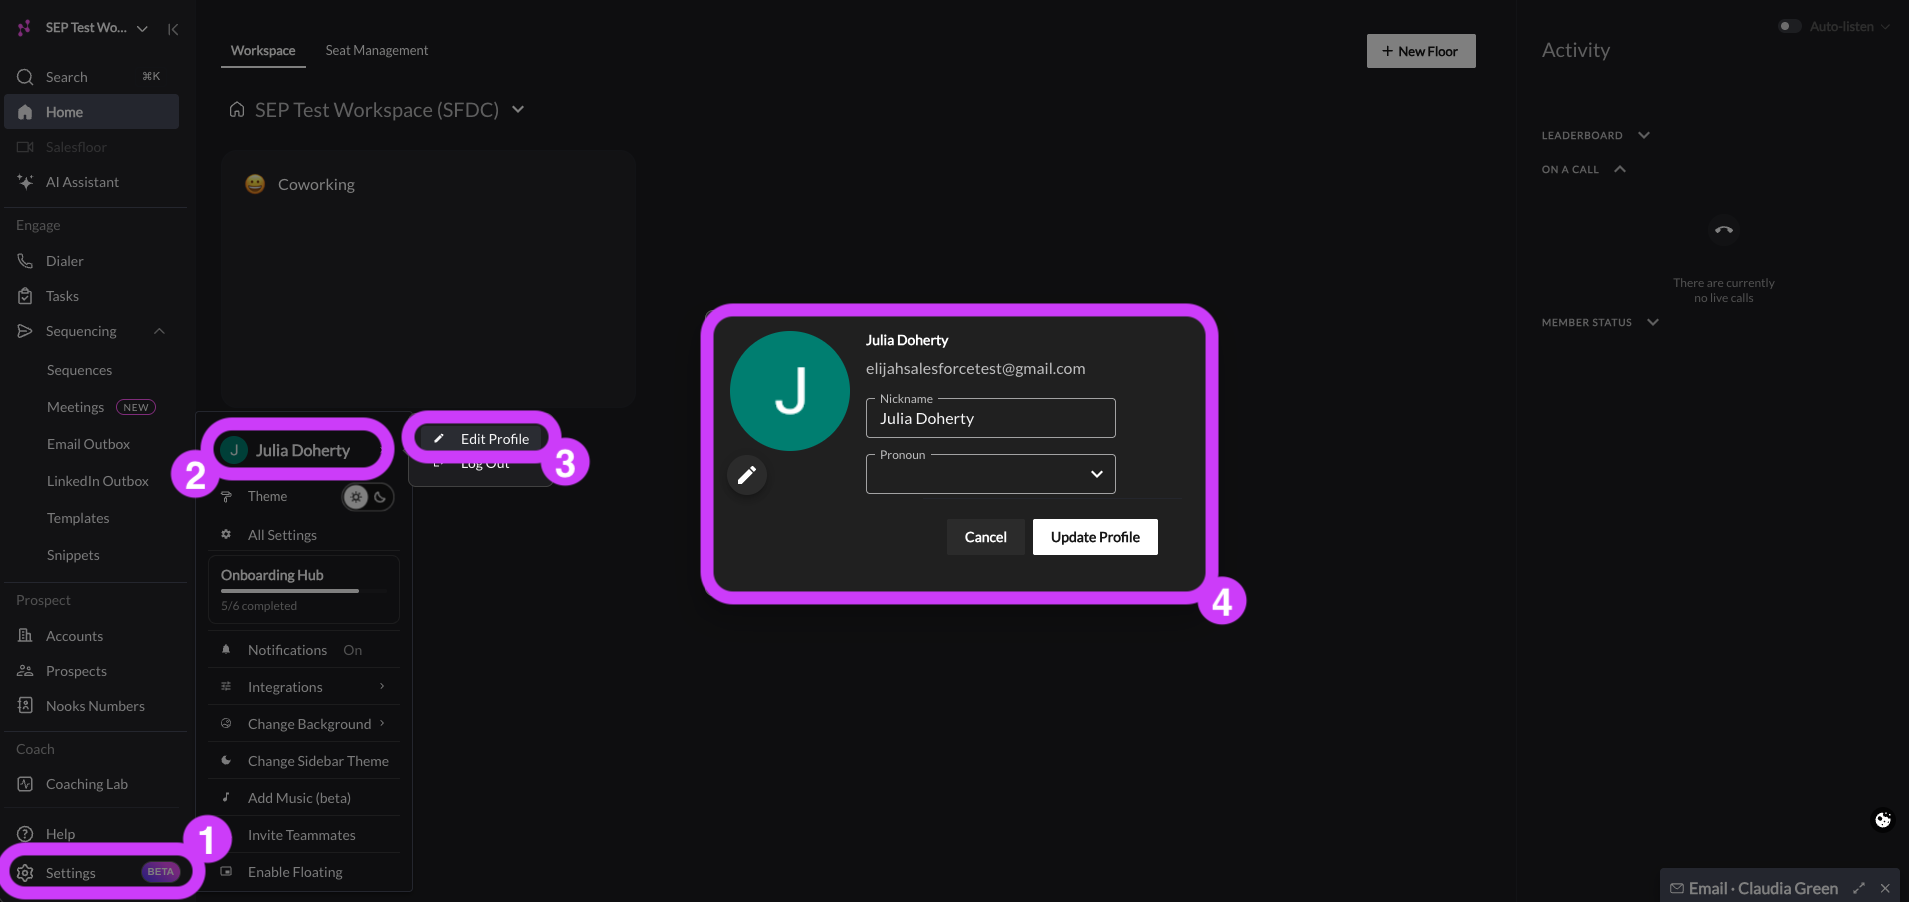
Click Settings in the lower-left corner.
Click your name or profile icon at the top of the Settings pop-up menu.
Click Edit Profile.
Enter your name in the Nickname field in
<First> <Last>format.Optionally, add a profile image and your pronouns.
Click Update Profile.
Reminder: Prospects see your Nooks Nickname when you send emails that user a sender name personalization variable. Enter the name you use professionally. Learn more about your user Profile Settings here.
Nooks Chrome Extension Setup
The Nooks Chrome extension is responsible for bringing your Nooks tools into your CRM (Salesforce or HubSpot), Gmail inbox (if applicable), and LinkedIn. It also powers Nooks' LinkedIn automations. The following steps get you up and running with it.
Task 6: Install the Nooks Chrome Extension
To install the Nooks Chrome extension:
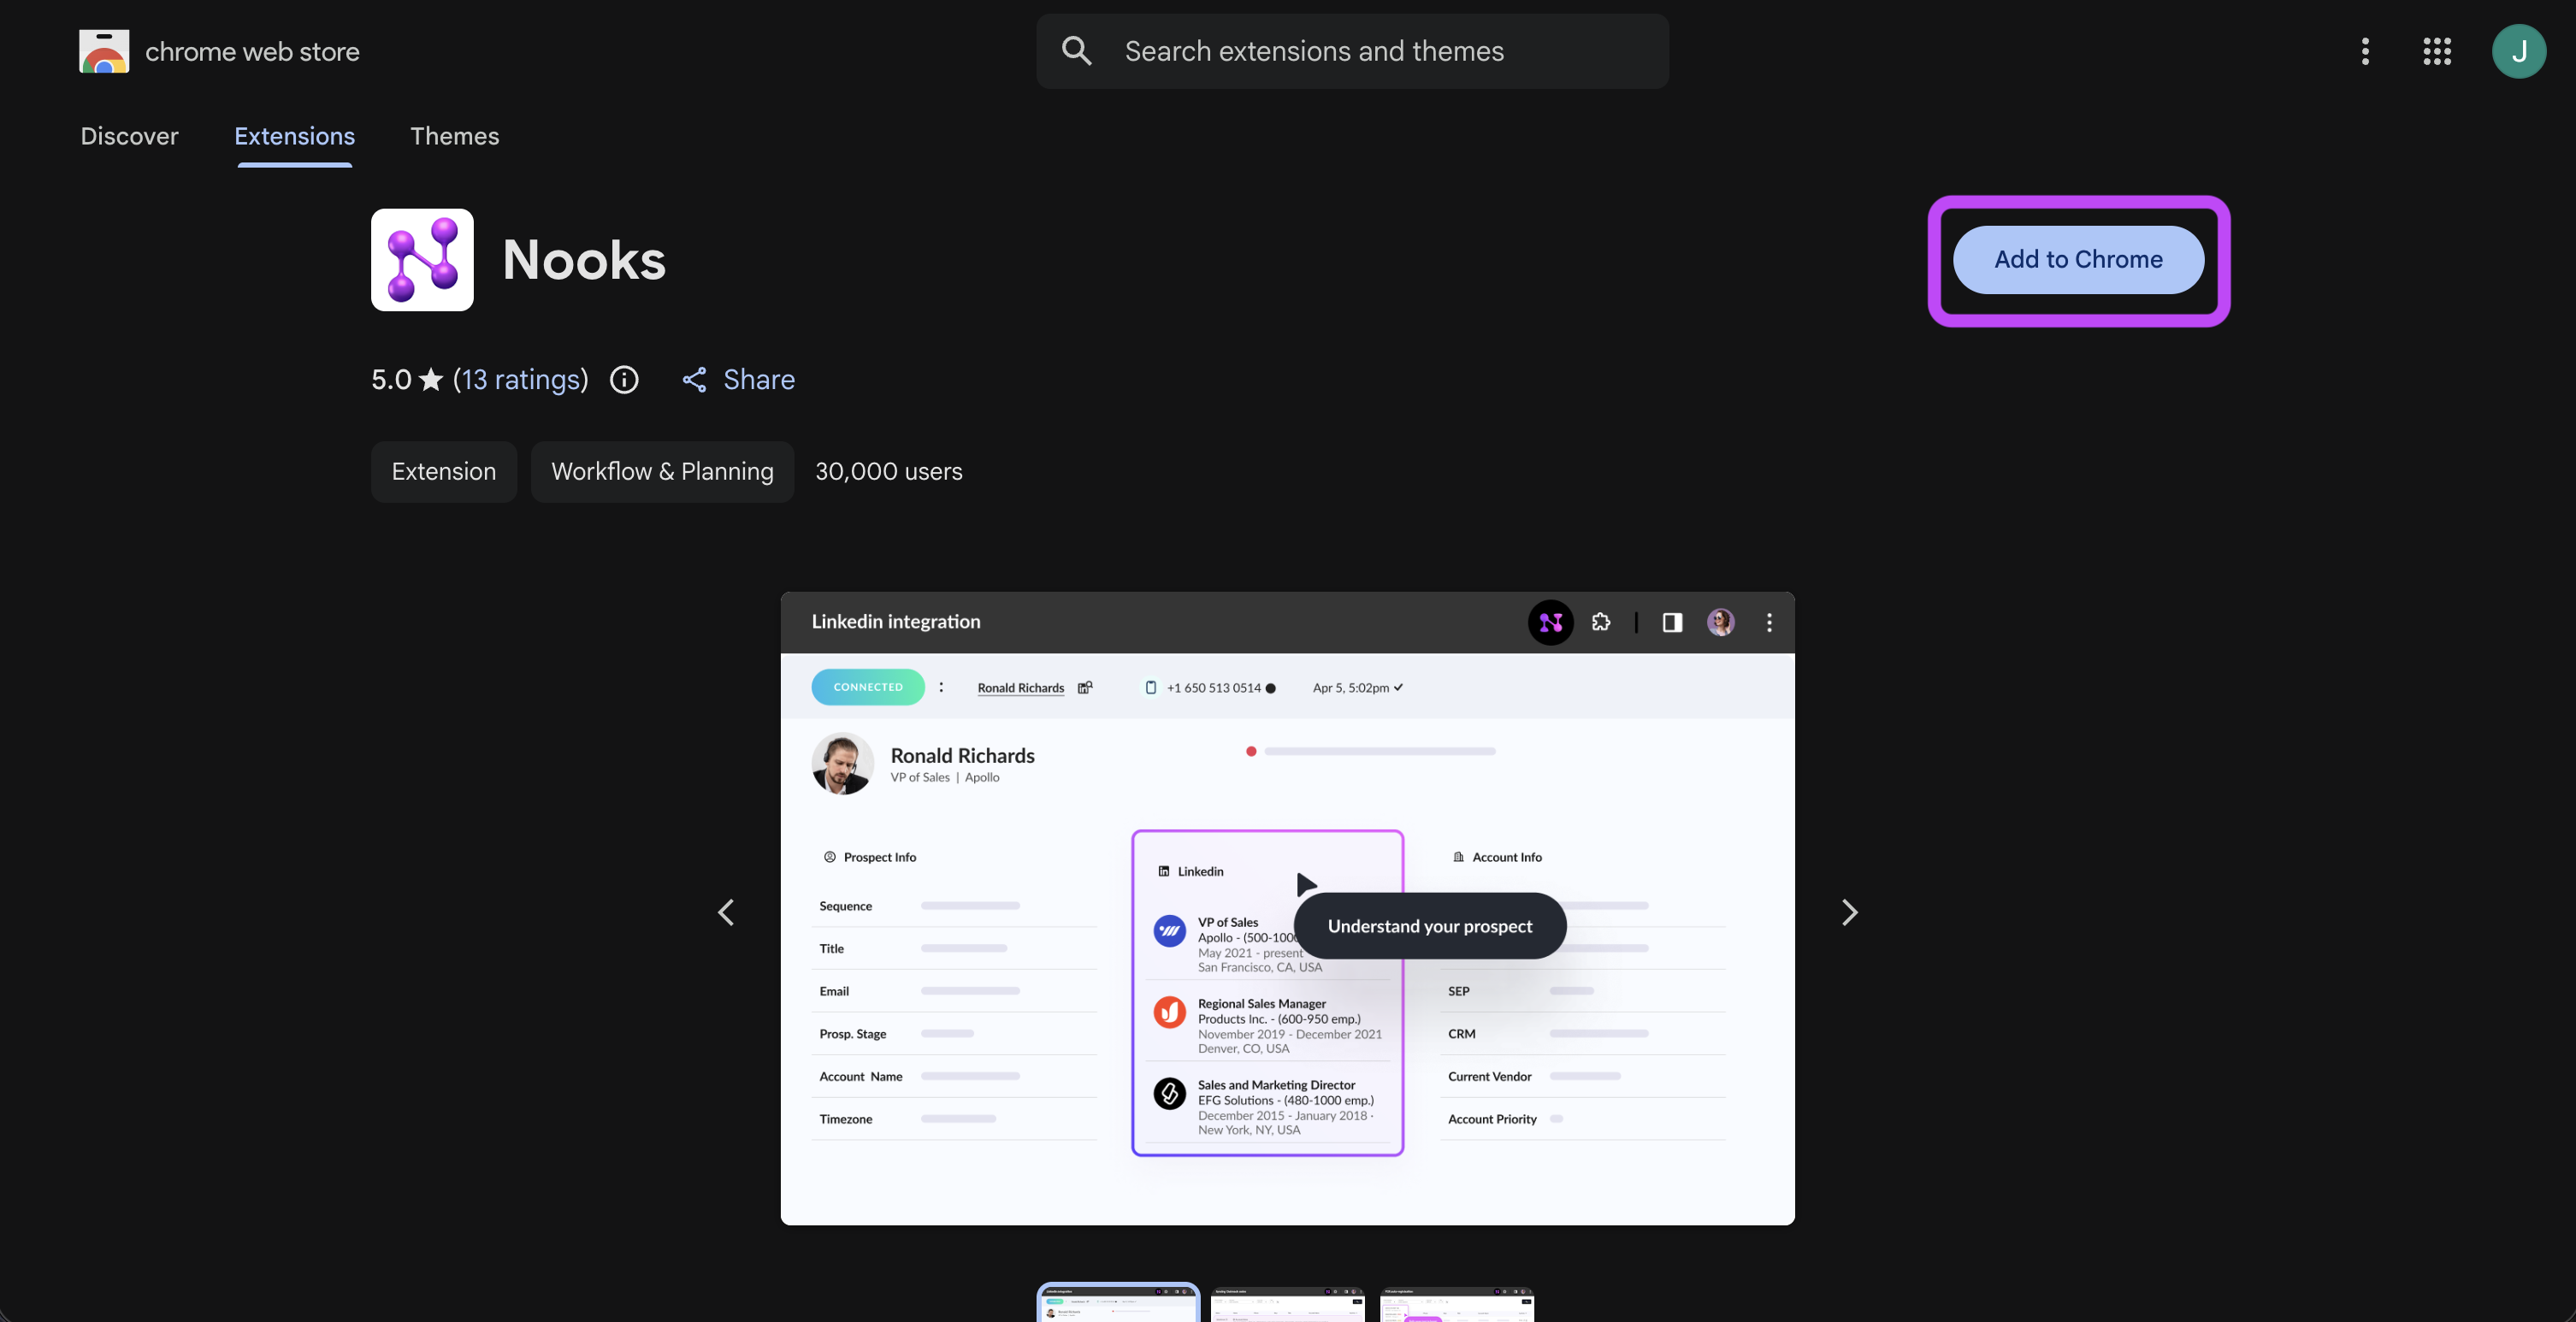
Open the Nooks Chrome extension in the Chrome web store here.
Click Add to Chrome.
In the pop-up, click Add extension.
See this guide for information on keeping your Chrome extension up to date, which ensures it is optimized for your browser.
Task 7: Pin the Chrome Extension
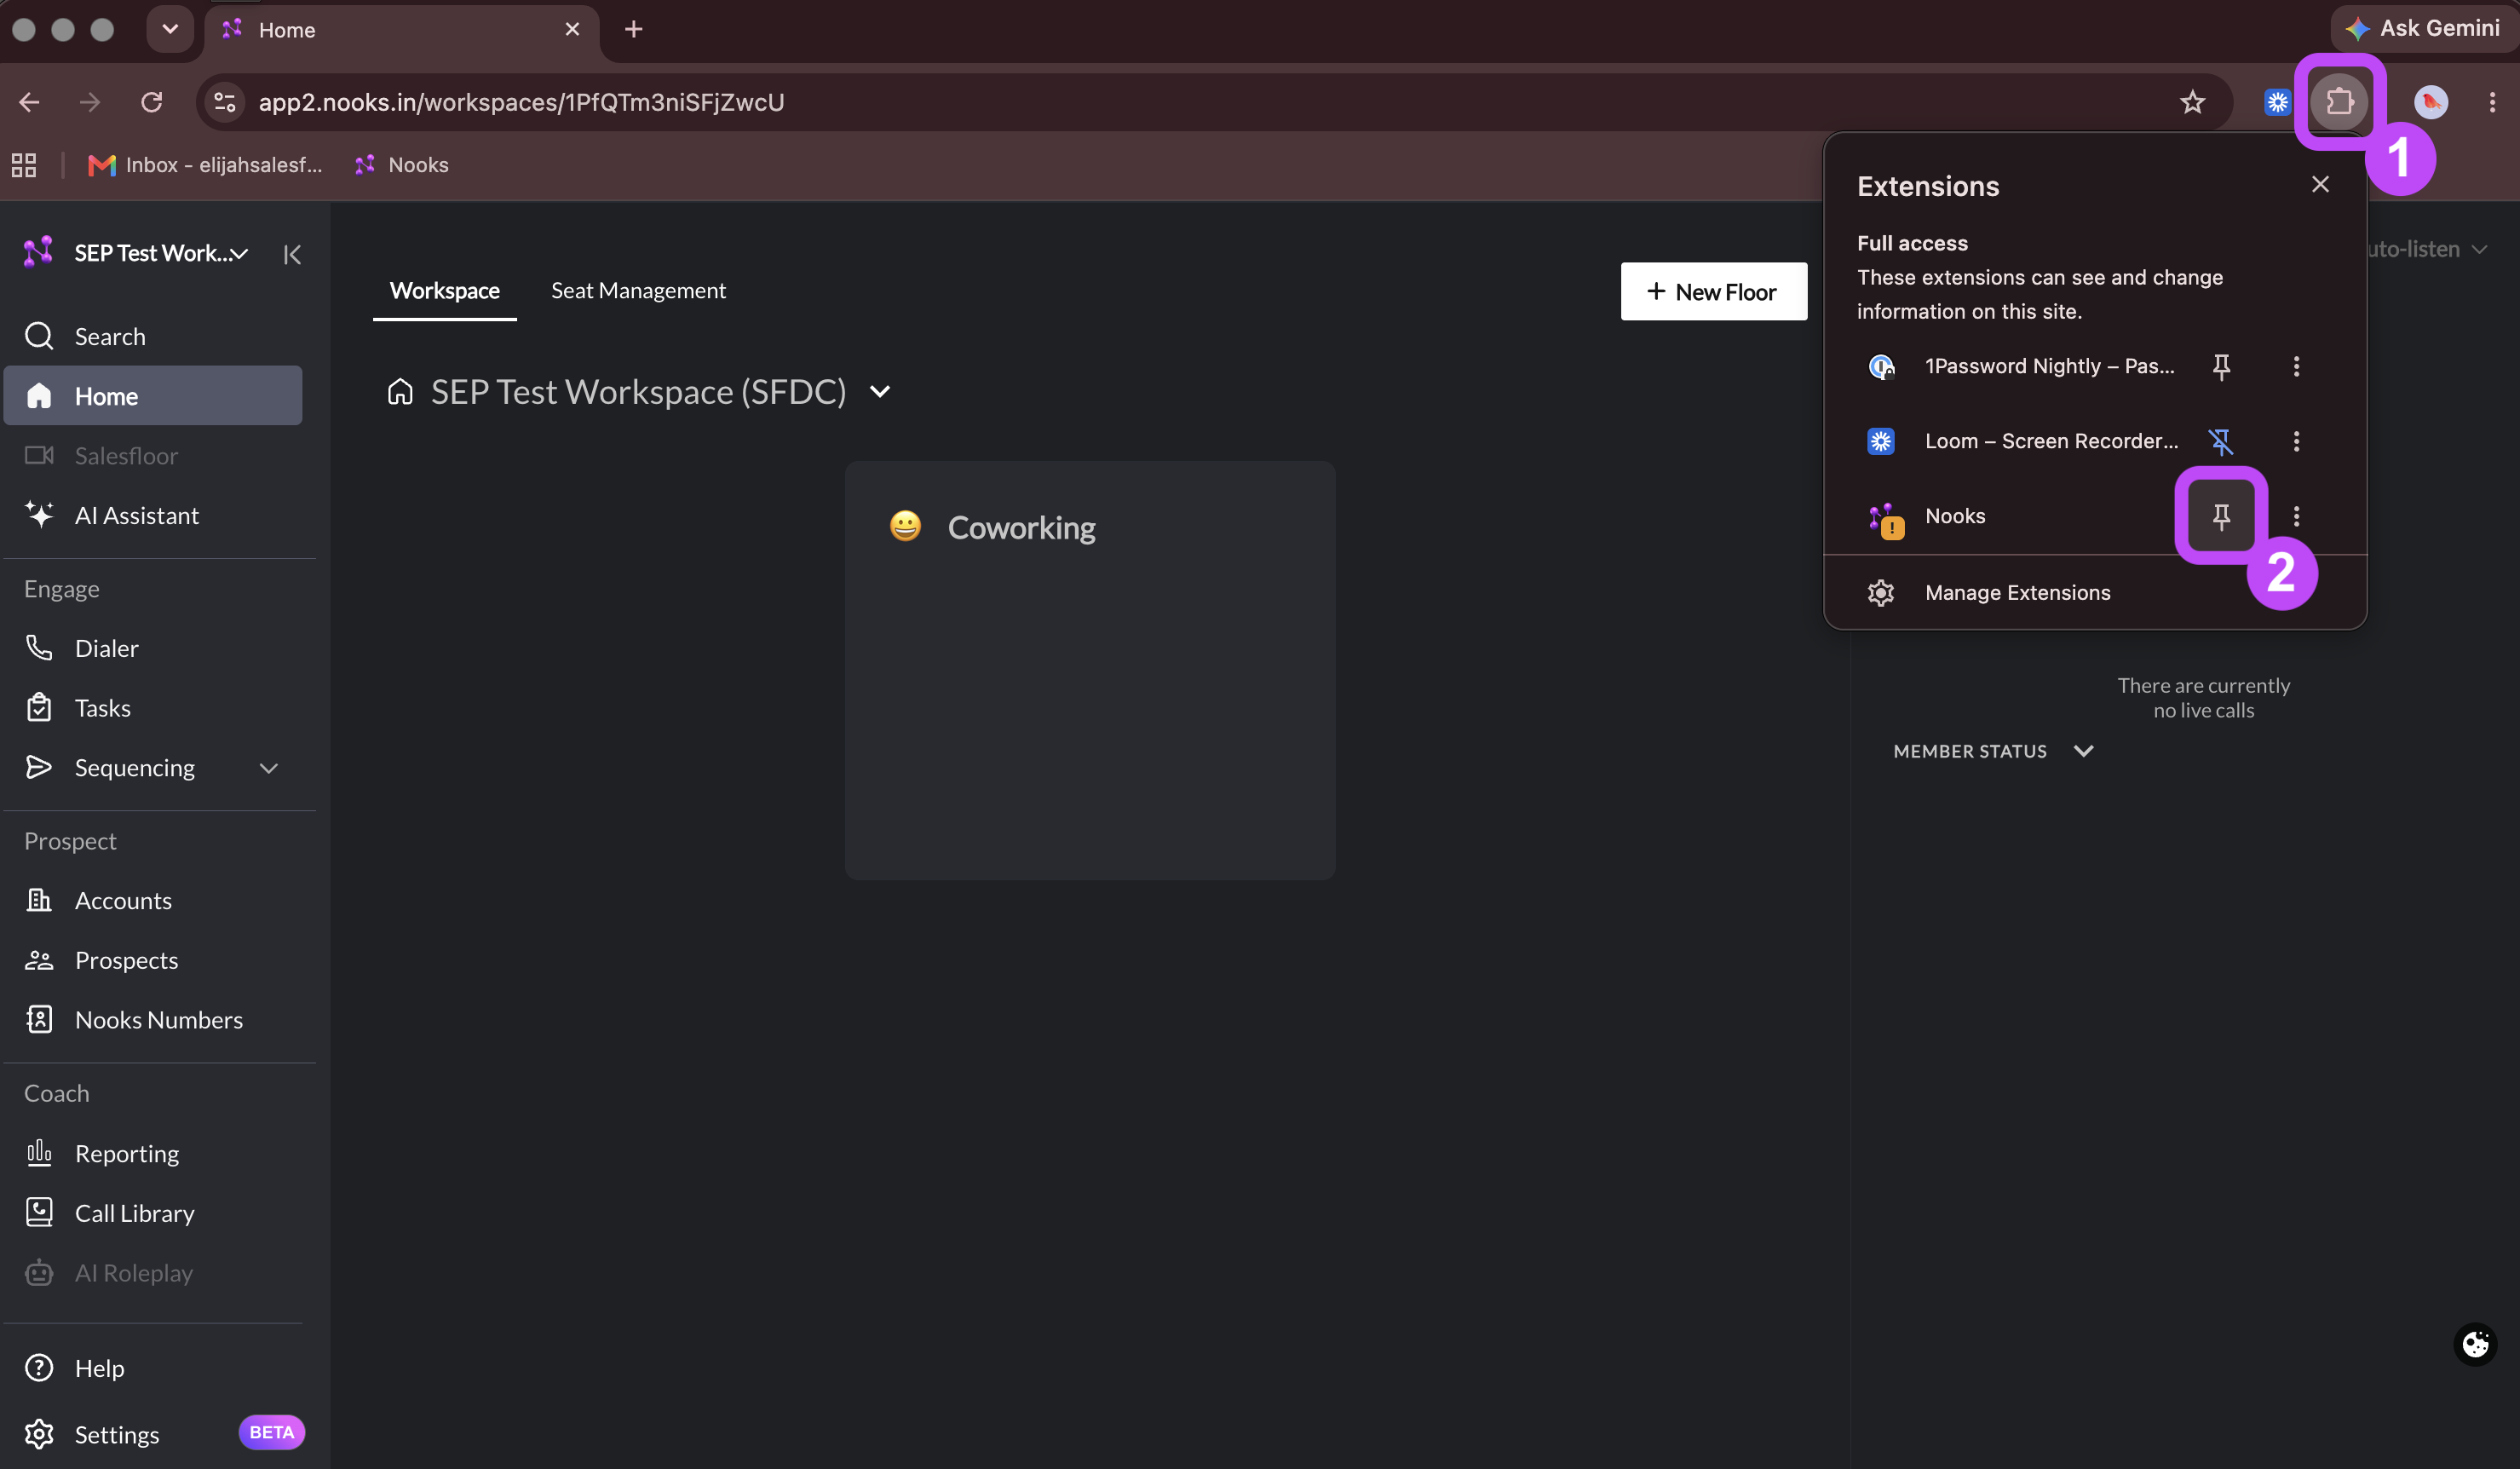
Pinning the Nooks Chrome extension in your browser makes it easily accessible. To do so:
Click the puzzle piece icon in the top-right corner of your Chrome browser.
Click the thumbtack icon next to the Nooks Chrome extension.
Task 8: Grant Permissions in the Chrome Extension
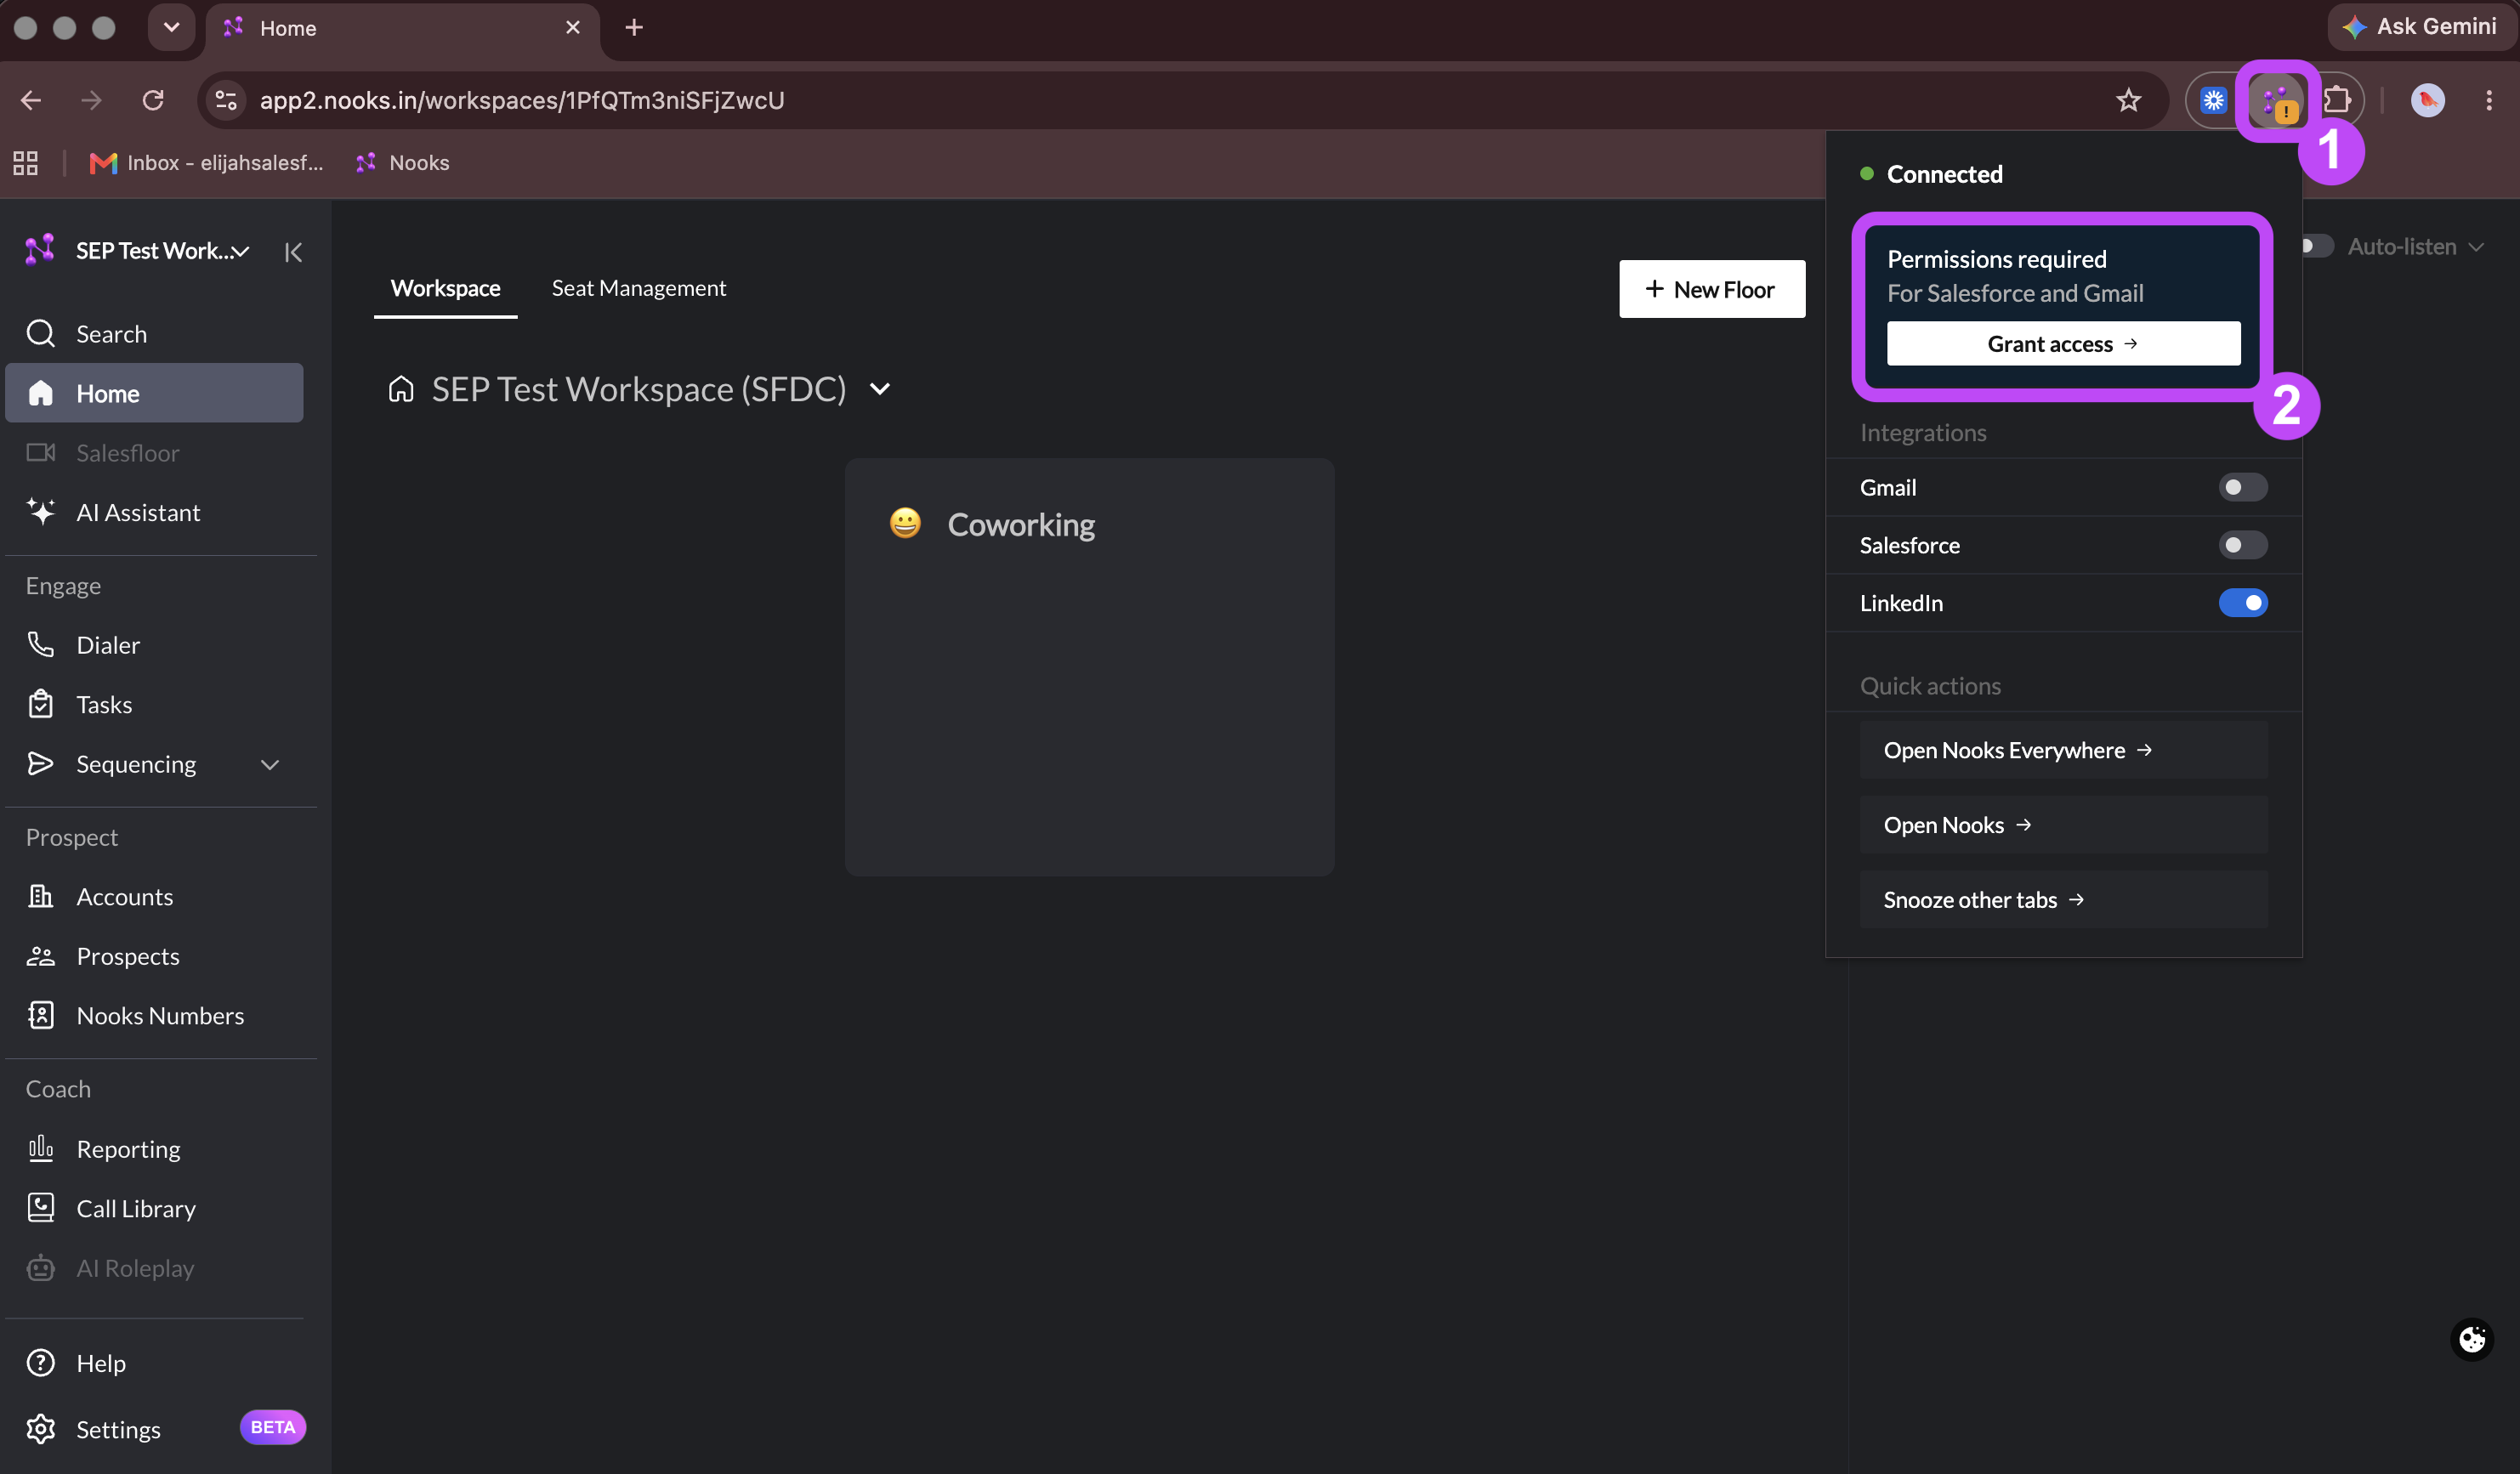
To enable the Chrome extension in your CRM and Gmail, as well as to suppress self-opens from counting toward your email open tracking counts, grant all requested permissions in the Nooks Chrome extension.
Click on the Nooks Chrome extension in the top-right corner of your browser.
Click any Grant Permissions and Grant Access buttons in the Chrome extension.
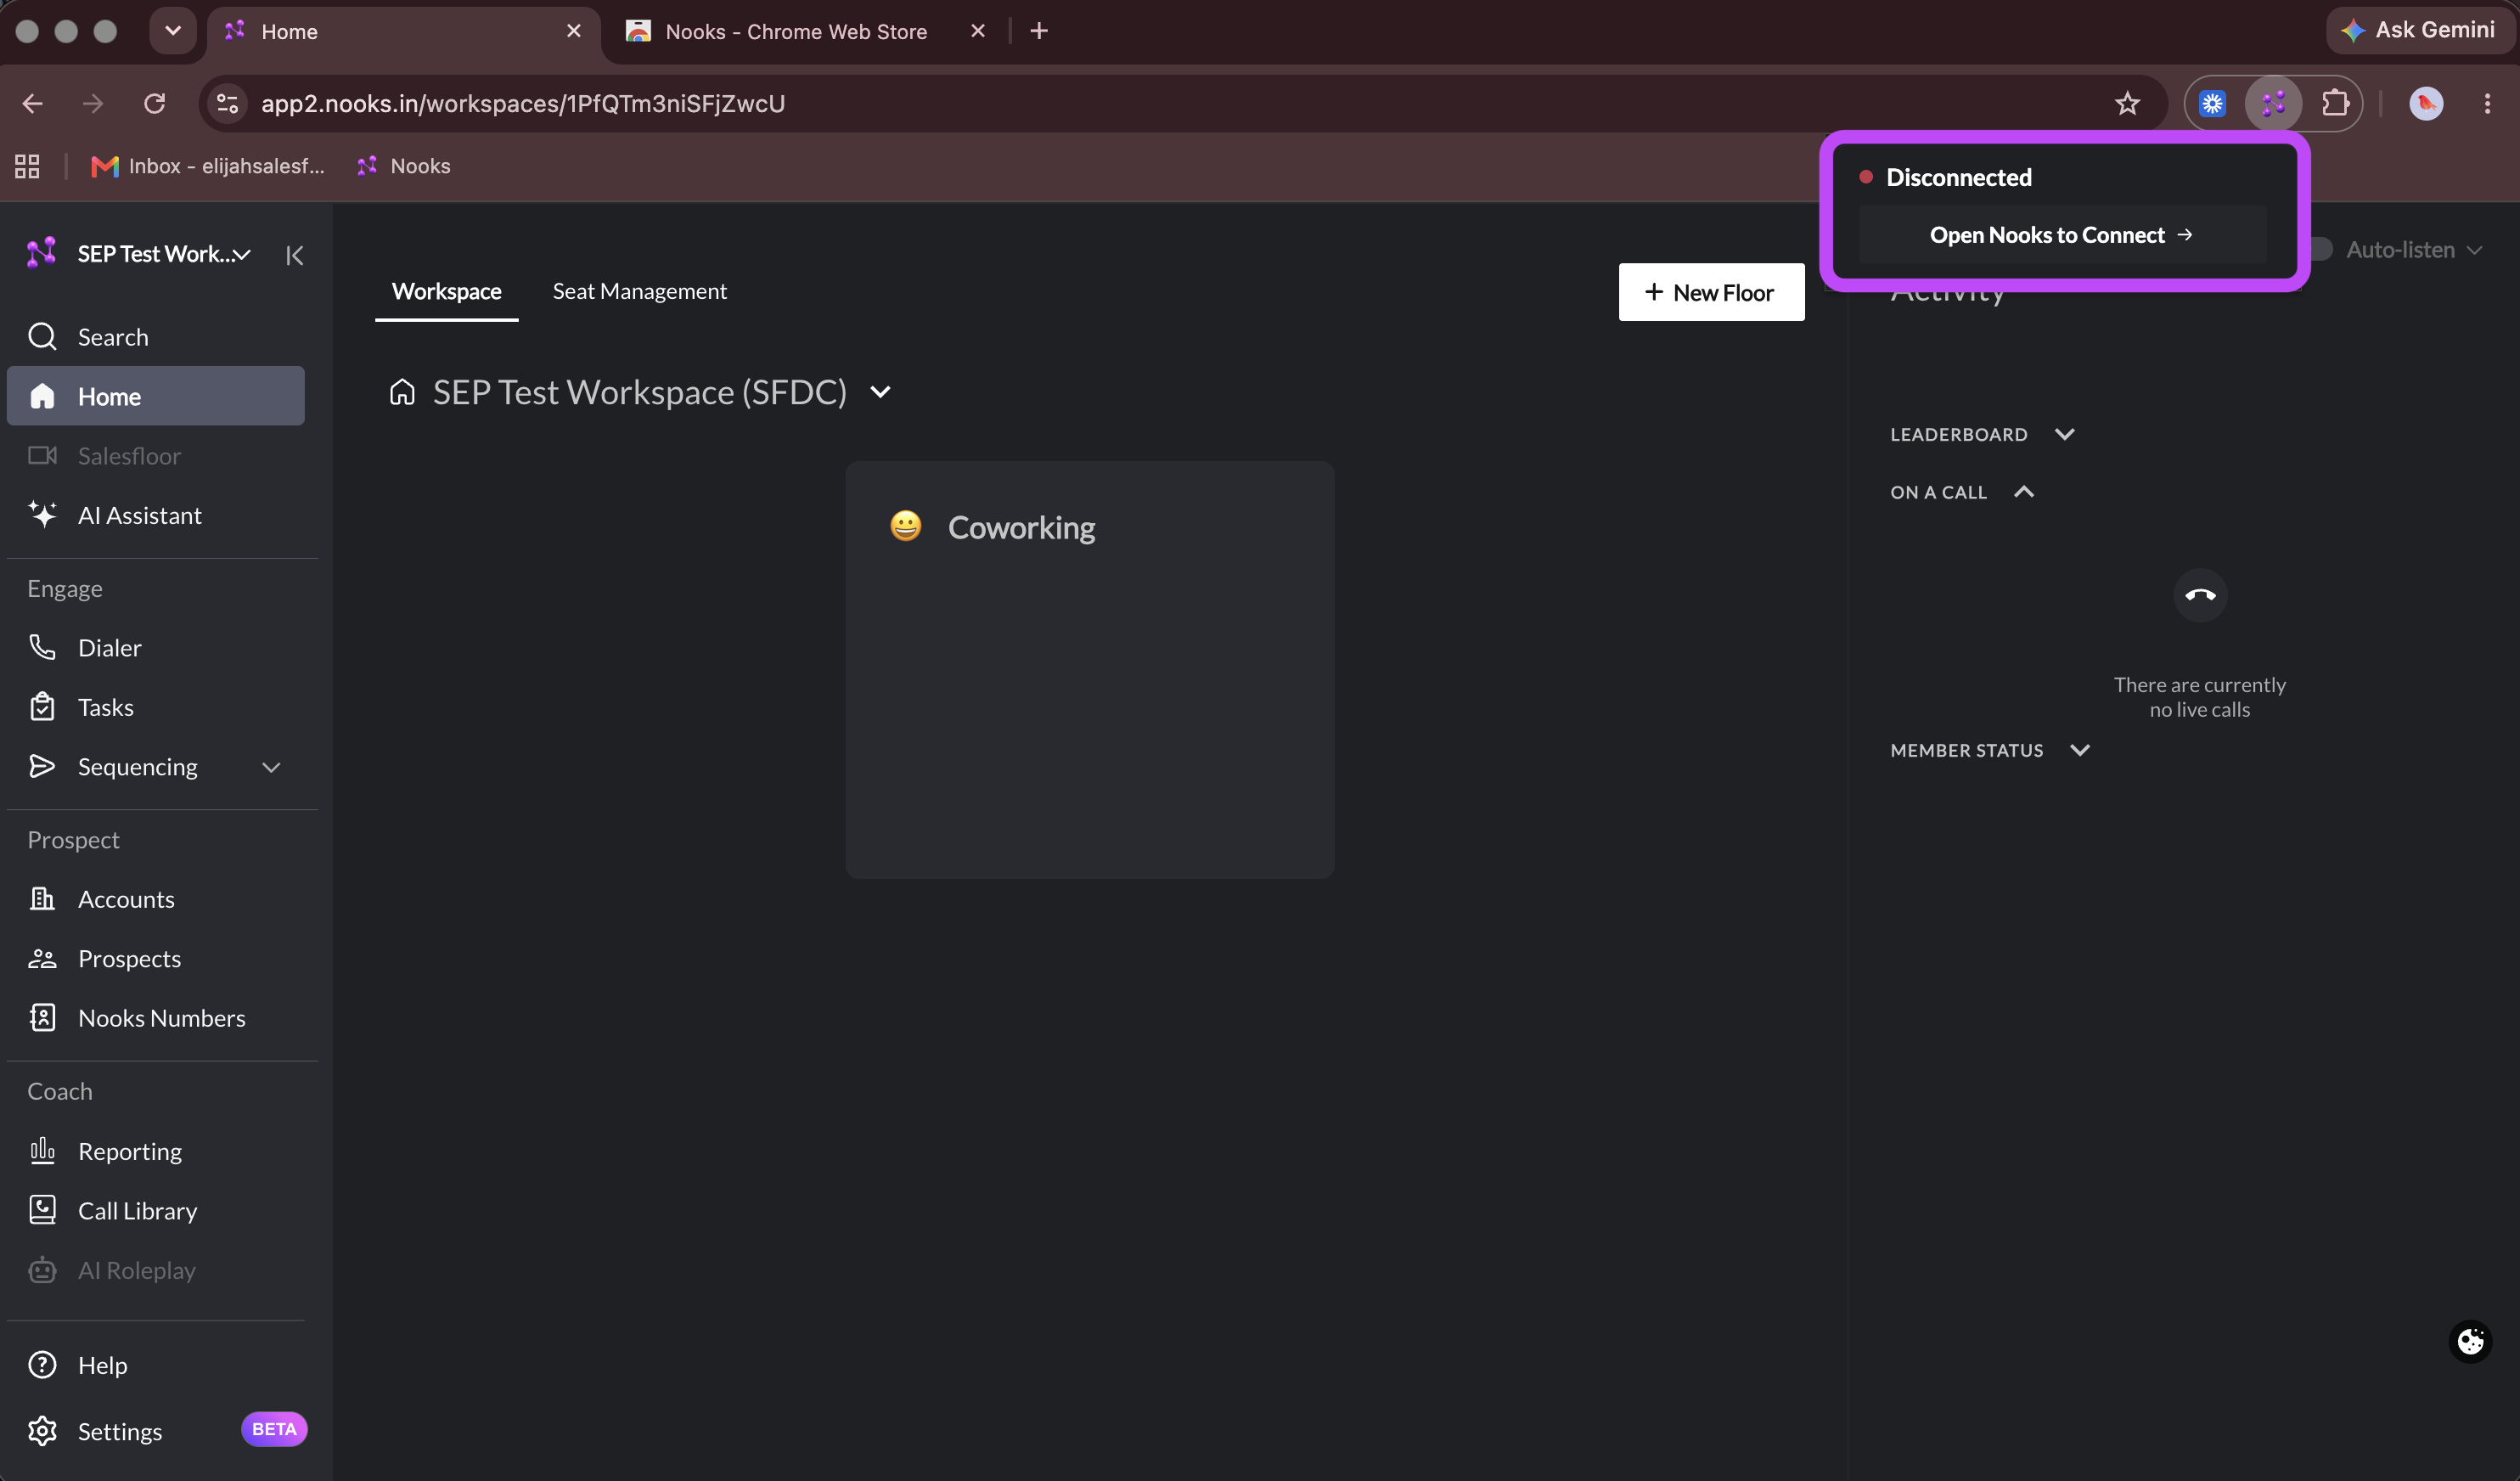
Troubleshooting tip: If you only see "Open Nooks to Connect" when you click on the Nooks Chrome extension:
Refresh your Nooks tab.
Re-open the Nooks Chrome extension.
Task 9: Remove Other SEP Chrome Extensions
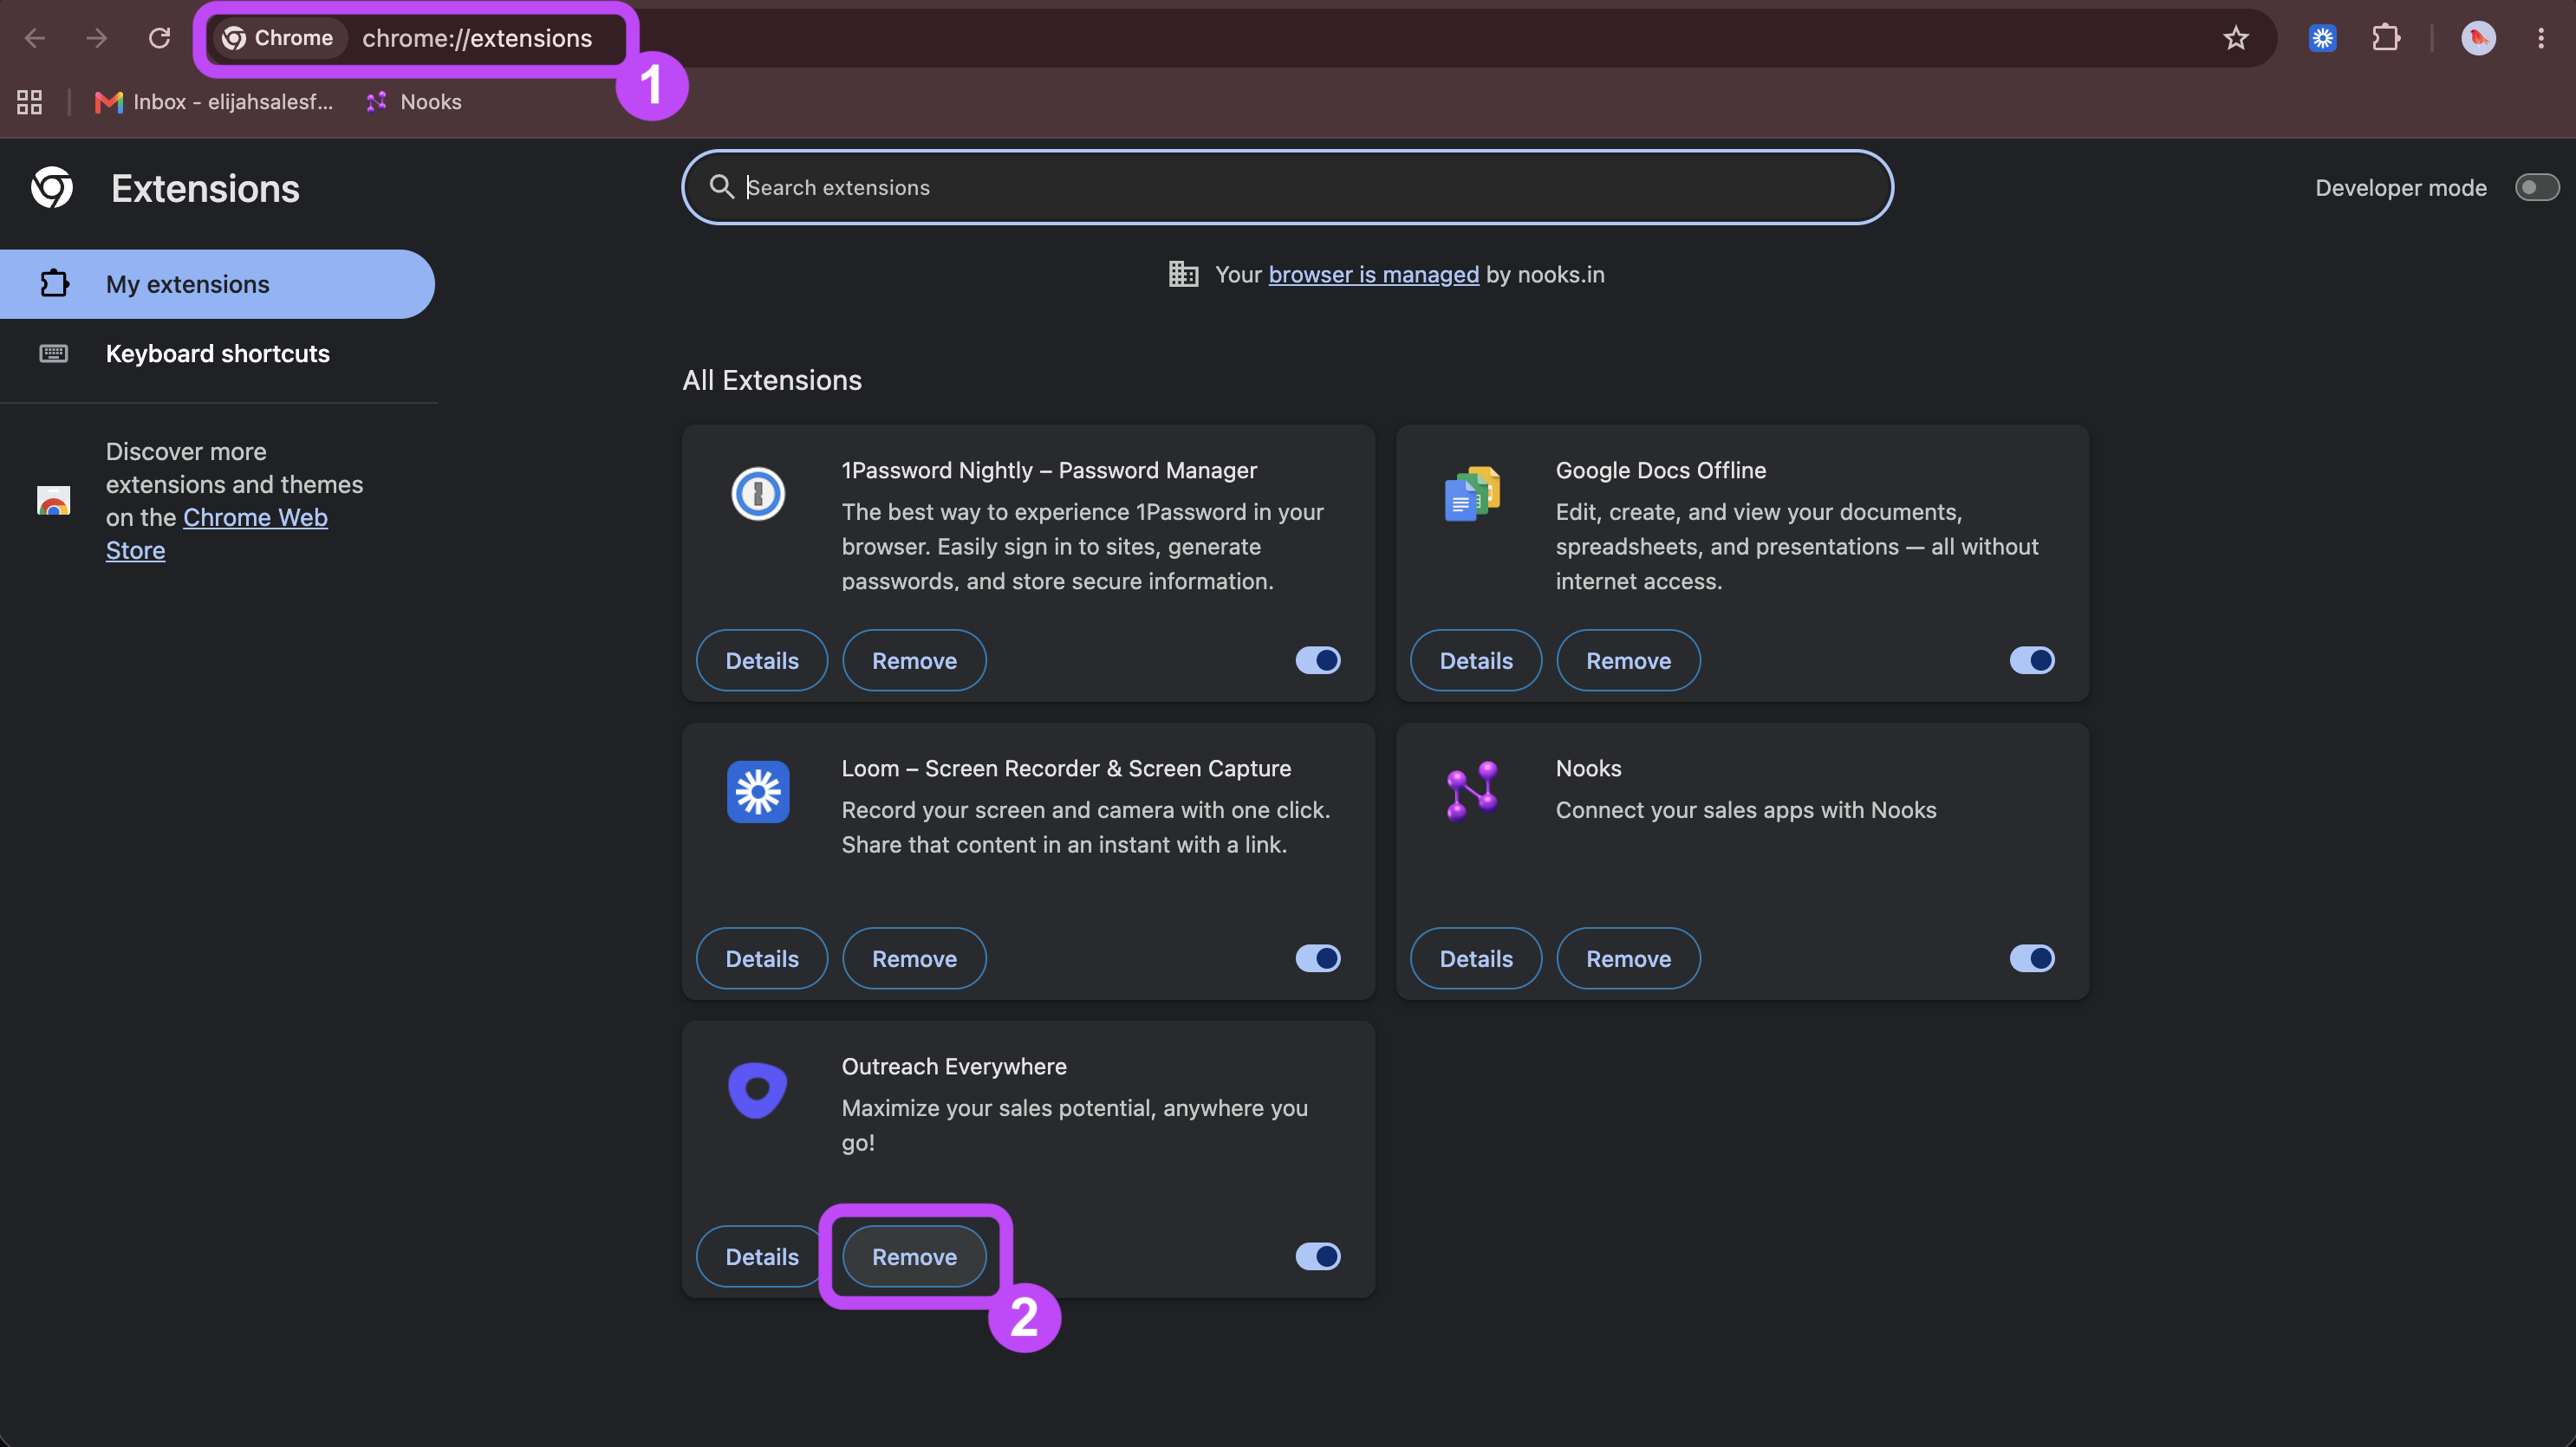
SEP Chrome extension (e.g., Outreach, Salesloft, Clari Groove, etc.) can interfere with the Nooks Chrome extension because they often try to inject components into the same locations in Gmail, Salesforce, HubSpot, and LinkedIn. To ensure uninterrupted access to the Nooks Chrome extension features, disable or remove other your previous SEP's Chrome extension.
Enter chrome://extensions into your Chrome address bar.
Click Remove for any other SEP Chrome extensions (Outreach, Salesloft, Clari Groove, etc.).
Task 10: Enable Nooks Everywhere
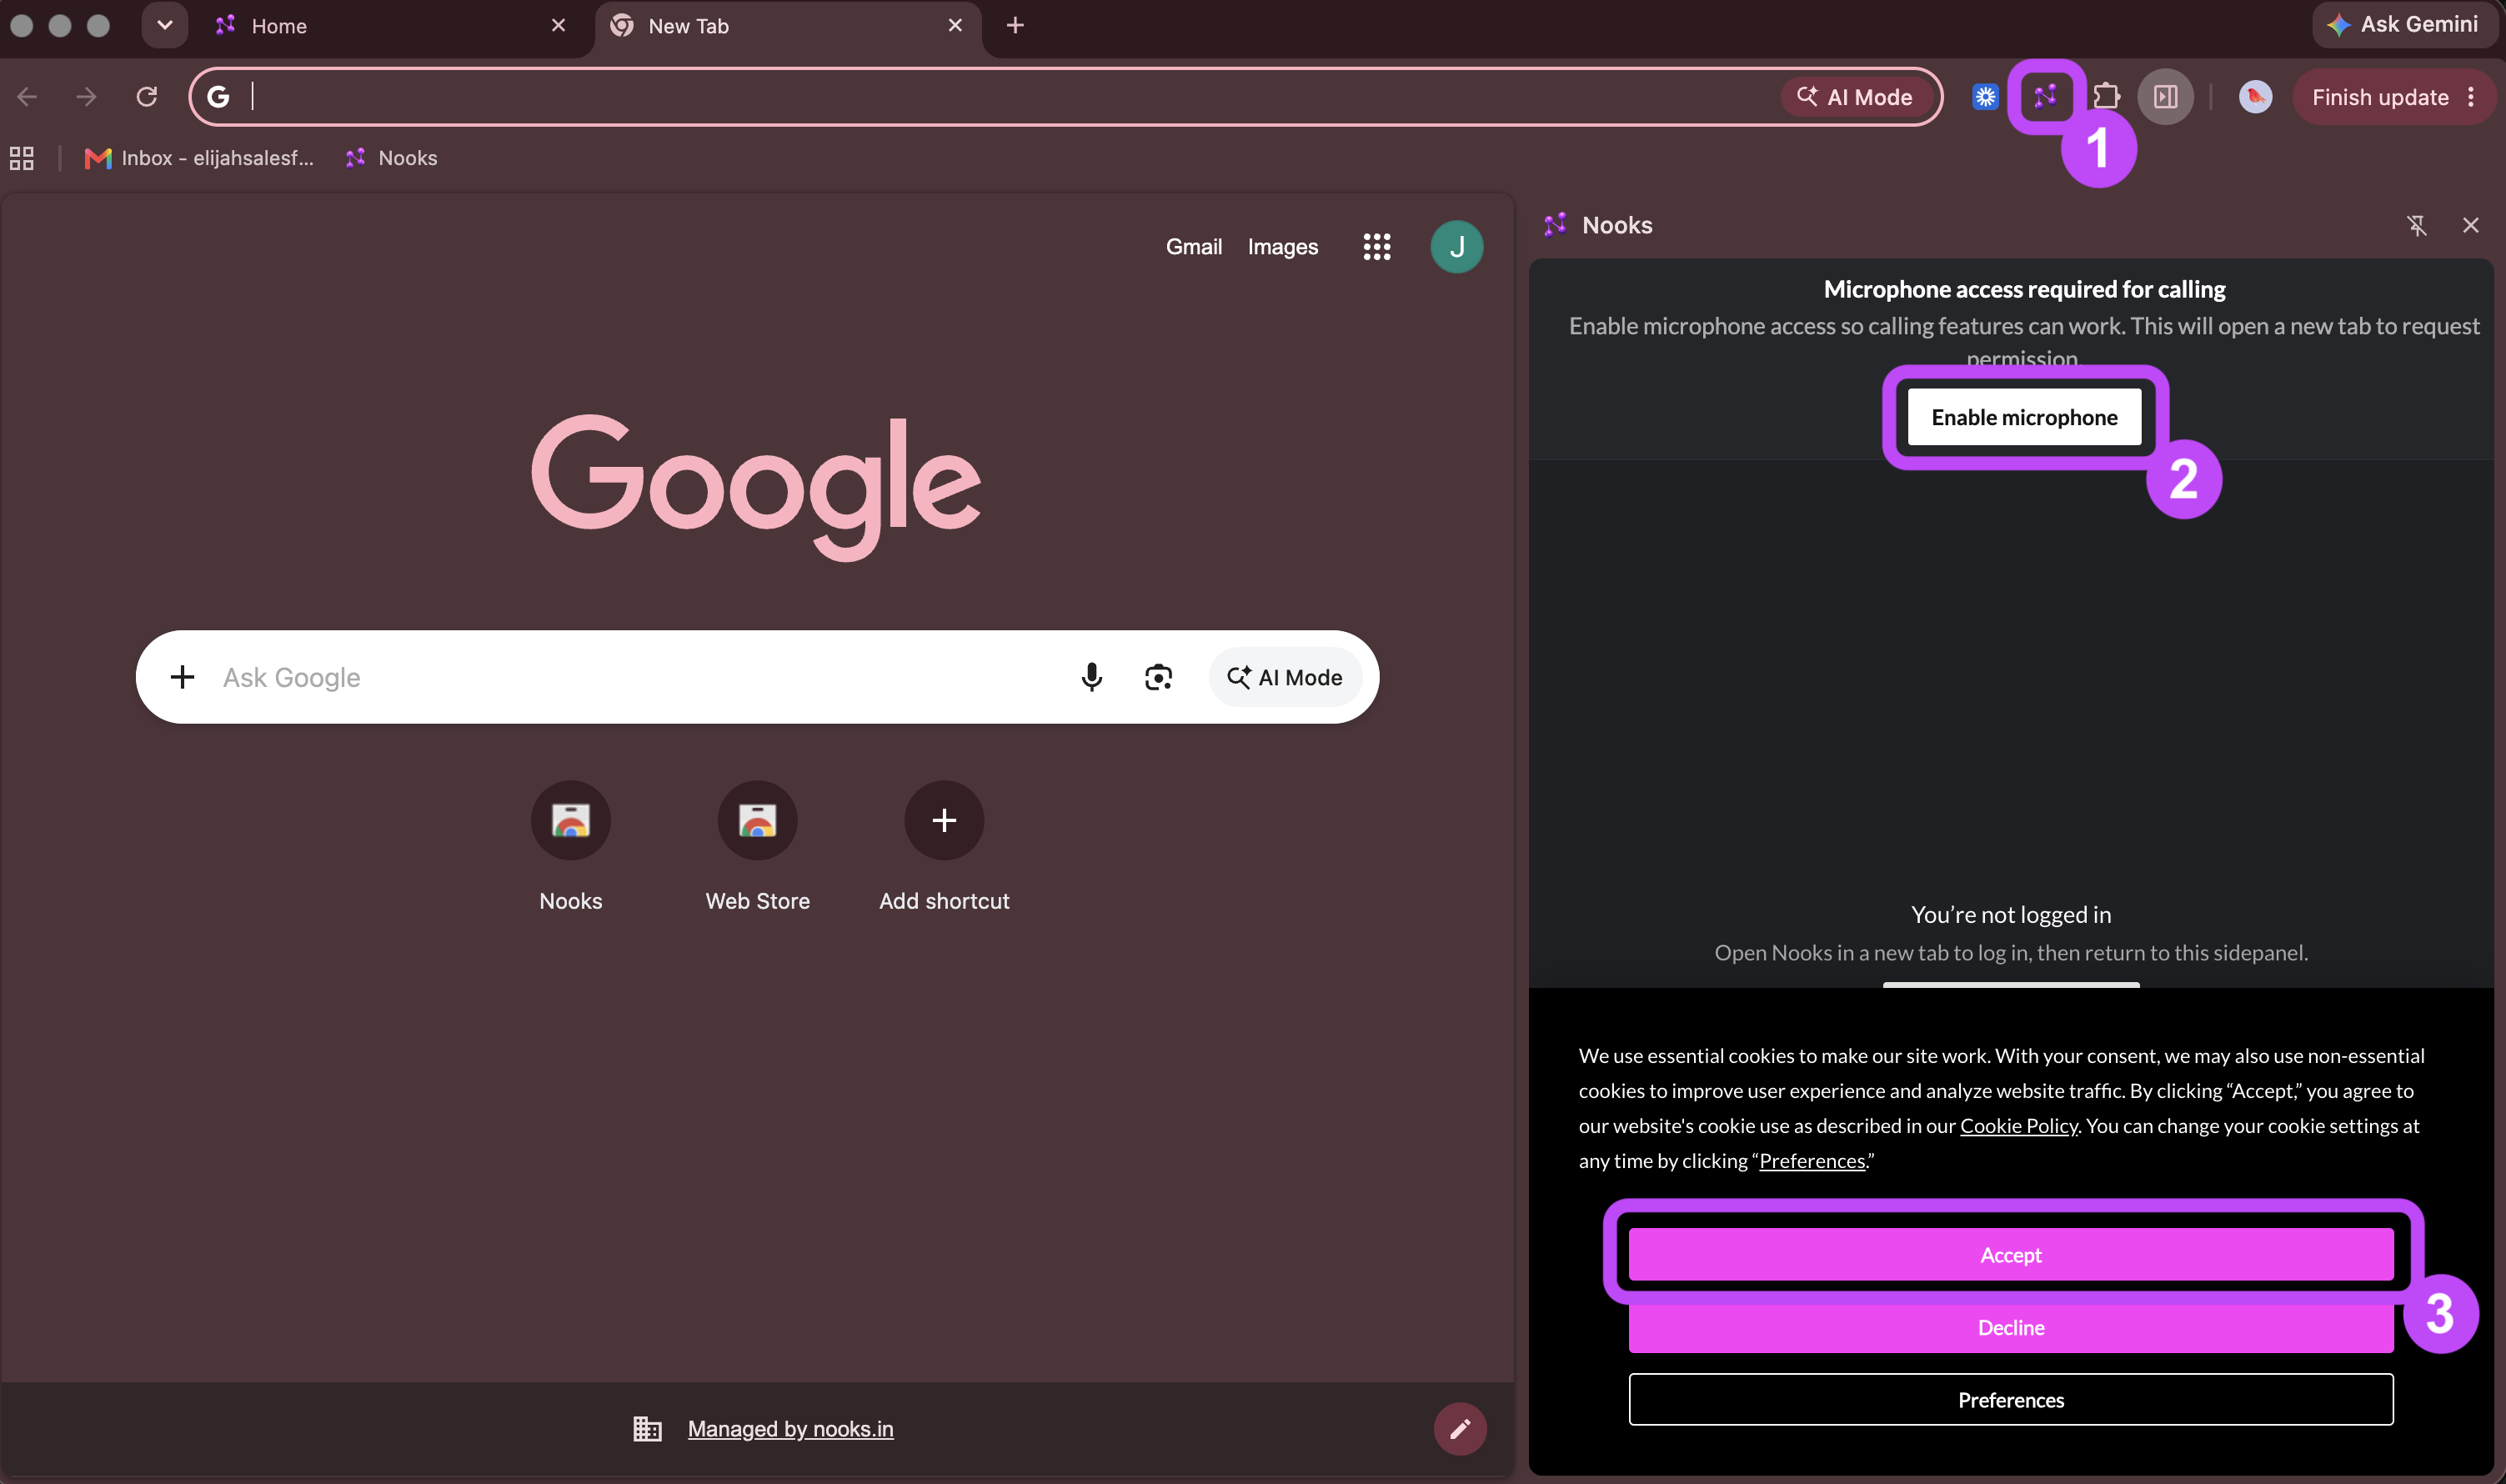
Open and set up the Nooks Everywhere side panel, which you can use to access Nooks features while you are working from Gmail, HubSpot, Salesforce, or LinkedIn Sales Navigator.
In any tab in your browser, click the Nooks Chrome extension in the top-right corner of Chrome. Then, click Open Nooks Everywhere.
Click Enable Microphone. Then, in the Chrome pop-up, click Allow while visiting this site. This enables the Nooks Everywhere side panel to use your microphone while you make calls from it.
Click Accept for the cookies preference to enable the Nooks Everywhere side panel to render images fully.
If needed, log into Nooks from the Nooks Everywhere side panel to connect it to your Nooks account.
Email Setup
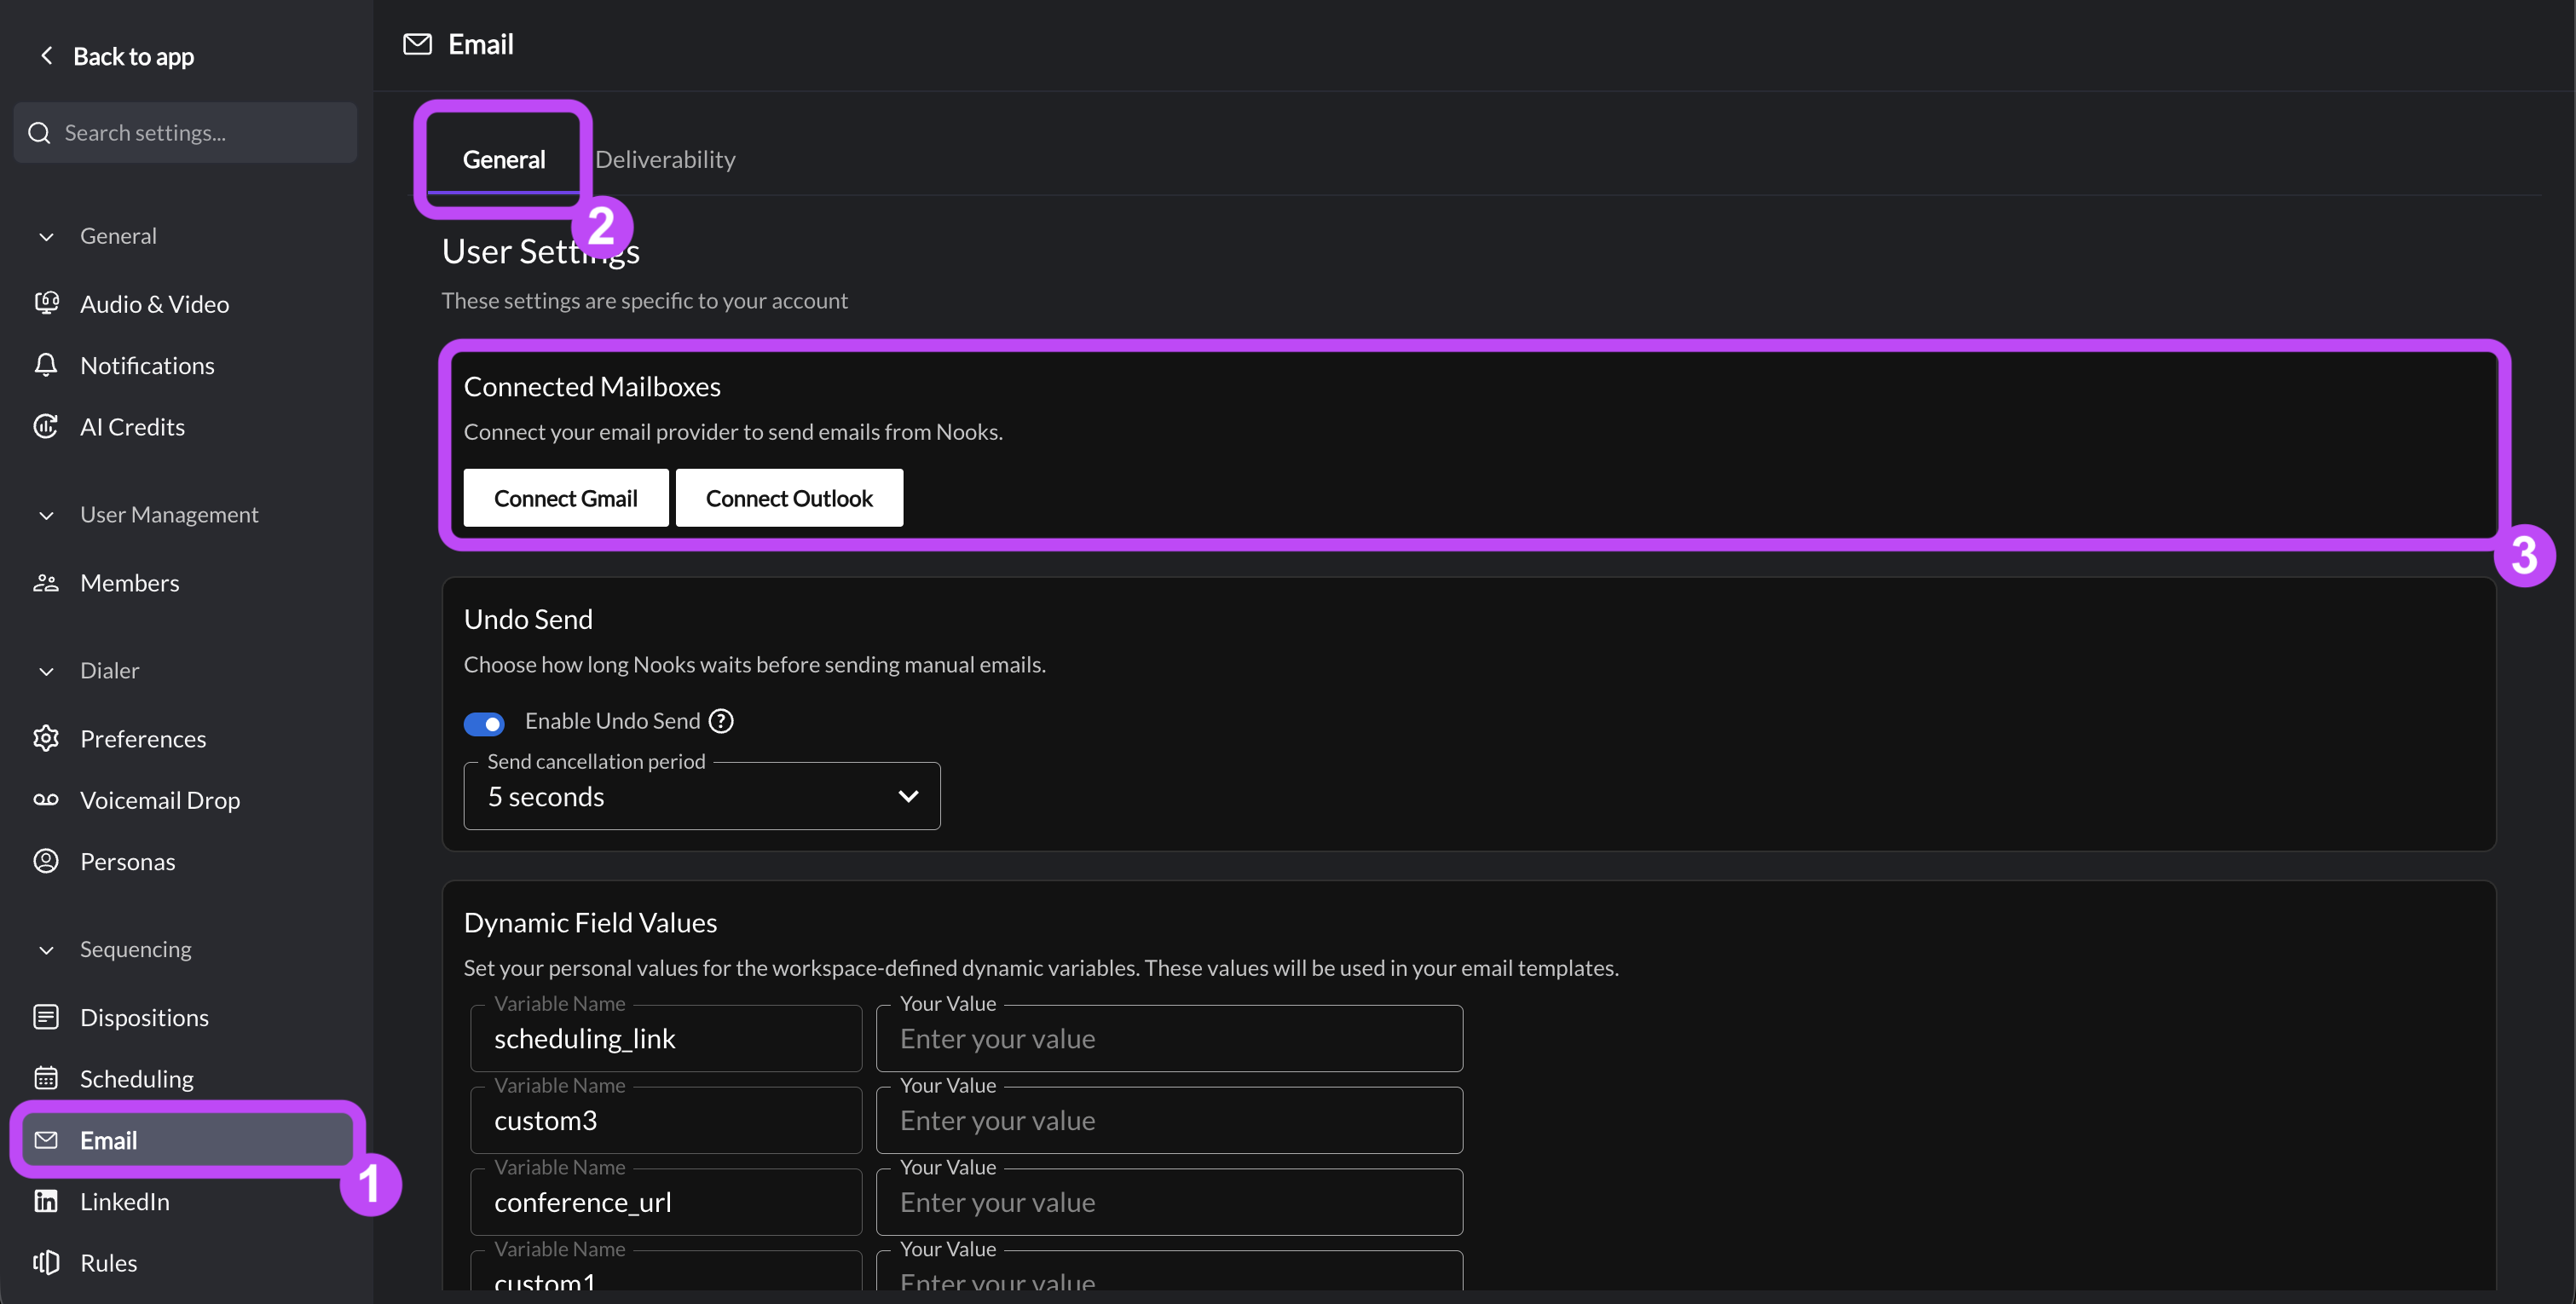
Set up your email so Nooks can track, send, and log emails on your behalf. To complete these steps:
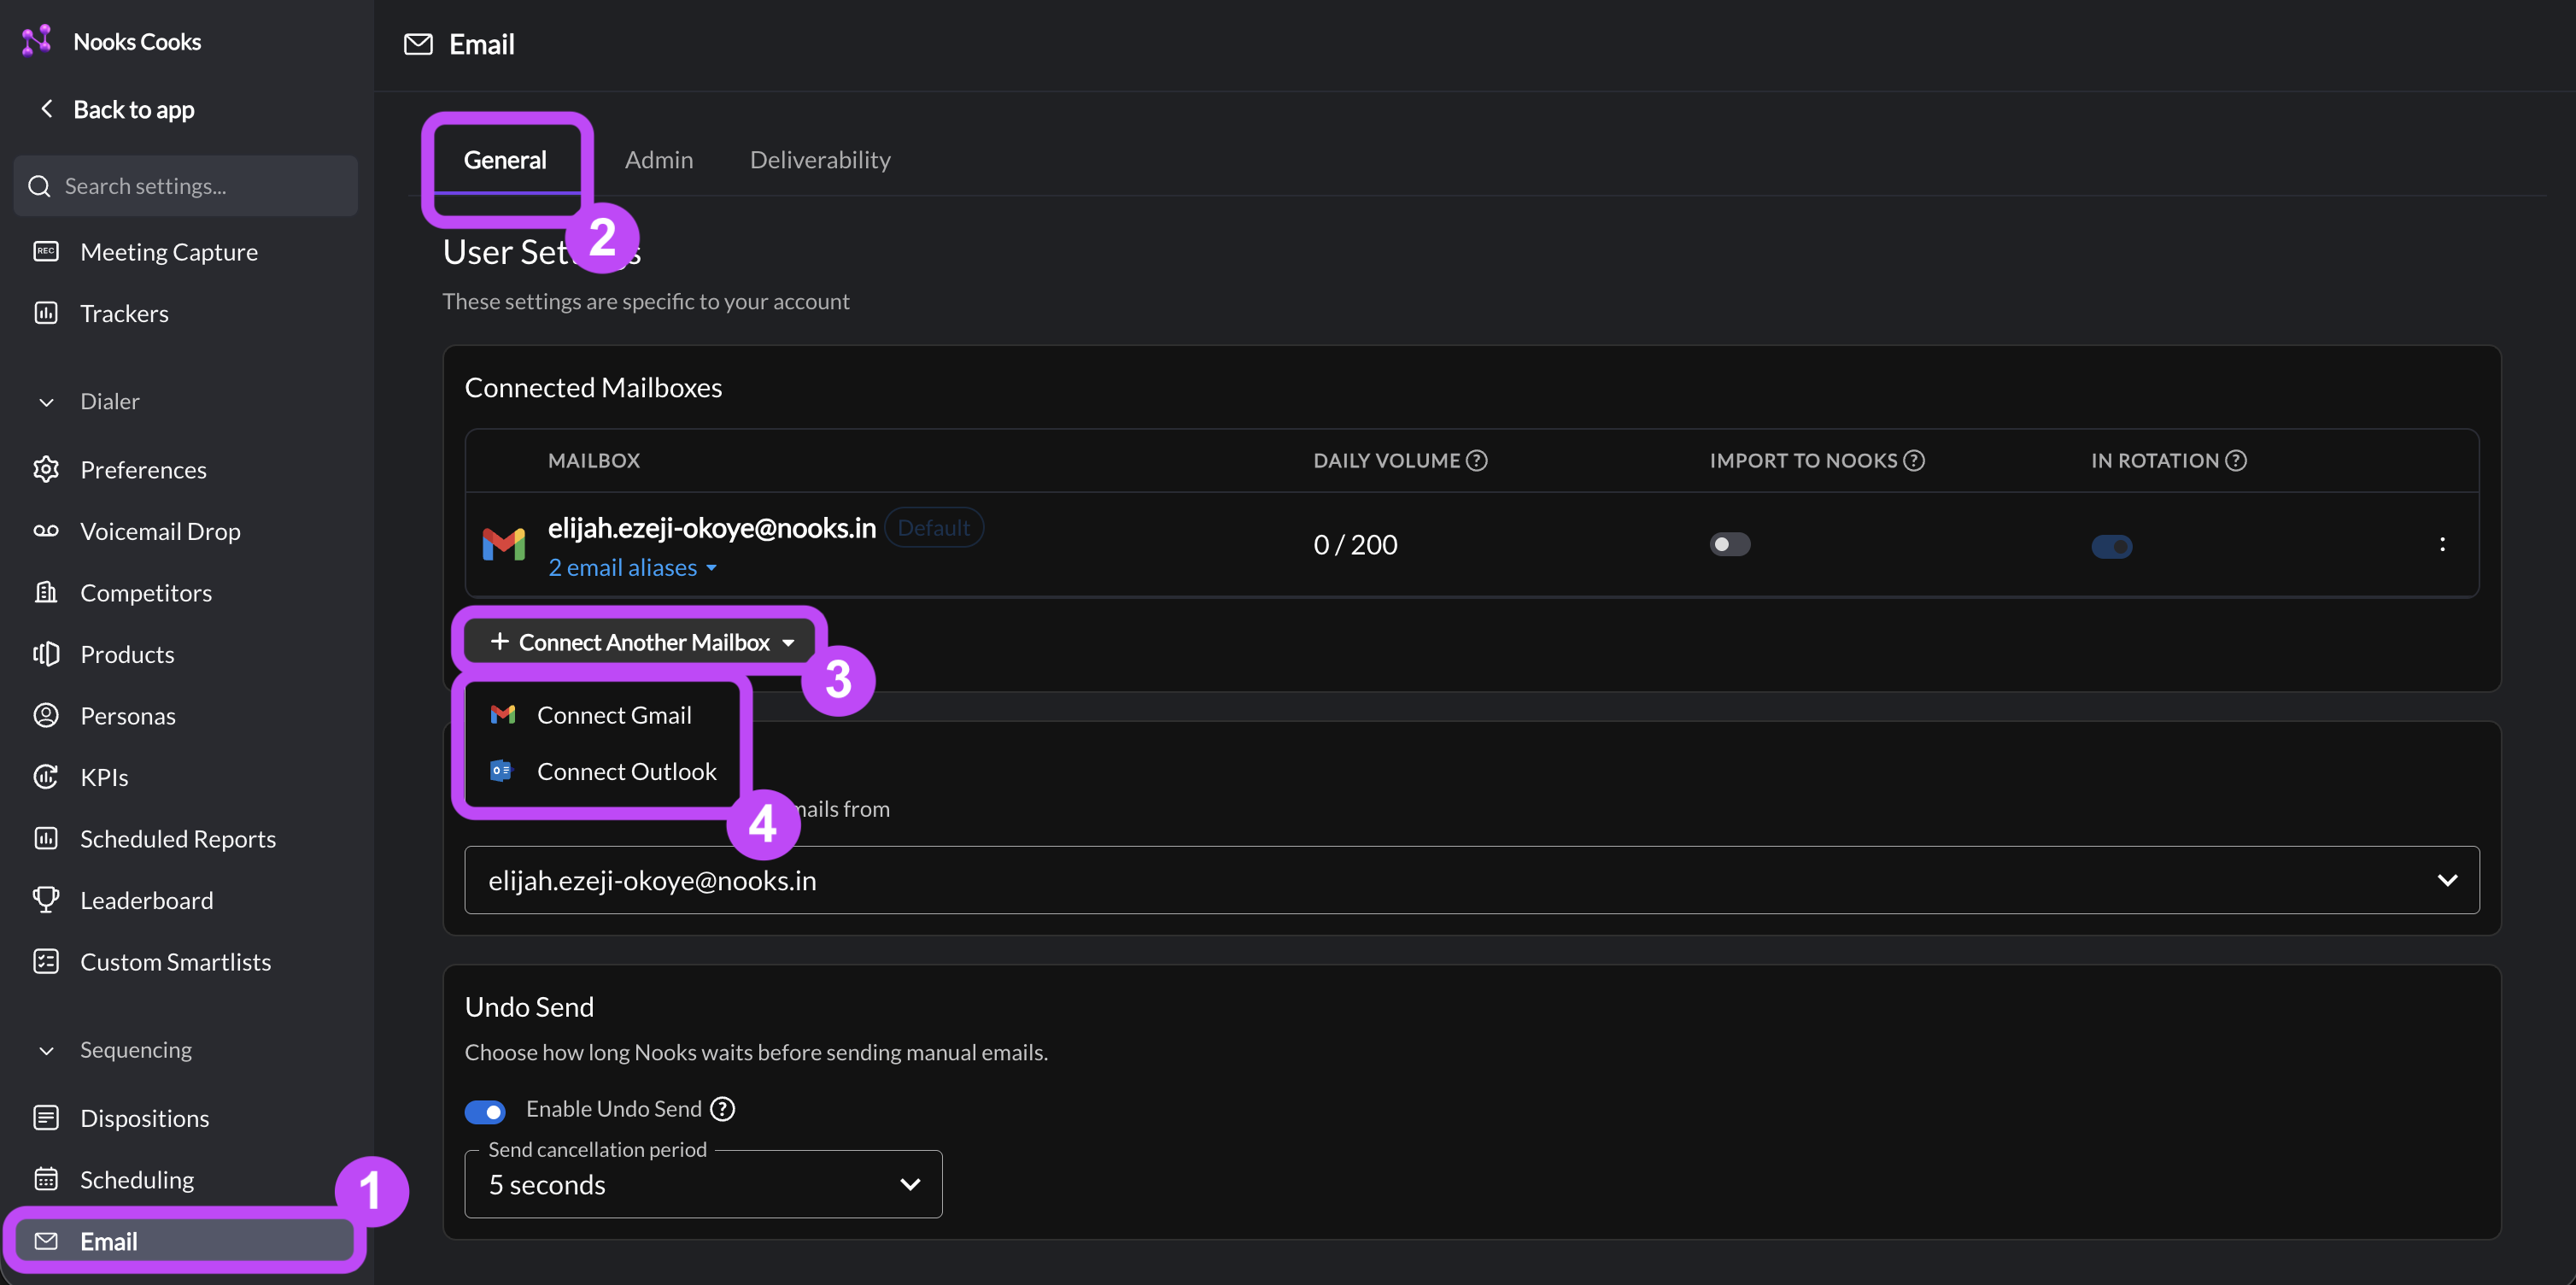
Go to Settings → All Settings.
Under Sequencing, select Email.
Task 11: Connect Your Email to Nooks
Connect Nooks to your email provider. Your email connection is the backbone of Nooks' sequencing functionality.
In the Connected Mailboxes section of the General tab, connect your email to Nooks by clicking Connect Gmail or Connect Outlook.
Sign into your email account through the OAuth flow and accept all mail and calendar permissions.
[If Applicable] Task 12: Select Your Default Alias
If you have email aliases on the mailbox you connected, choose which alias you want to be your default sending alias. When you send emails from this mailbox in Nooks, they will send from your selected alias.
Locate the Email Aliases section of the General tab.
Use the dropdown to select your email alias.
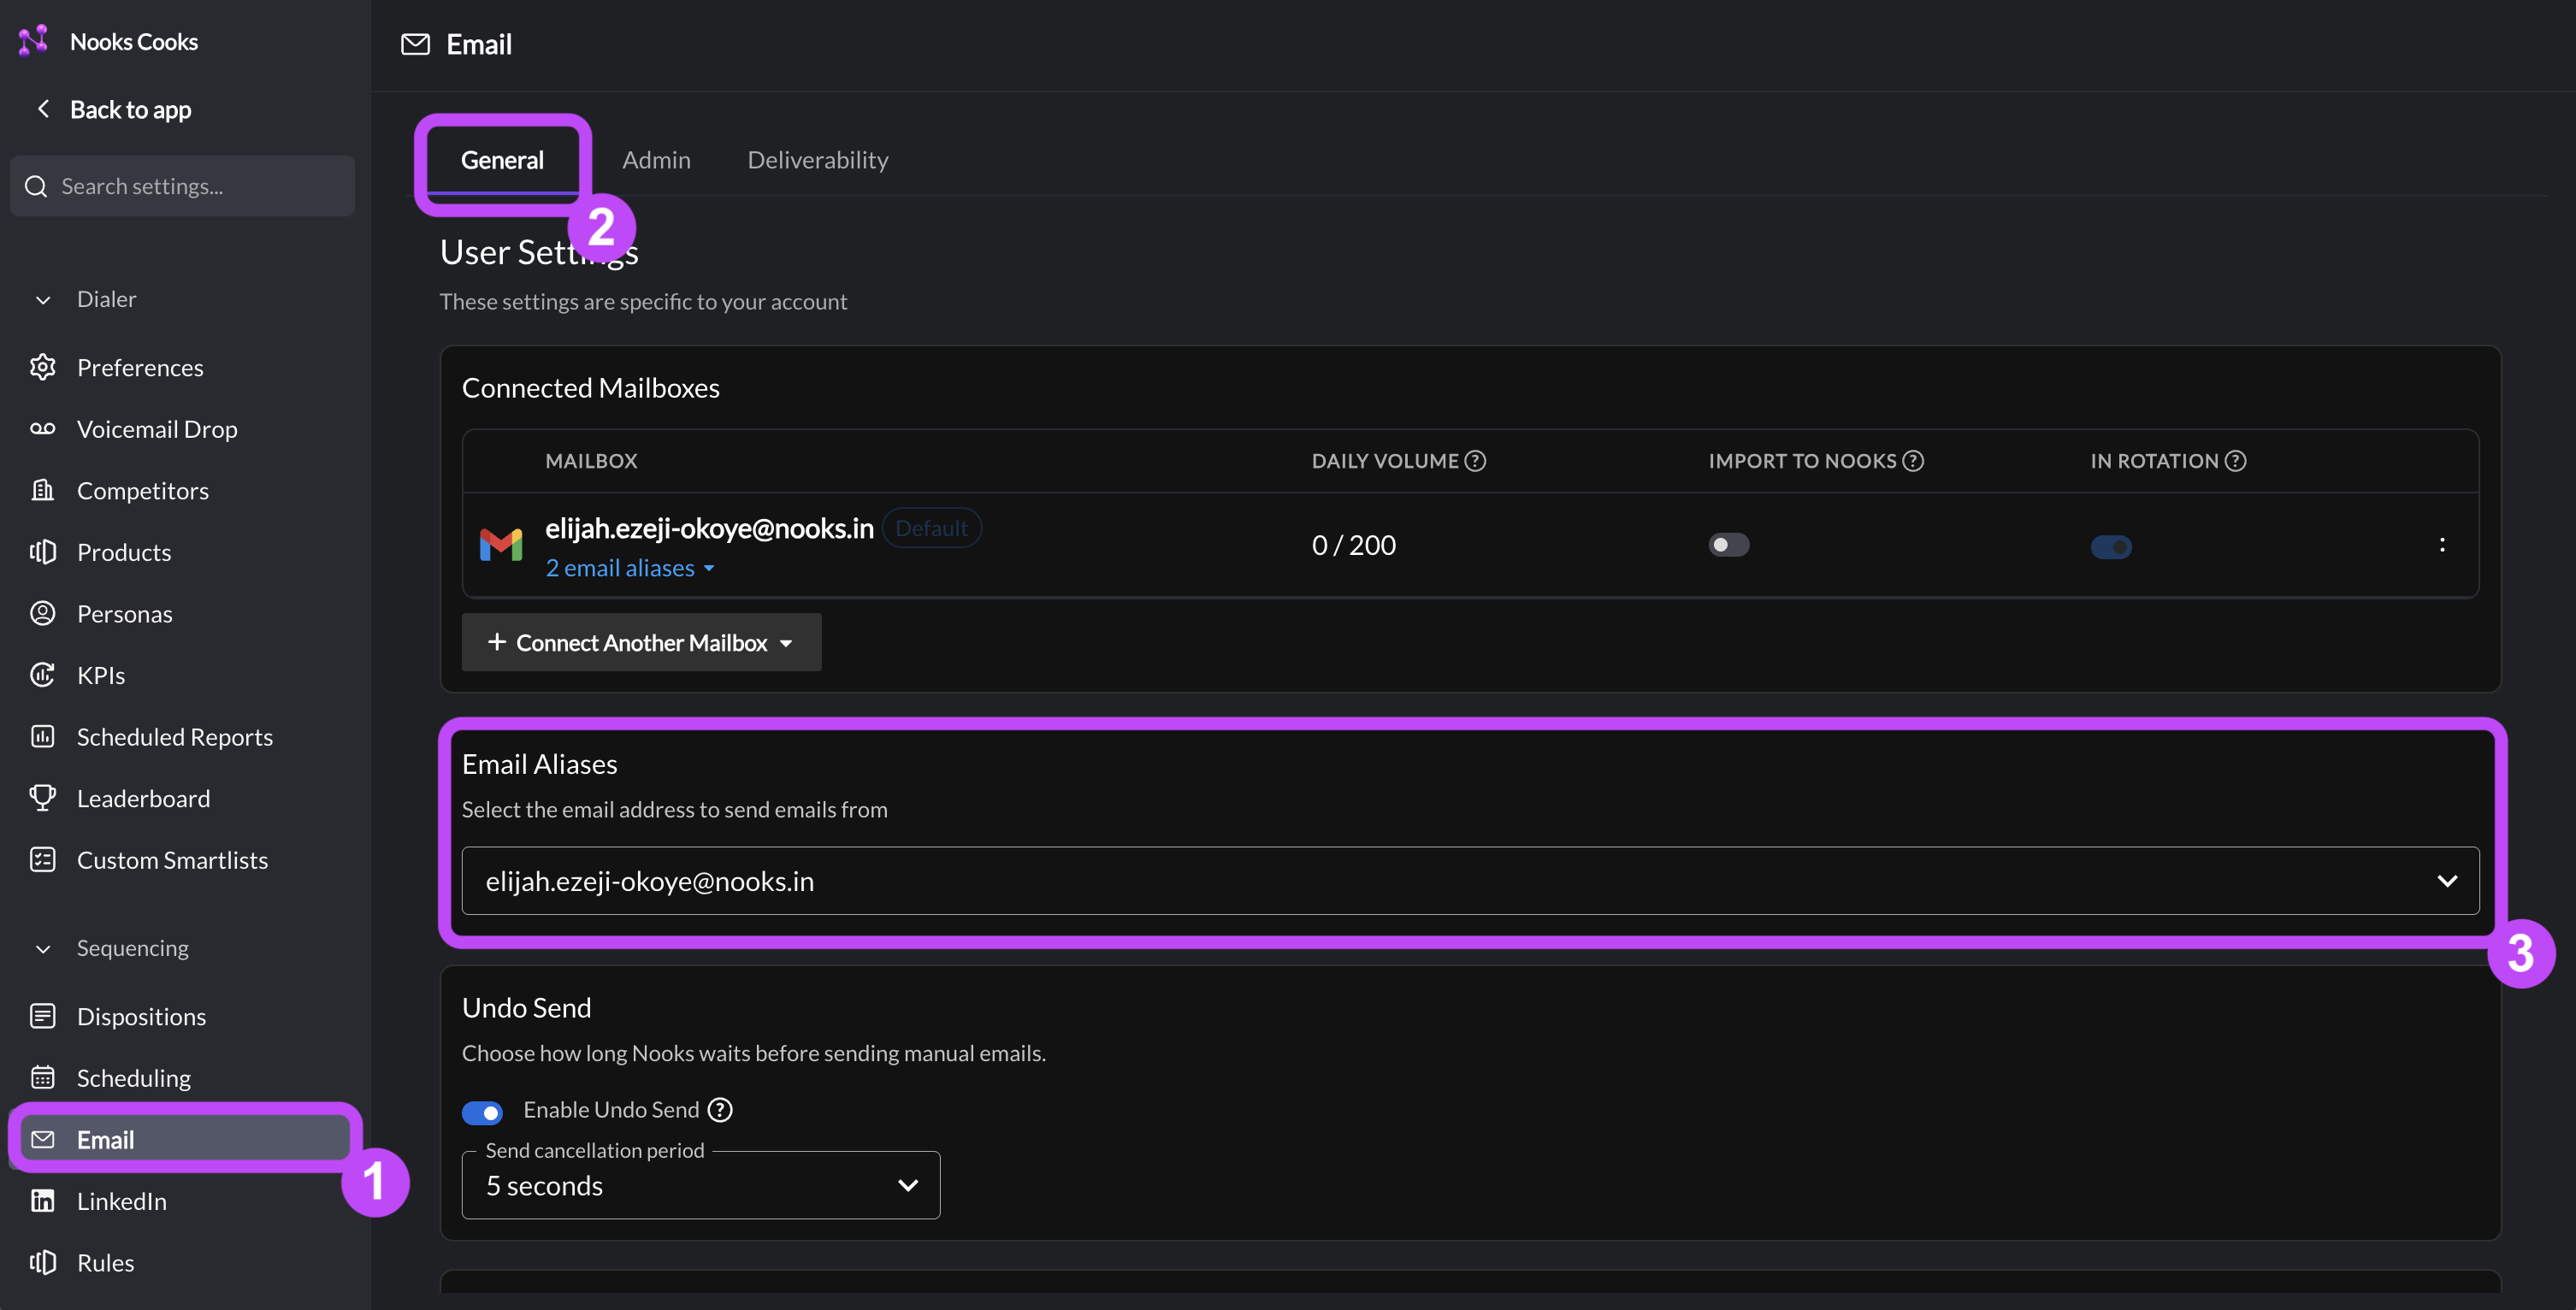
Note: You can come back to this setting at any time to update your default email alias in Nooks.
[If Applicable] Task 13: Connect Additional Mailboxes
If you use multiple email addresses for prospecting, connect your other mailboxes to Nooks. You can connect up to 10 mailboxes to your Nooks account.
In the Connected Mailboxes section of the General tab, click + Connect Another Mailbox, then click Connect Gmail or Connect Outlook.
Sign into your email account through the OAuth flow and accept all mail and calendar permissions.
Task 14: Configure Your Mailbox Settings
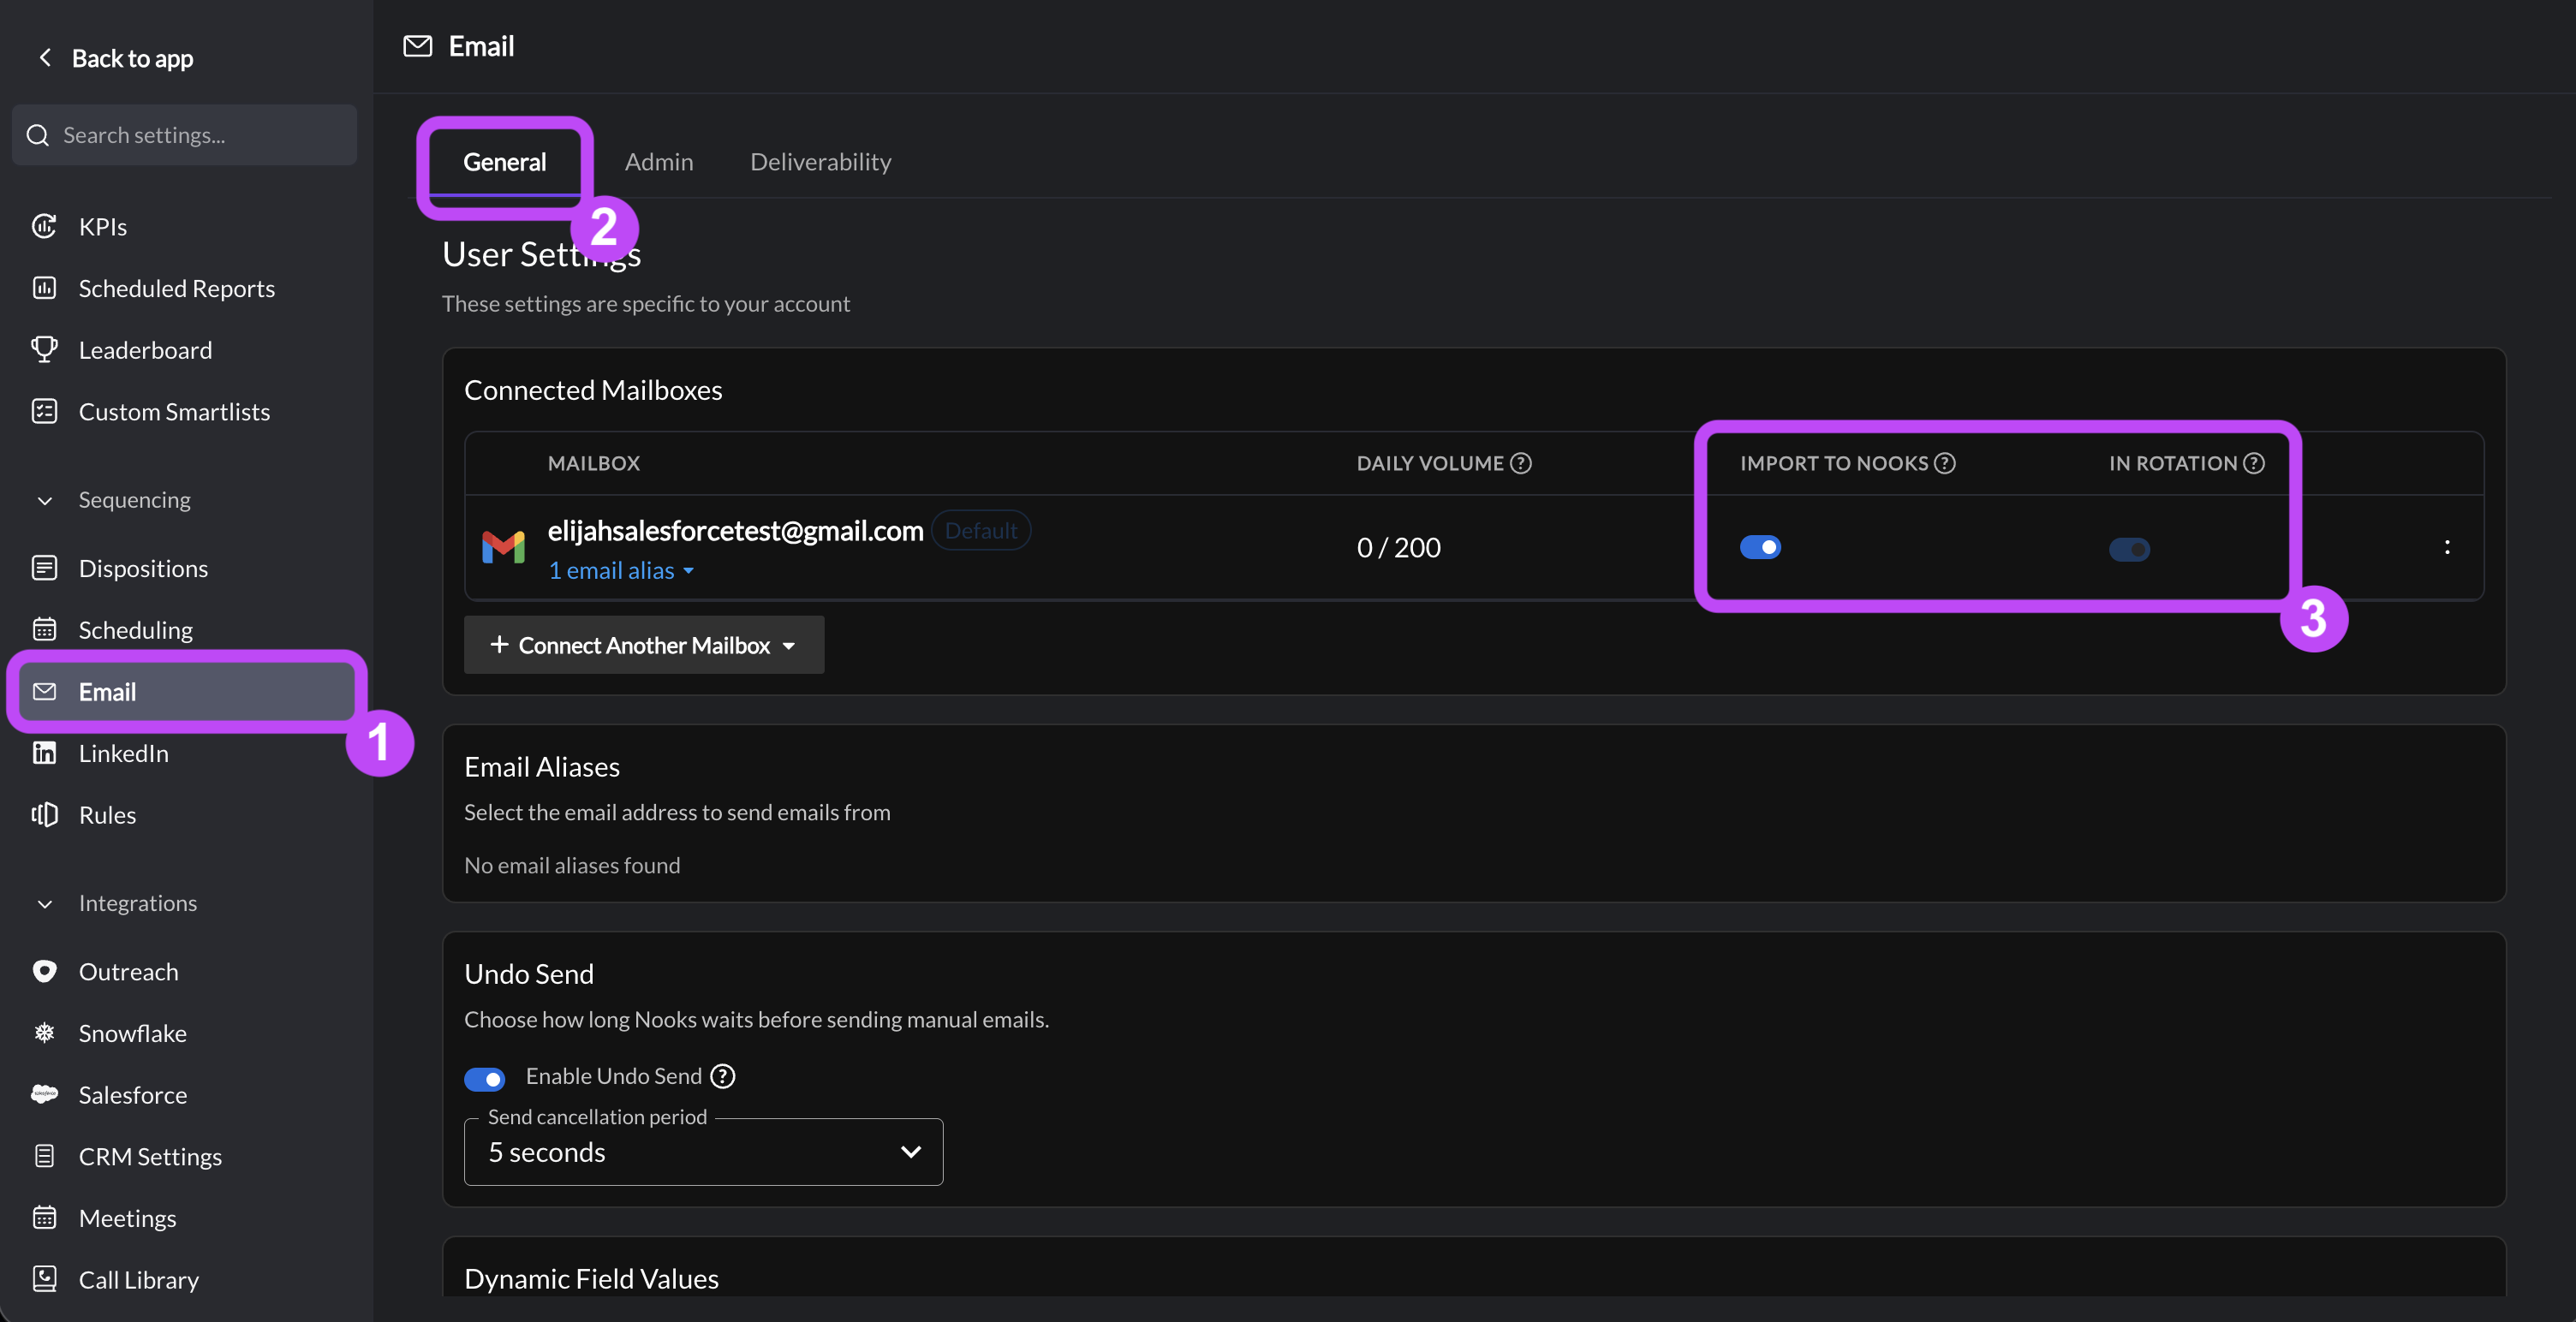
For each connected mailbox, review the settings in the mailbox table on the Email Settings page.
In the Connected Mailboxes section, toggle the following settings for each mailbox.
Import to Nooks: This setting controls whether Nooks imports emails you send to a CRM prospect directly from Gmail or Outlook to Nooks and logs them to your CRM.
Toggled on (recommended): Nooks imports any emails you send to a prospect directly from Gmail or Outlook to Nooks and logs them to your CRM.
Toggled off: Nooks does not import emails you send directly from Gmail or Outlook to Nooks or log them to your CRM.
In Rotation: This setting controls whether the mailbox is included in the Mailbox Rotation. When prospects are enrolled in a Sequence with Mailbox Rotation, Nooks chooses the optimal email address to send your Sequence emails from at send time.
Toggled on: This email address is included in your mailbox rotation pool and can be used for mailbox rotation.
Toggled off: This email address is excluded from your mailbox rotation pool and cannot be used for mailbox rotation.
Note: At least one connected mailbox must have In Rotation toggled on.
[If Applicable] Task 15: Set Your Dynamic Variable
Dynamic Variables are used to populate values in emails with the sender's details. If your Workspace admin team have created Dynamic Variables for your team, you must add a value for your Nooks users. You will hit an error if you try to enroll prospects into a Sequence that contains a Dynamic Variable you have not added a value for.
Under Dynamic Variables, enter your value for each Workspace-defined variable name. The value you enter is what Nooks automatically inserts into emails you send that contain this variable. For example, if your Workspace has a
scheduling_linkVariable, enter the URL to your scheduling link.If you do not see any Dynamic Variables in this section, your Workspace admin team have not set any up yet. Continue to the next setup task.
Click Save Changes at the bottom of the Dynamic Variables section.
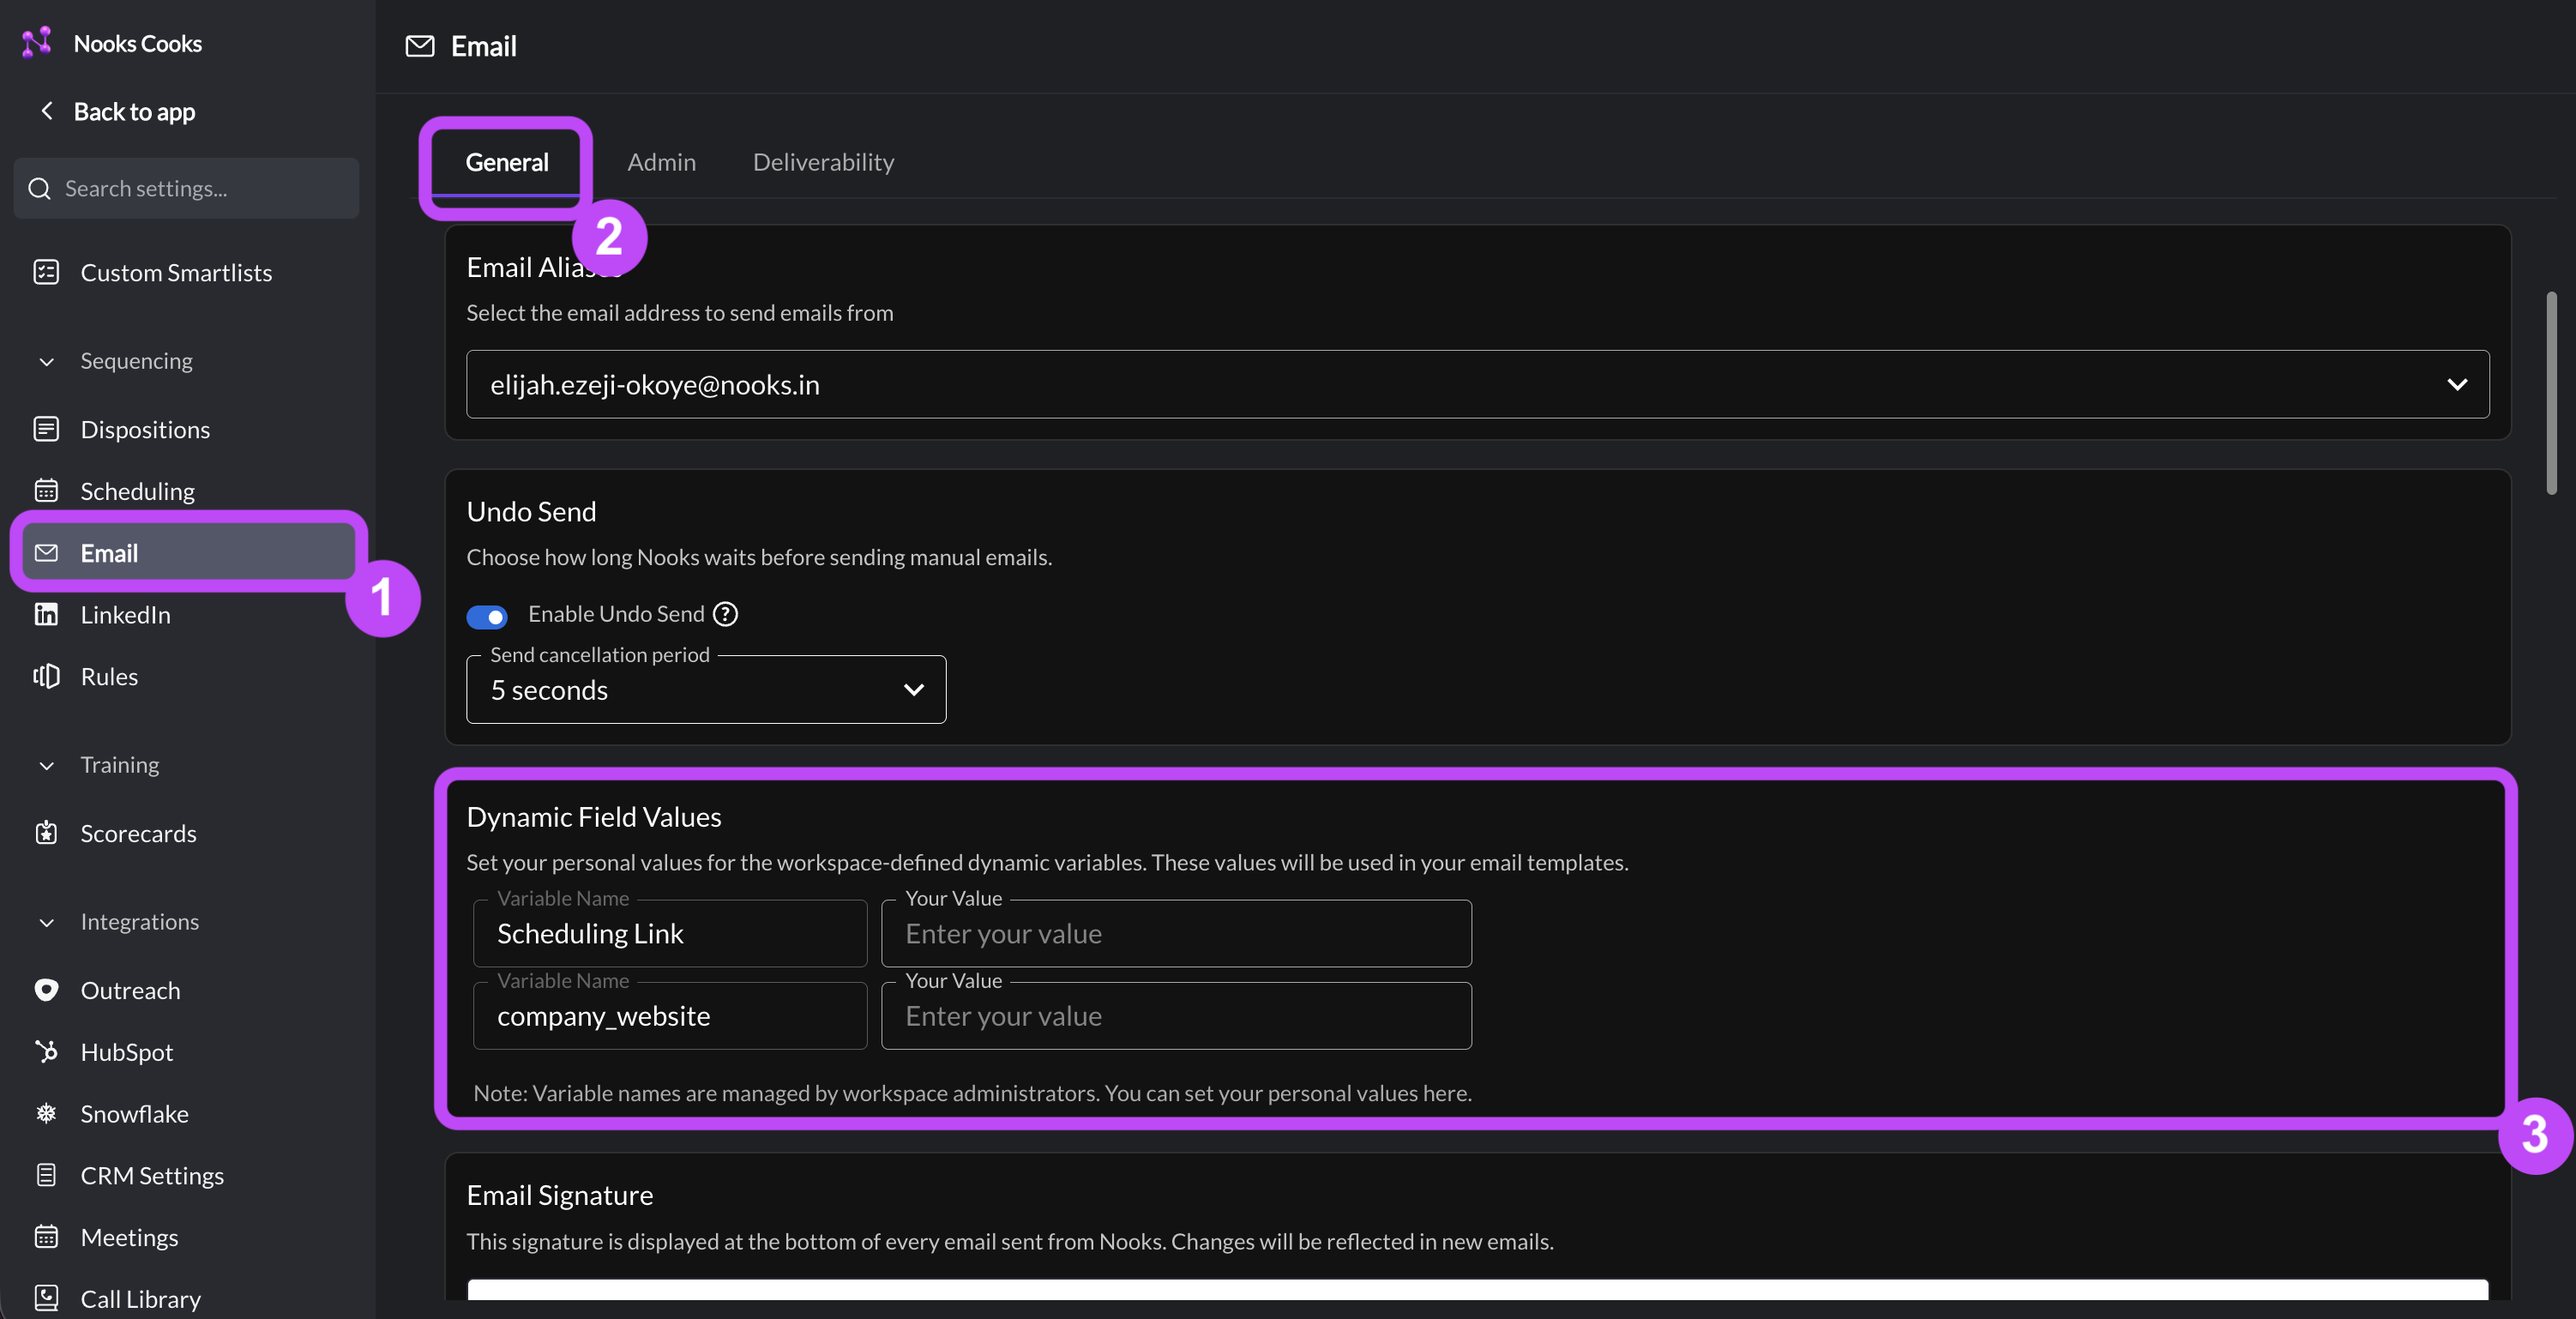
Configuration Note: The Dynamic Variable names are managed by your Workspace admin team. You are only setting your personal value for each one.
Task 16: Configure Your Email Signature
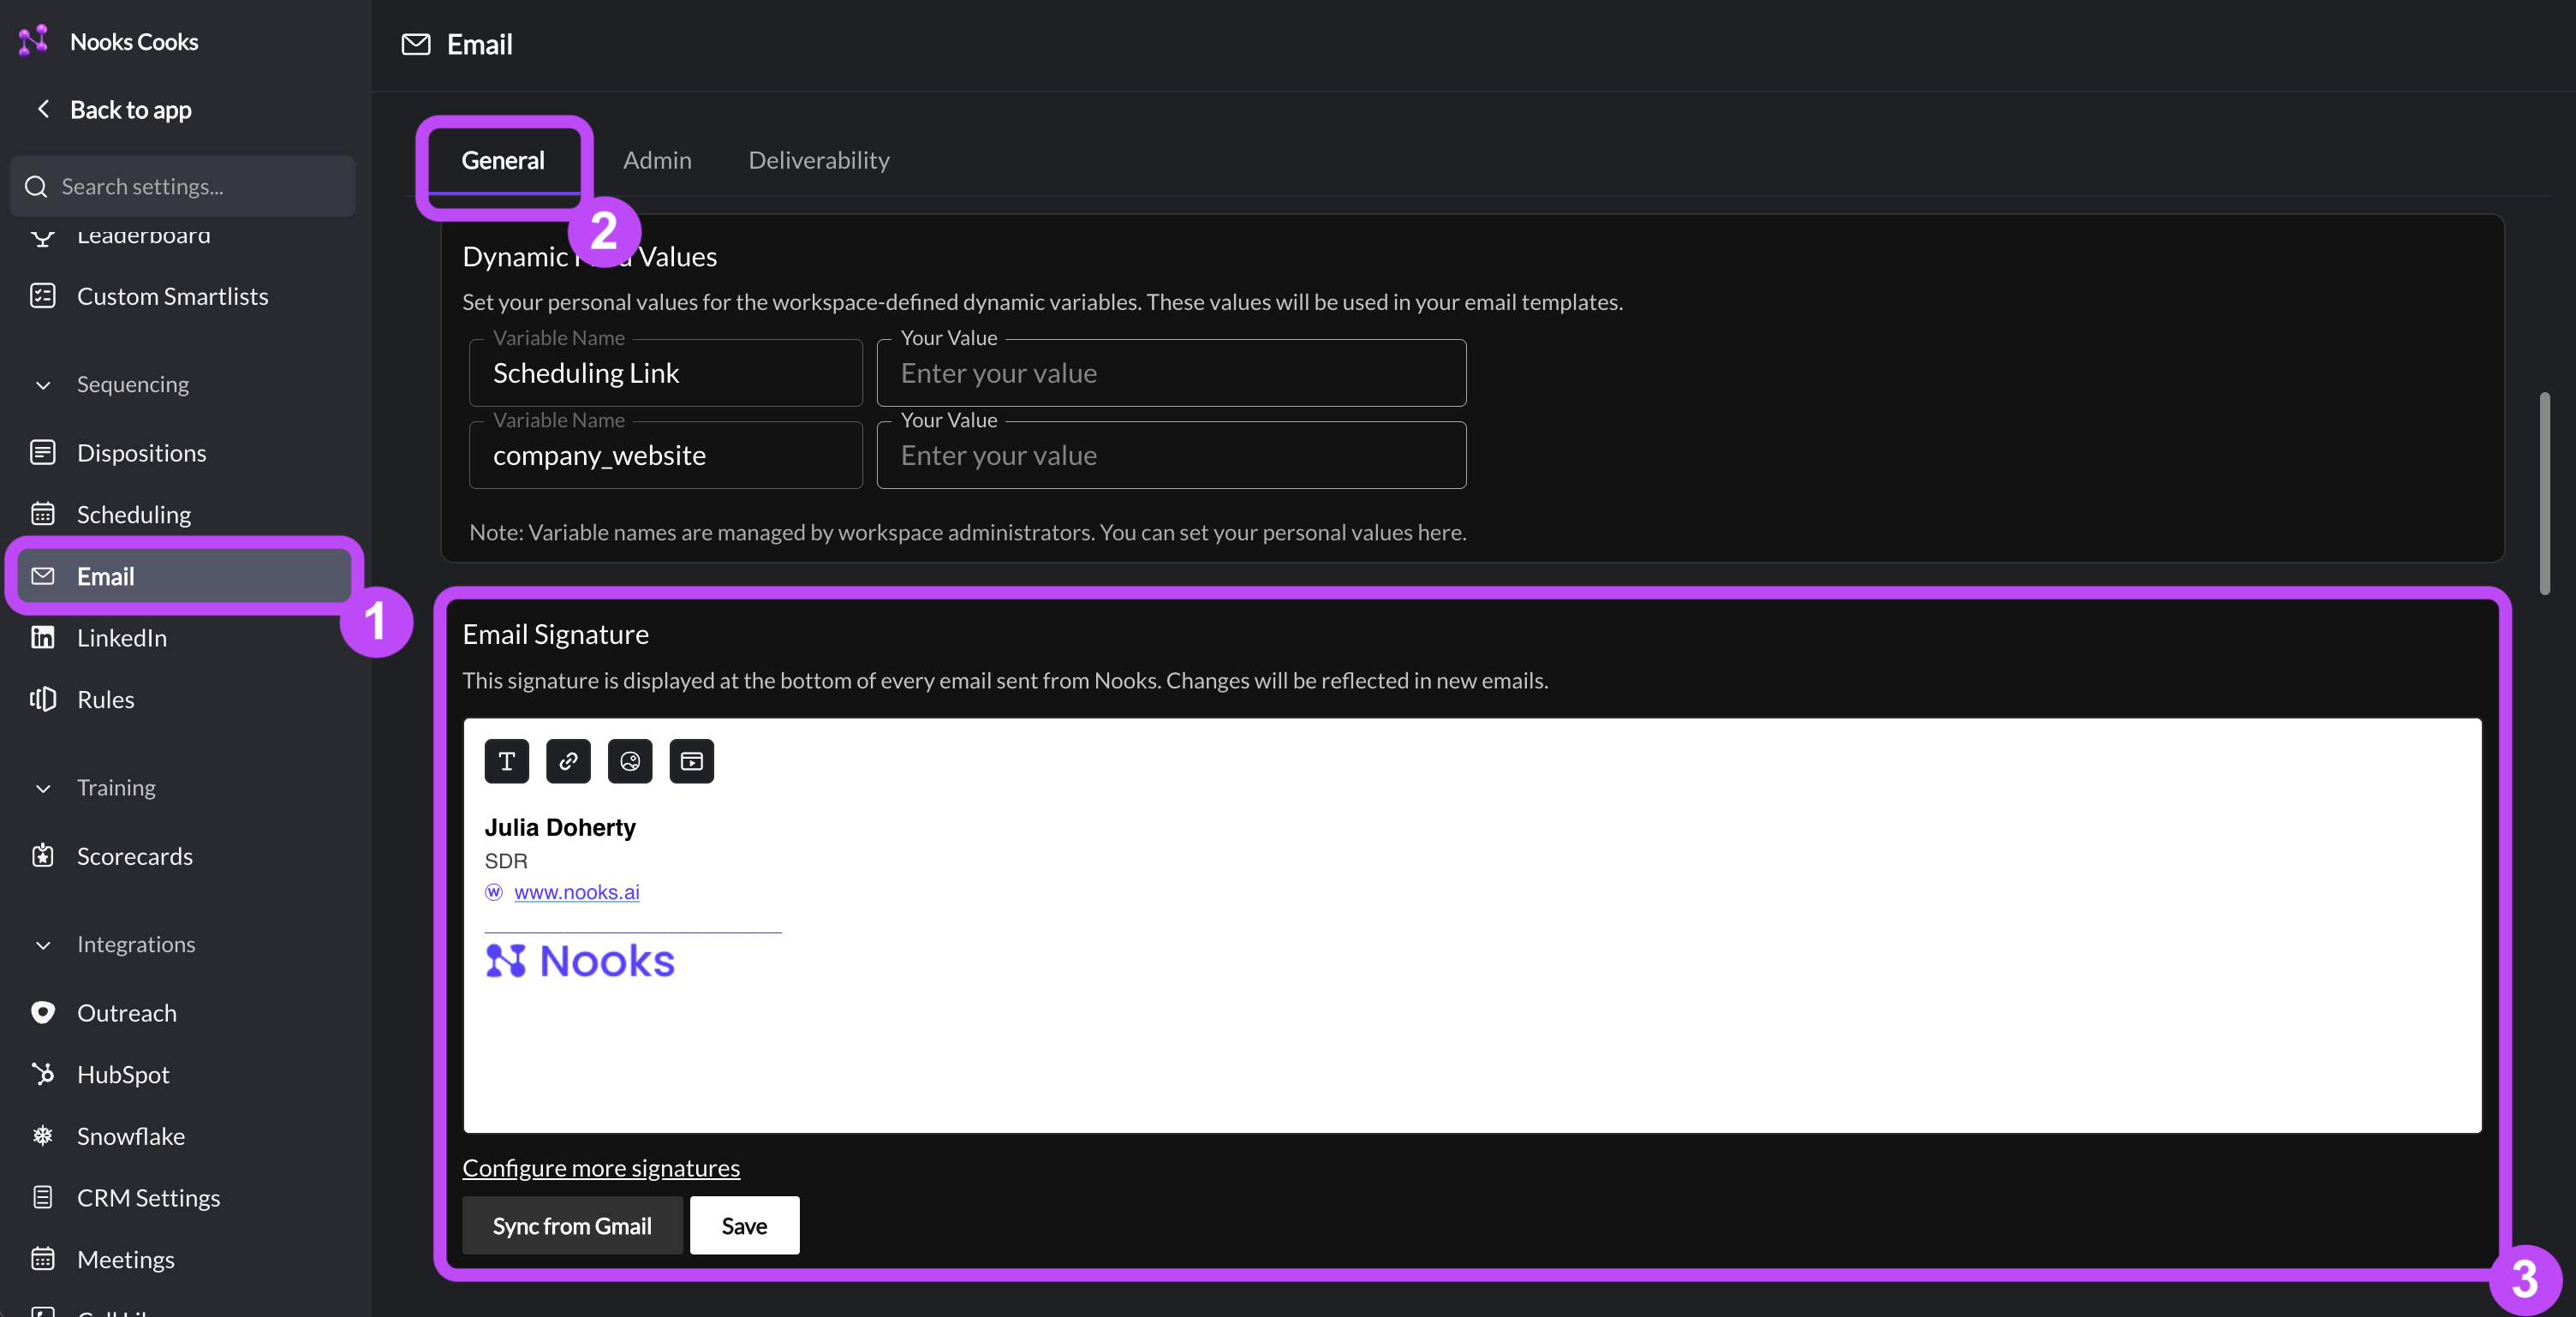
Set up your email signature. Your email signature will be appended to the emails you send from Nooks.
Under Email Signature, write or paste your email signature into the editor.
If you use Gmail: You can optionally click Sync from Gmail to sync your signature from your Gmail settings.
Click Save.
If you use multiple mailboxes or email aliases: Click Configure More Signatures (under the signature editor) to configure the email signatures for the other mailboxes and aliases you have connected to Nooks.
Scheduling Settings Setup
Your scheduling settings control when Nooks Sequencing tasks become due and when emails are sent. To configure these settings:
Go to Settings → All Settings.
Under Sequencing, select Scheduling.
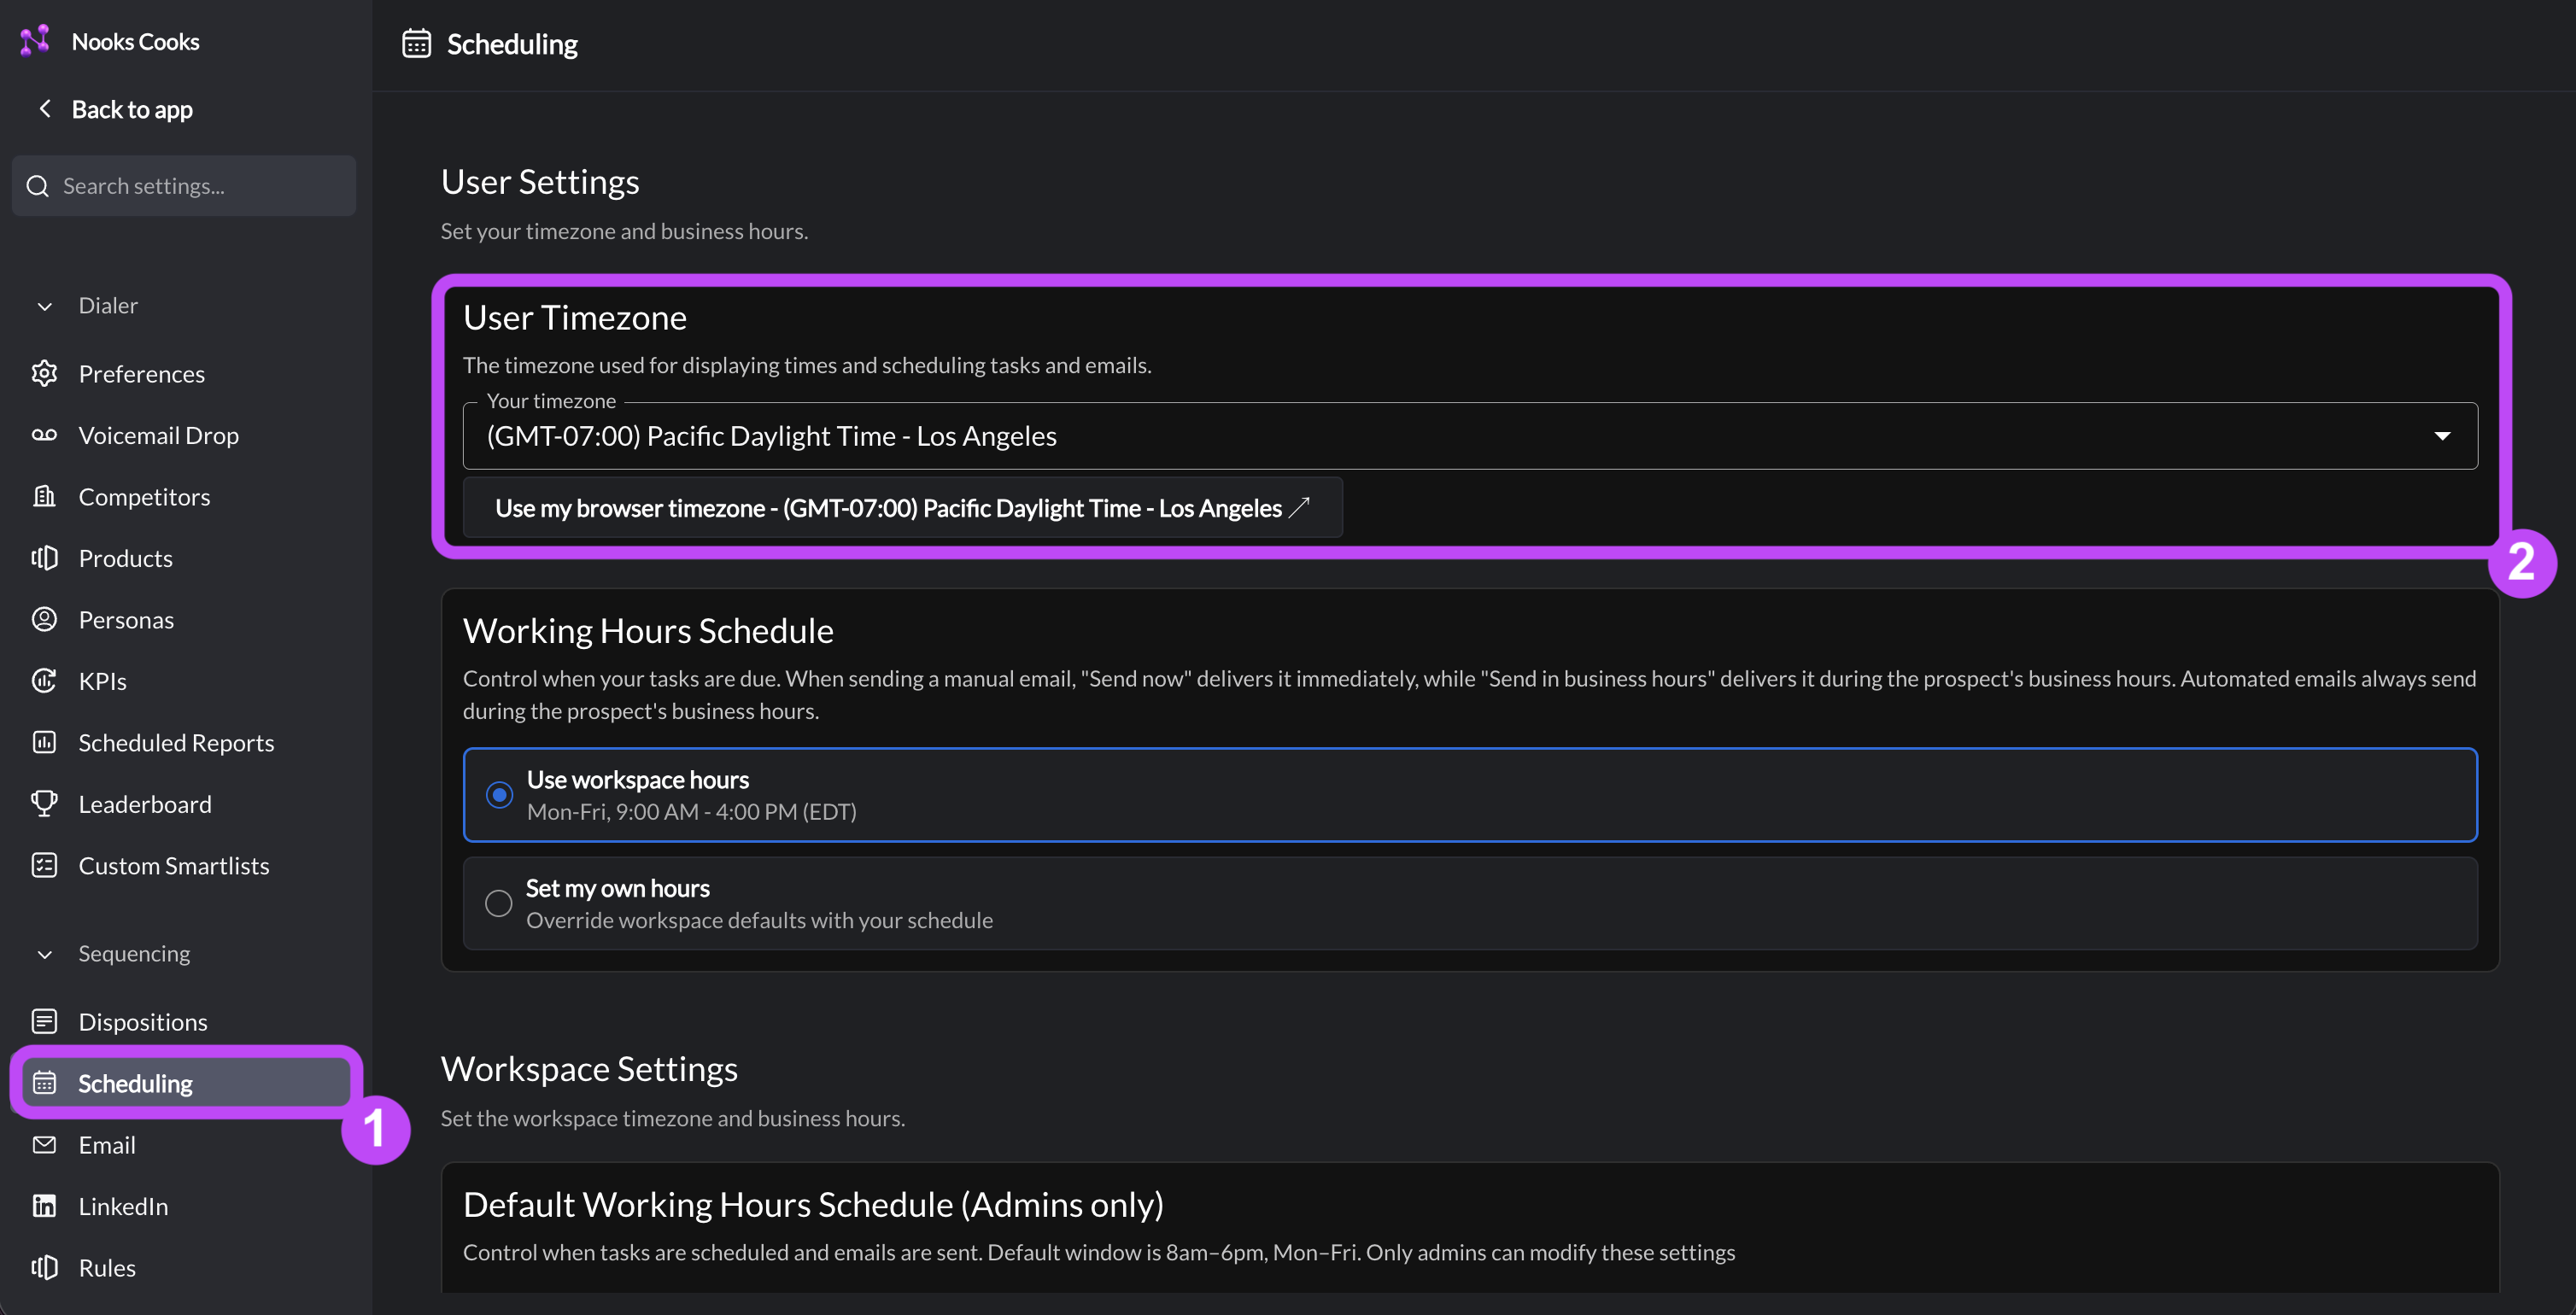
Task 17: Set Your Timezone
Your timezone is used to display dates and times in Nooks, as well as scheduling tasks and emails.
Under User Timezone, use the dropdown to select your timezone. Alternatively, click Use my browser timezone to use the timezone Nooks currently detects from your browser.
Your changes save automatically.
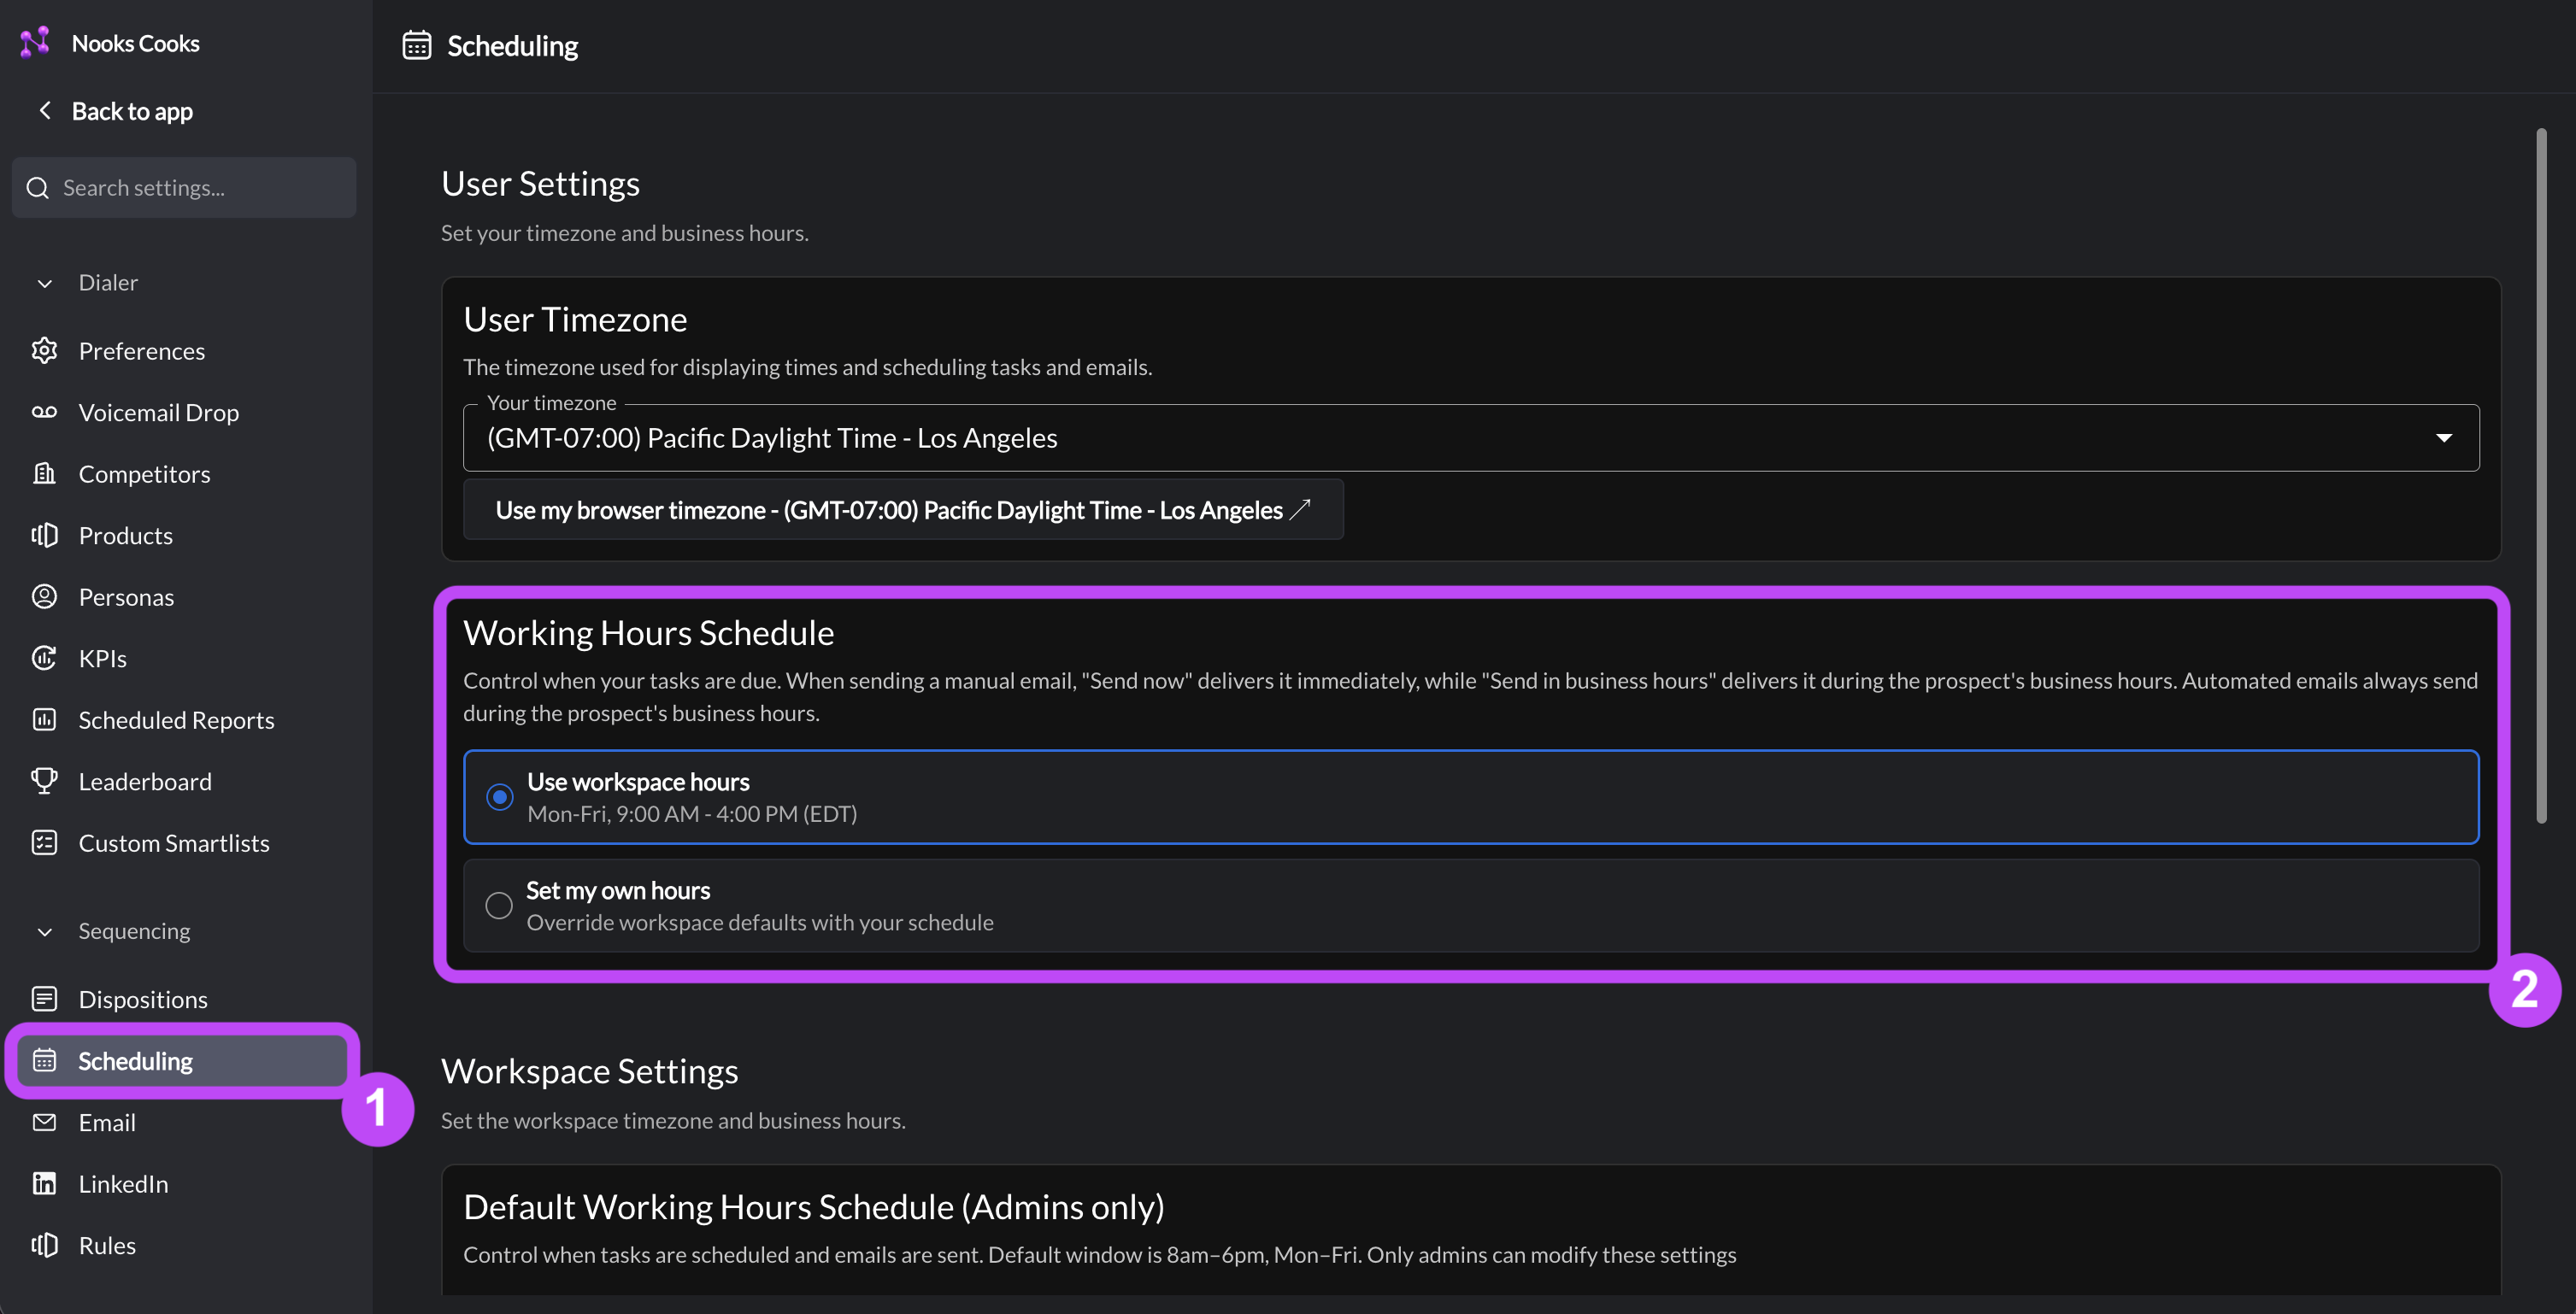
Task 18: Choose Your Working Hours
Your Working Hours schedule controls when your tasks are due and when emails are sent. Choose between the following options:
Use workspace hours: Use the Default Working Hours Schedule that your Workspace admin team has configured (visible in the selection option).
Set my own hours: Define your own Allowed Days, Start Time, and End Time.
Nooks Meetings & Booking Link Setup
Nooks Meetings lets you manage your calendar from Nooks. You can book meetings manually across Nooks, or send prospects your Nooks Booking Link to let prospects self-schedule meetings directly on your calendar based on your real-time calendar availability. To configure these settings:
Go to Settings → All Settings.
Under Integrations, select Meetings.
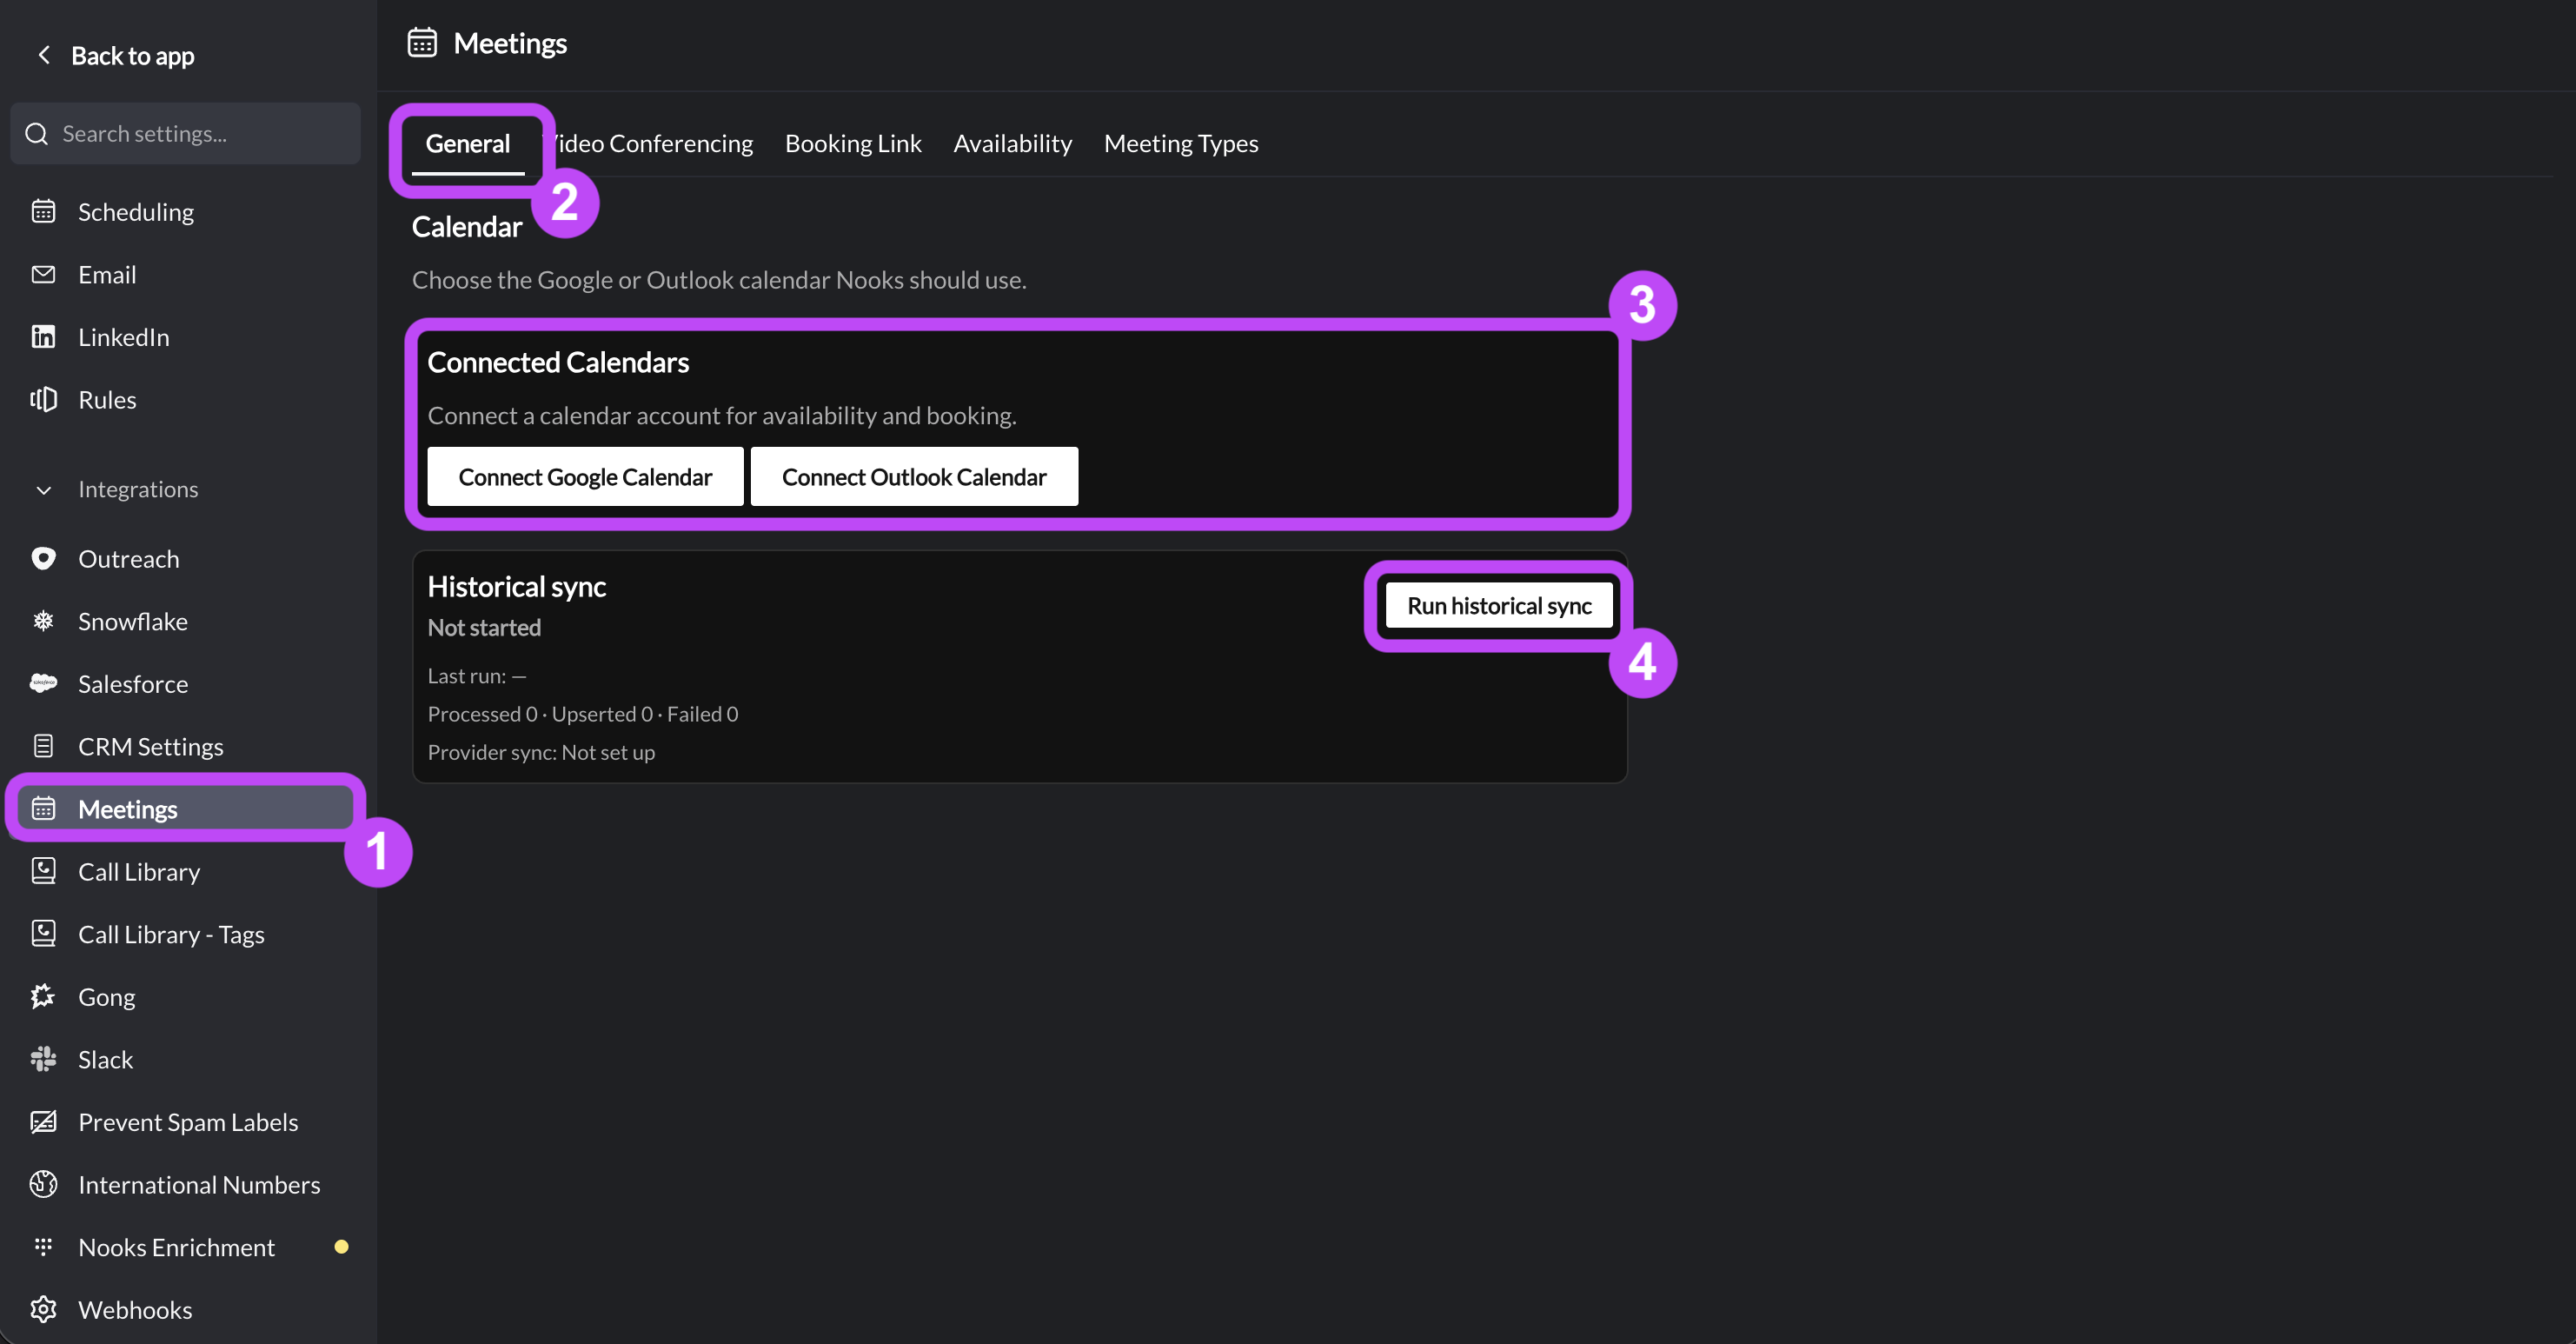
Task 19: Connect Your Calendar to Nooks
A connected calendar is required before you can use Nooks Meetings.
In Meetings settings, open the General tab.
Your calendar may already be connected from setting up your email account. If you do not see an active calendar connection, click Connect Google Calendar or Connect Outlook Calendar based on your provider.
Authenticate through the OAuth flow and accept all requested permissions.
Click Run Historical Sync to pull current meetings on your calendar into Nooks.
[If Applicable] Task 20: Connect Zoom to Nooks
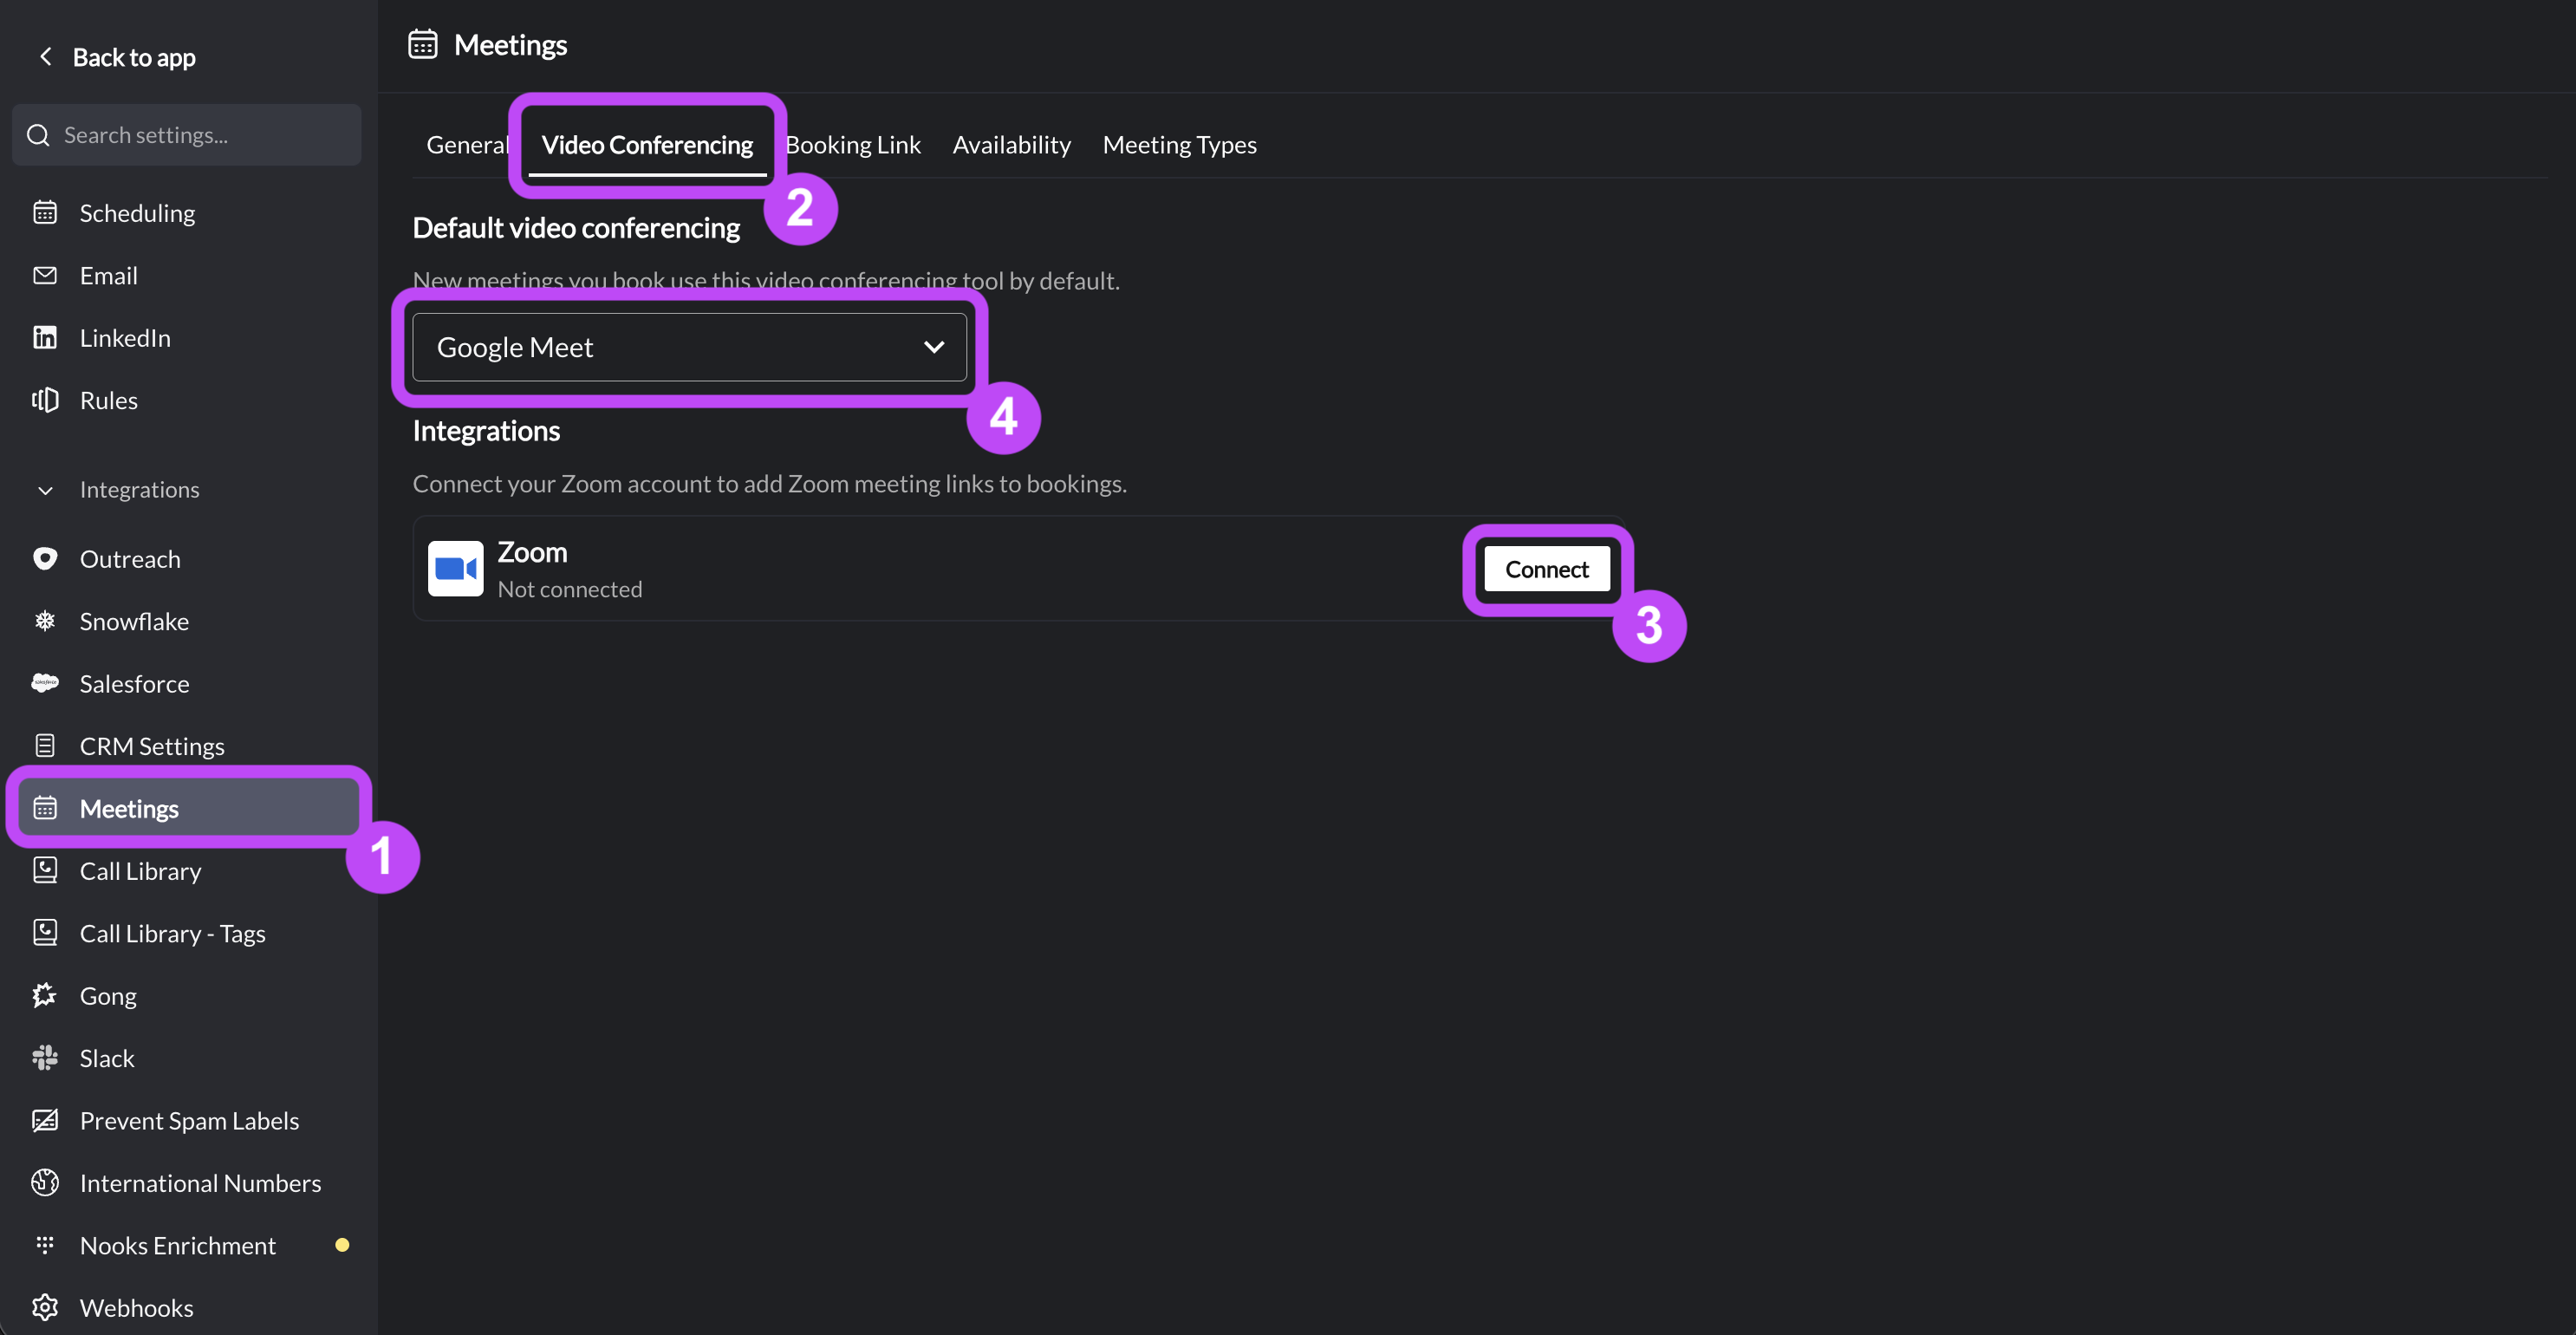
If your team uses Zoom for video conferencing, you can connect Zoom to Nooks so that Nooks automatically adds unique Zoom meeting links to meetings booked through your Booking Link.
In Meetings settings, open the Video Conferencing tab.
Under integrations, click Connect by Zoom to connect Zoom. Sign into your Zoom account.
Use the Default Video Conferencing dropdown to set Zoom as your default video conferencing tool.
Task 21: Enable Your Nooks Booking Link
Turn on and configure your Nooks Booking Link to enable prospects to self-schedule meetings on your calendar.
In Meetings settings, open the Booking Link tab.
Turn on the Enable booking link toggle.
Set the URL Slug for your booking link.
Click Save Changes at the bottom of the page.
See this guide for more advanced settings you can configure for your Nooks Booking Link.
Dynamic Variable Setup Tip
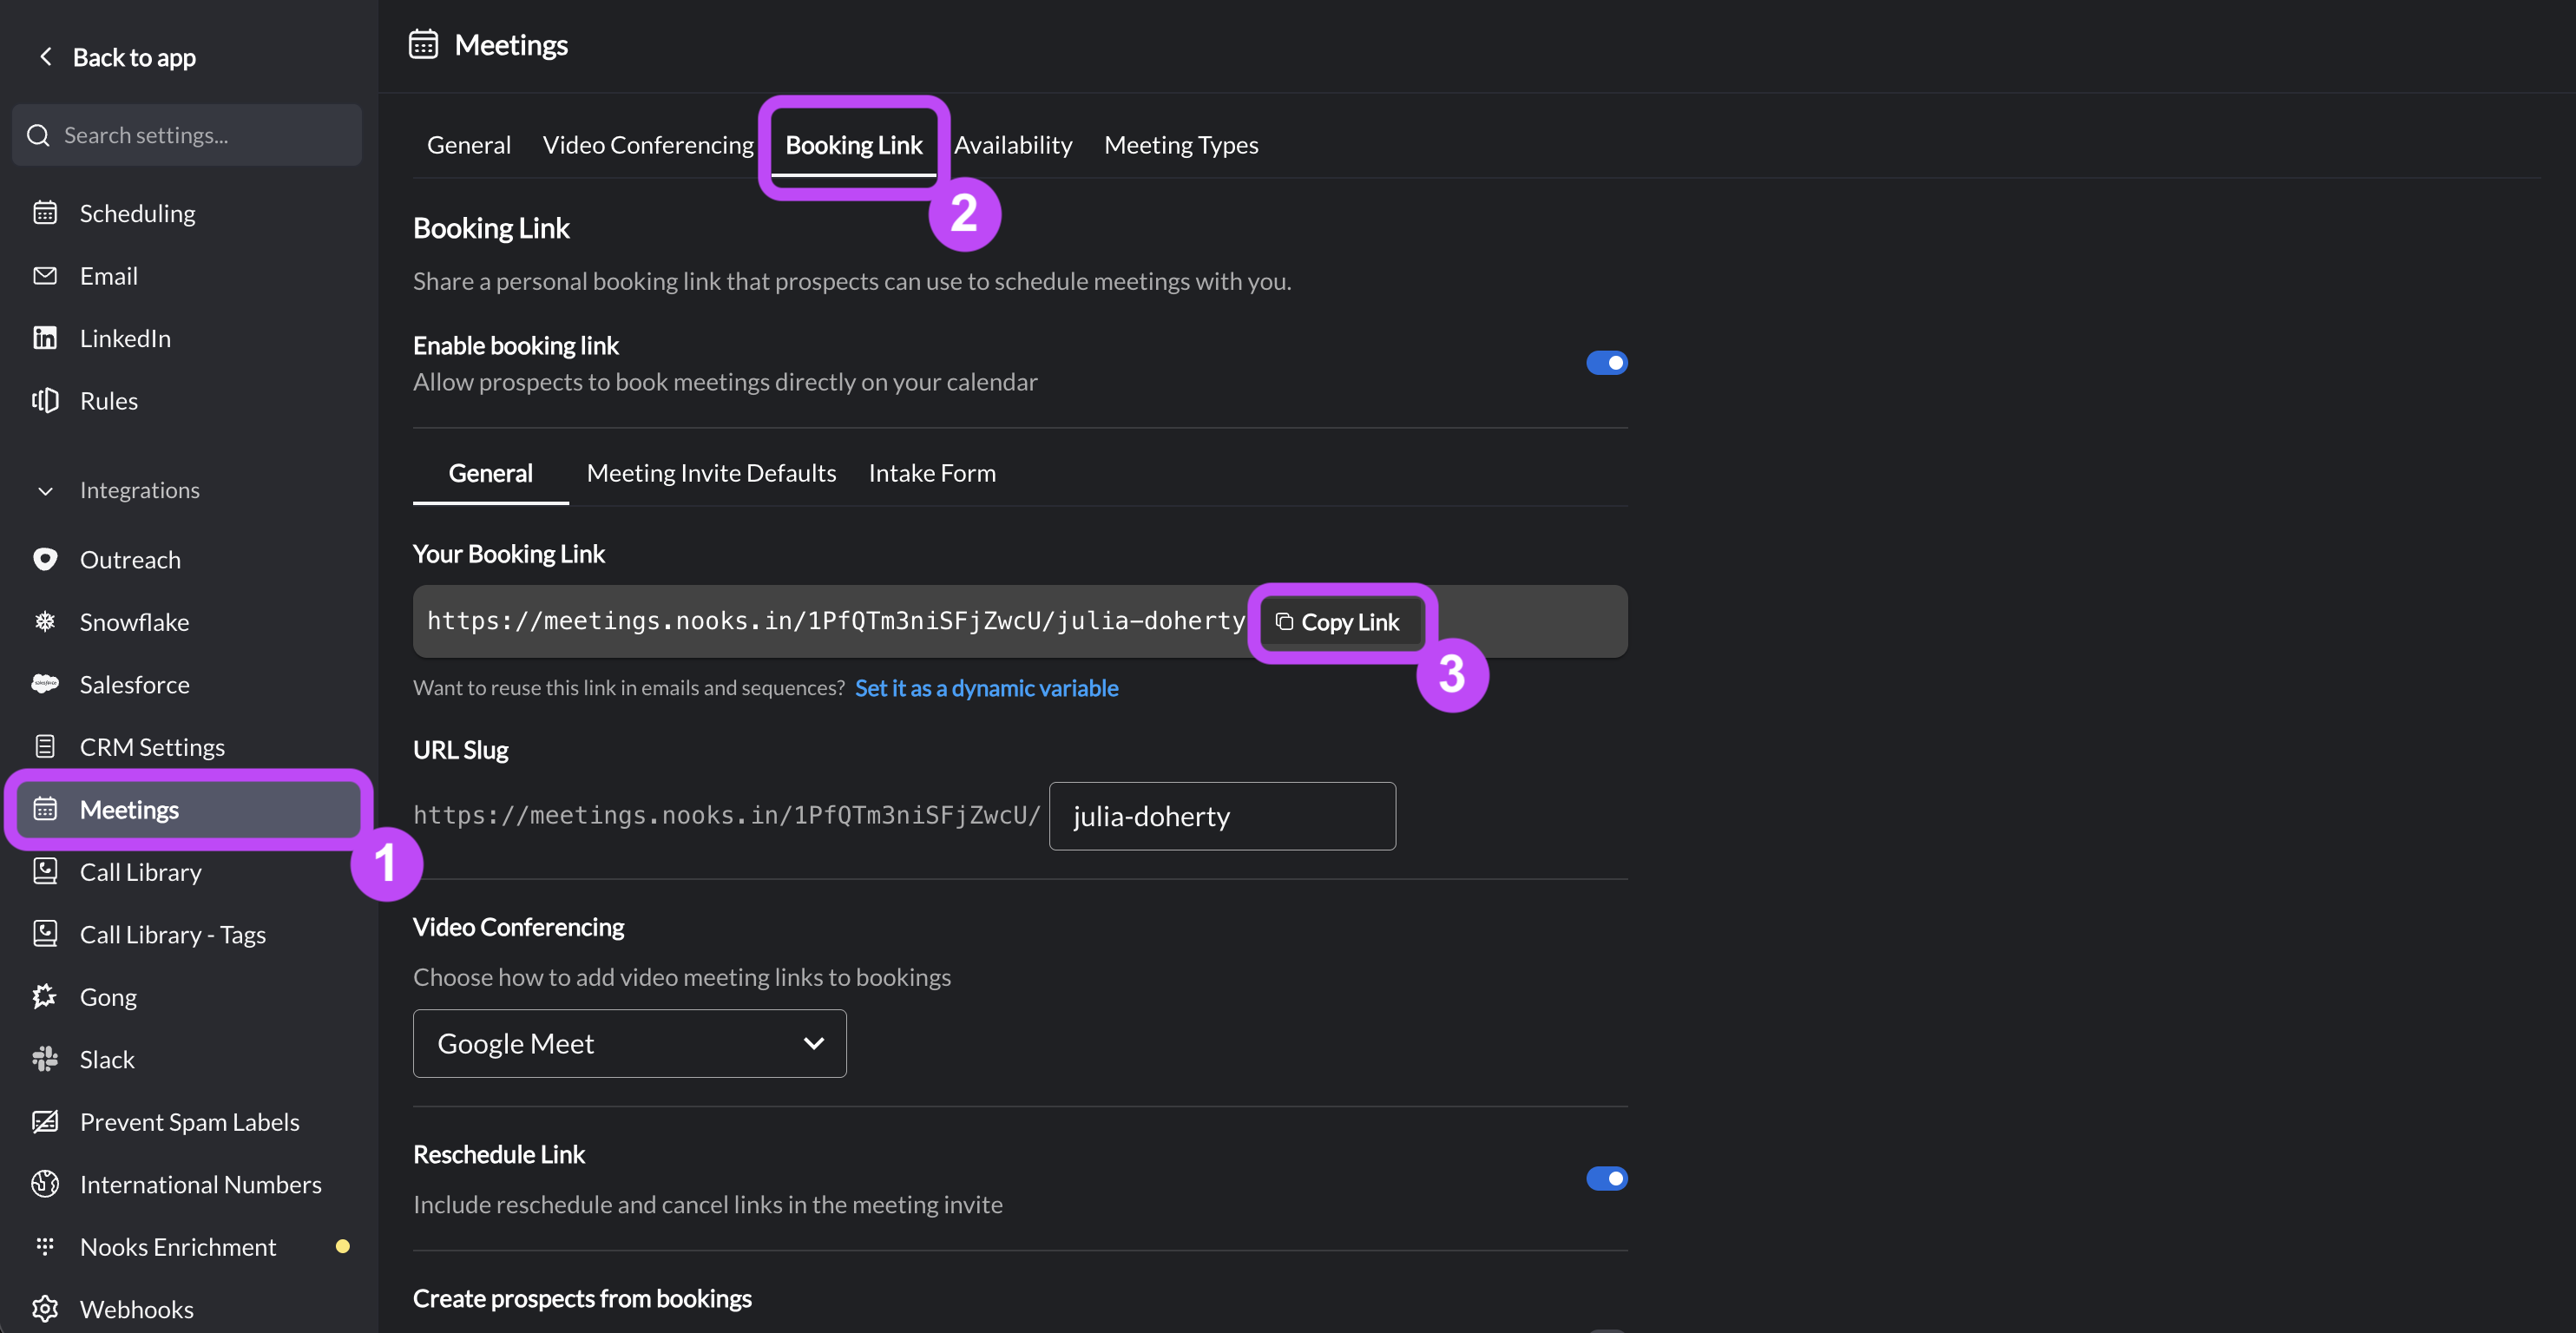
If your team has a "scheduling link" or "booking link" Dynamic Variable, you can use your Nooks Booking Link as your personal value for it. To do so:
From Meetings settings, open the Booking Link tab.
Click Copy Link to copy your Nooks Booking Link.
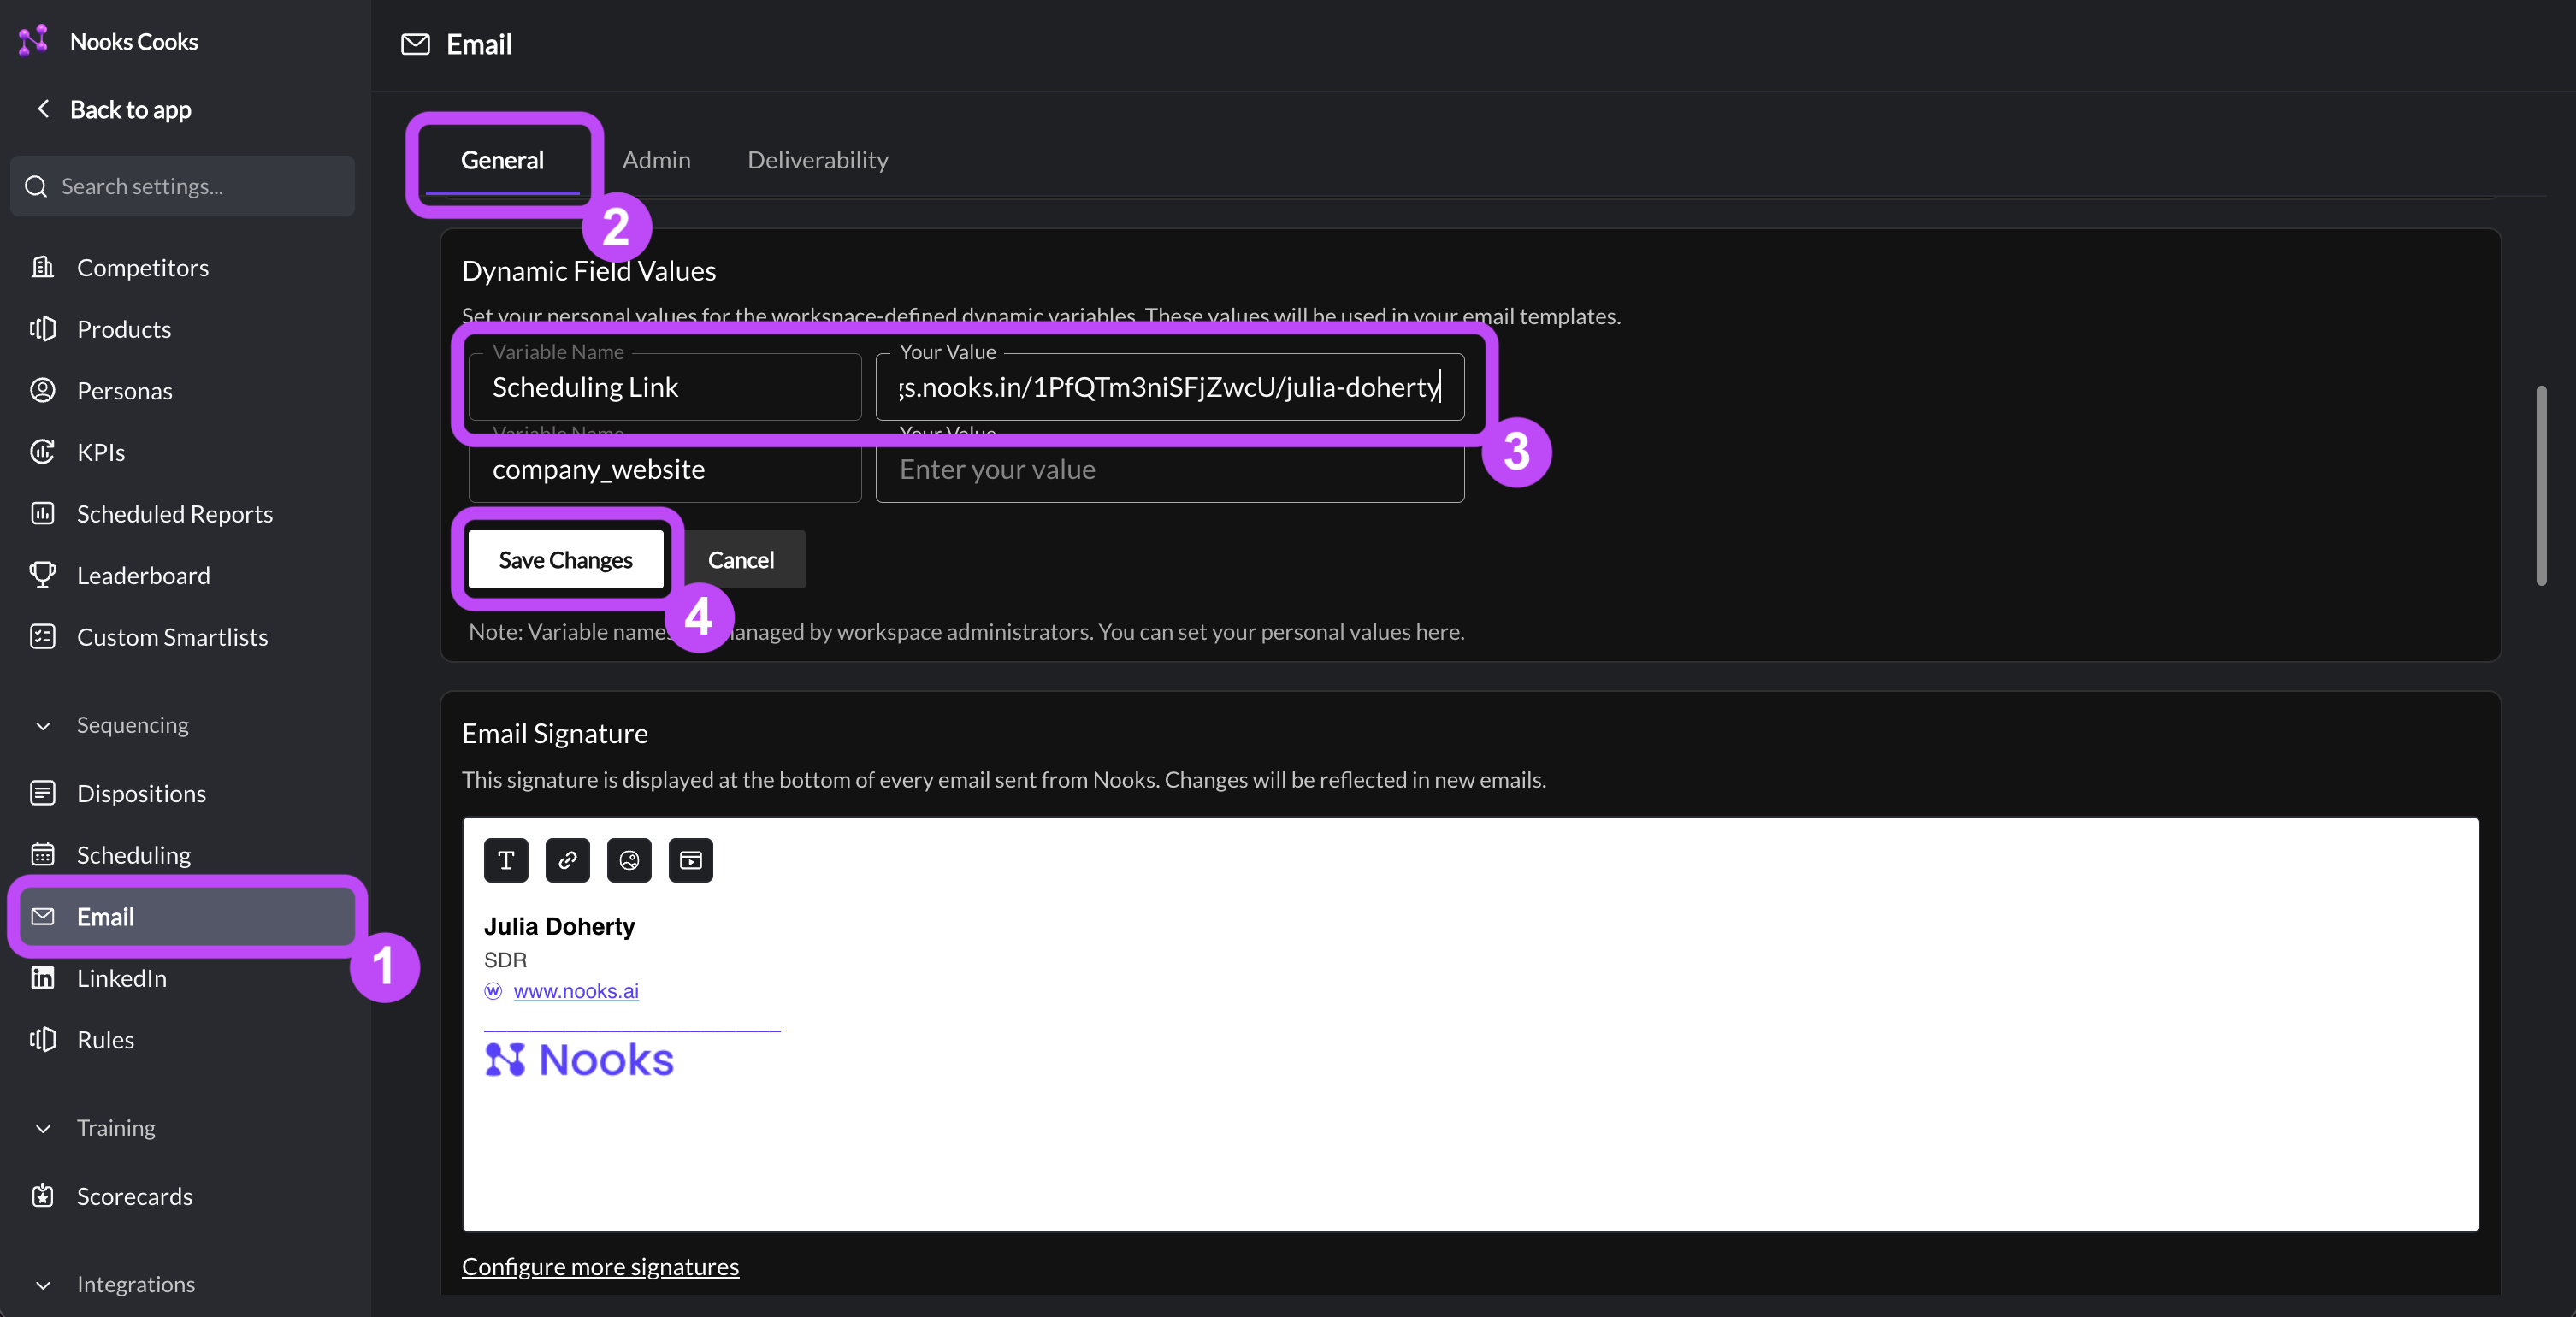
Navigate to the Email tab in Settings.
In the Dynamic Variables section, paste your Nooks Booking Link alongside your Workspace's "scheduling link" (or equivalent) variable.
Click Save Changes.
LinkedIn Setup
Nooks' LinkedIn automations rely on a connection to your LinkedIn account. These LinkedIn automations enable you to send Connection Requests and InMails from Nooks Sequences.
Task 22: Connect Your LinkedIn Account
For Nooks' LinkedIn Automations to work, you must first connect your LinkedIn account. If you do not connect your LinkedIn account, Nooks will skip any LinkedIn tasks in your Nooks Sequences.
Open a separate browser tab and sign into LinkedIn.
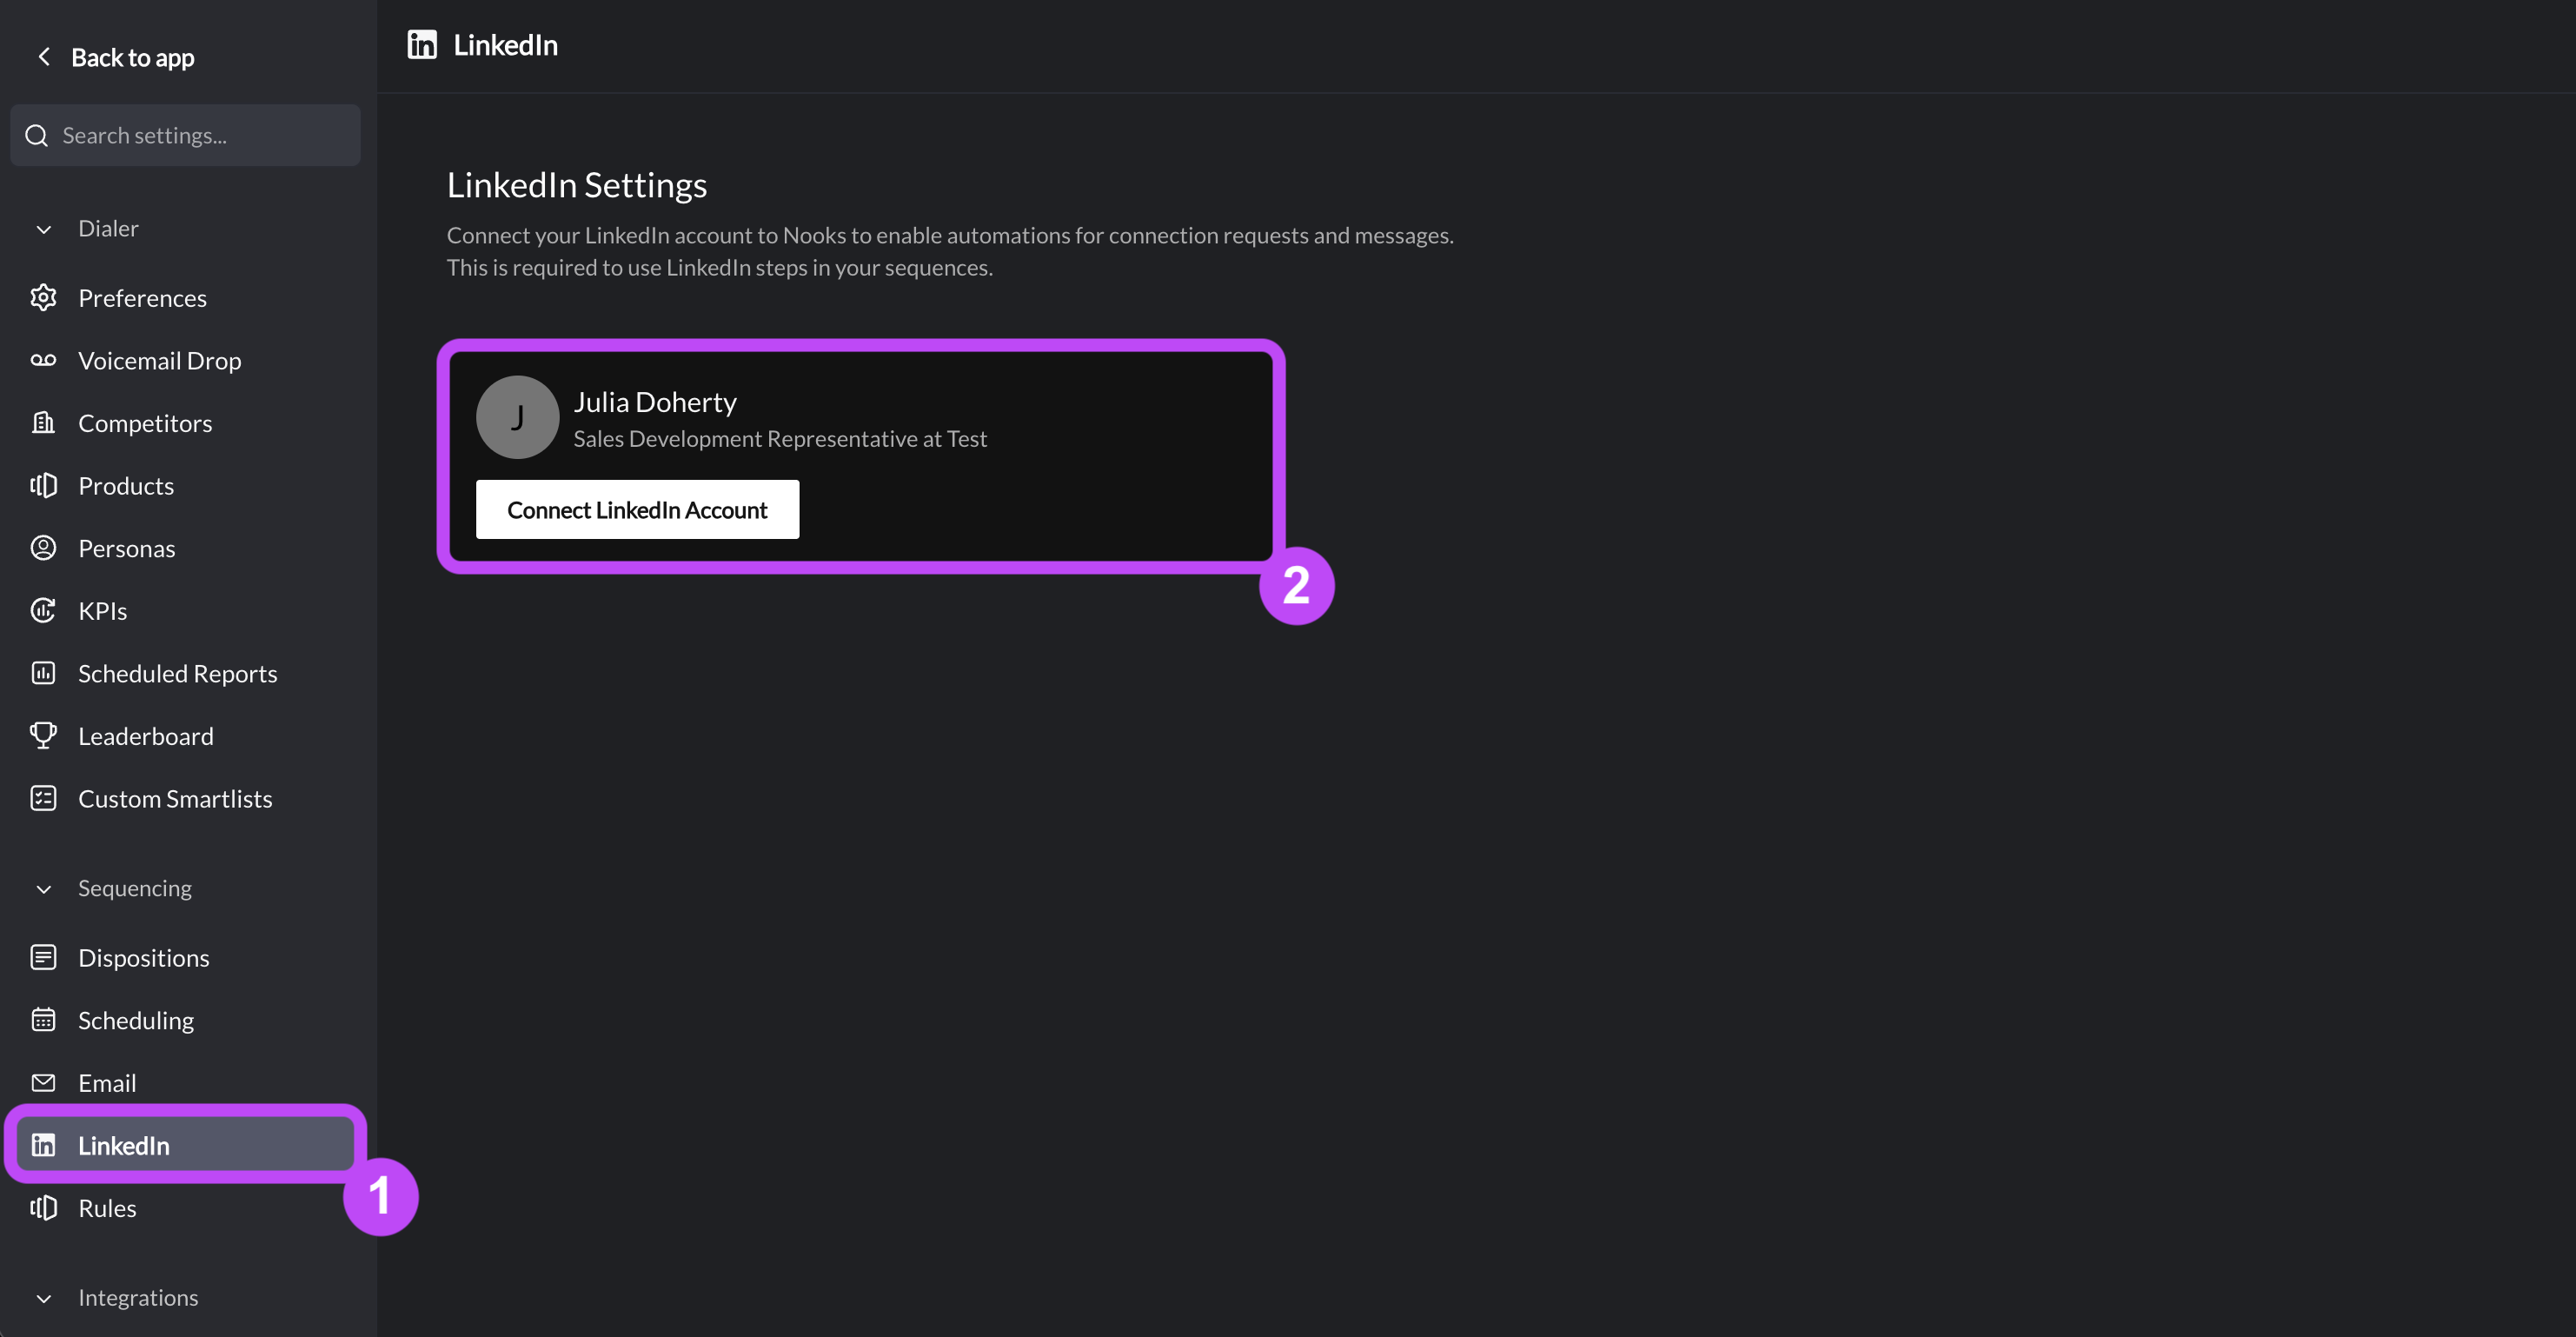
In Nooks, go to Settings → All Settings.
Under Sequencing, select LinkedIn.
Click Connect LinkedIn Account
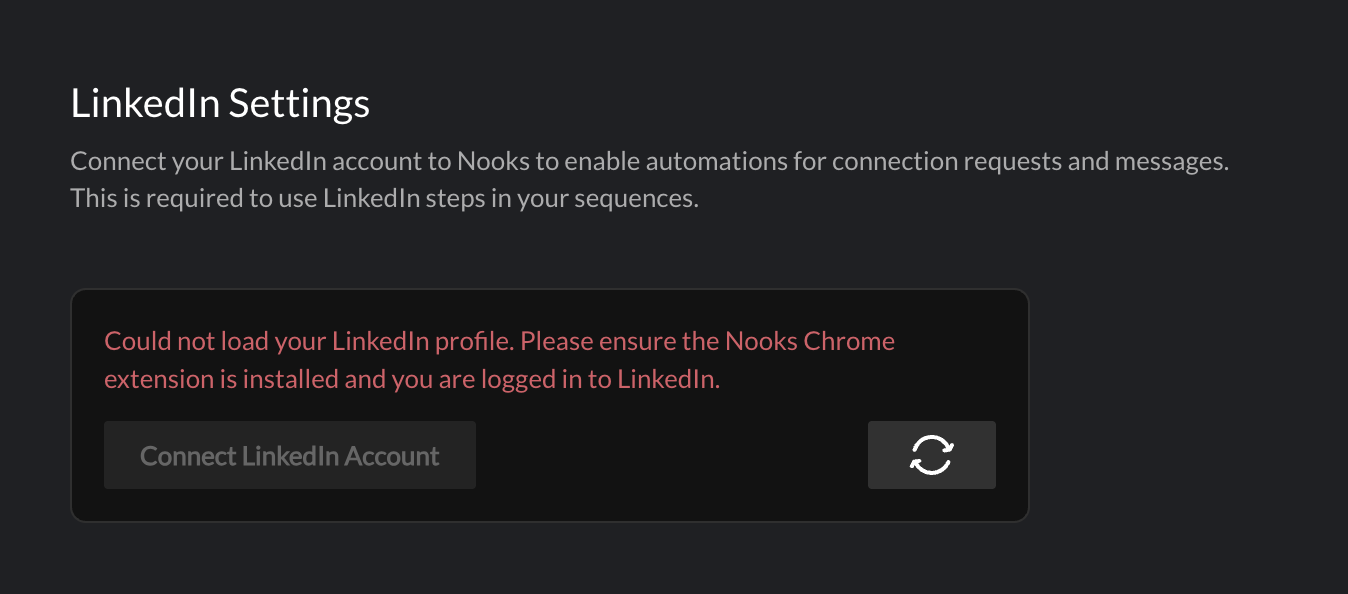
Troubleshooting Tip: If you see a Cannot load your linked in profile error:
Ensure you have the Nooks Chrome extension installed and connected.
Open a separate browser tab and log into LinkedIn there.
Refresh the Nooks LinkedIn Settings page.
Notification Preferences
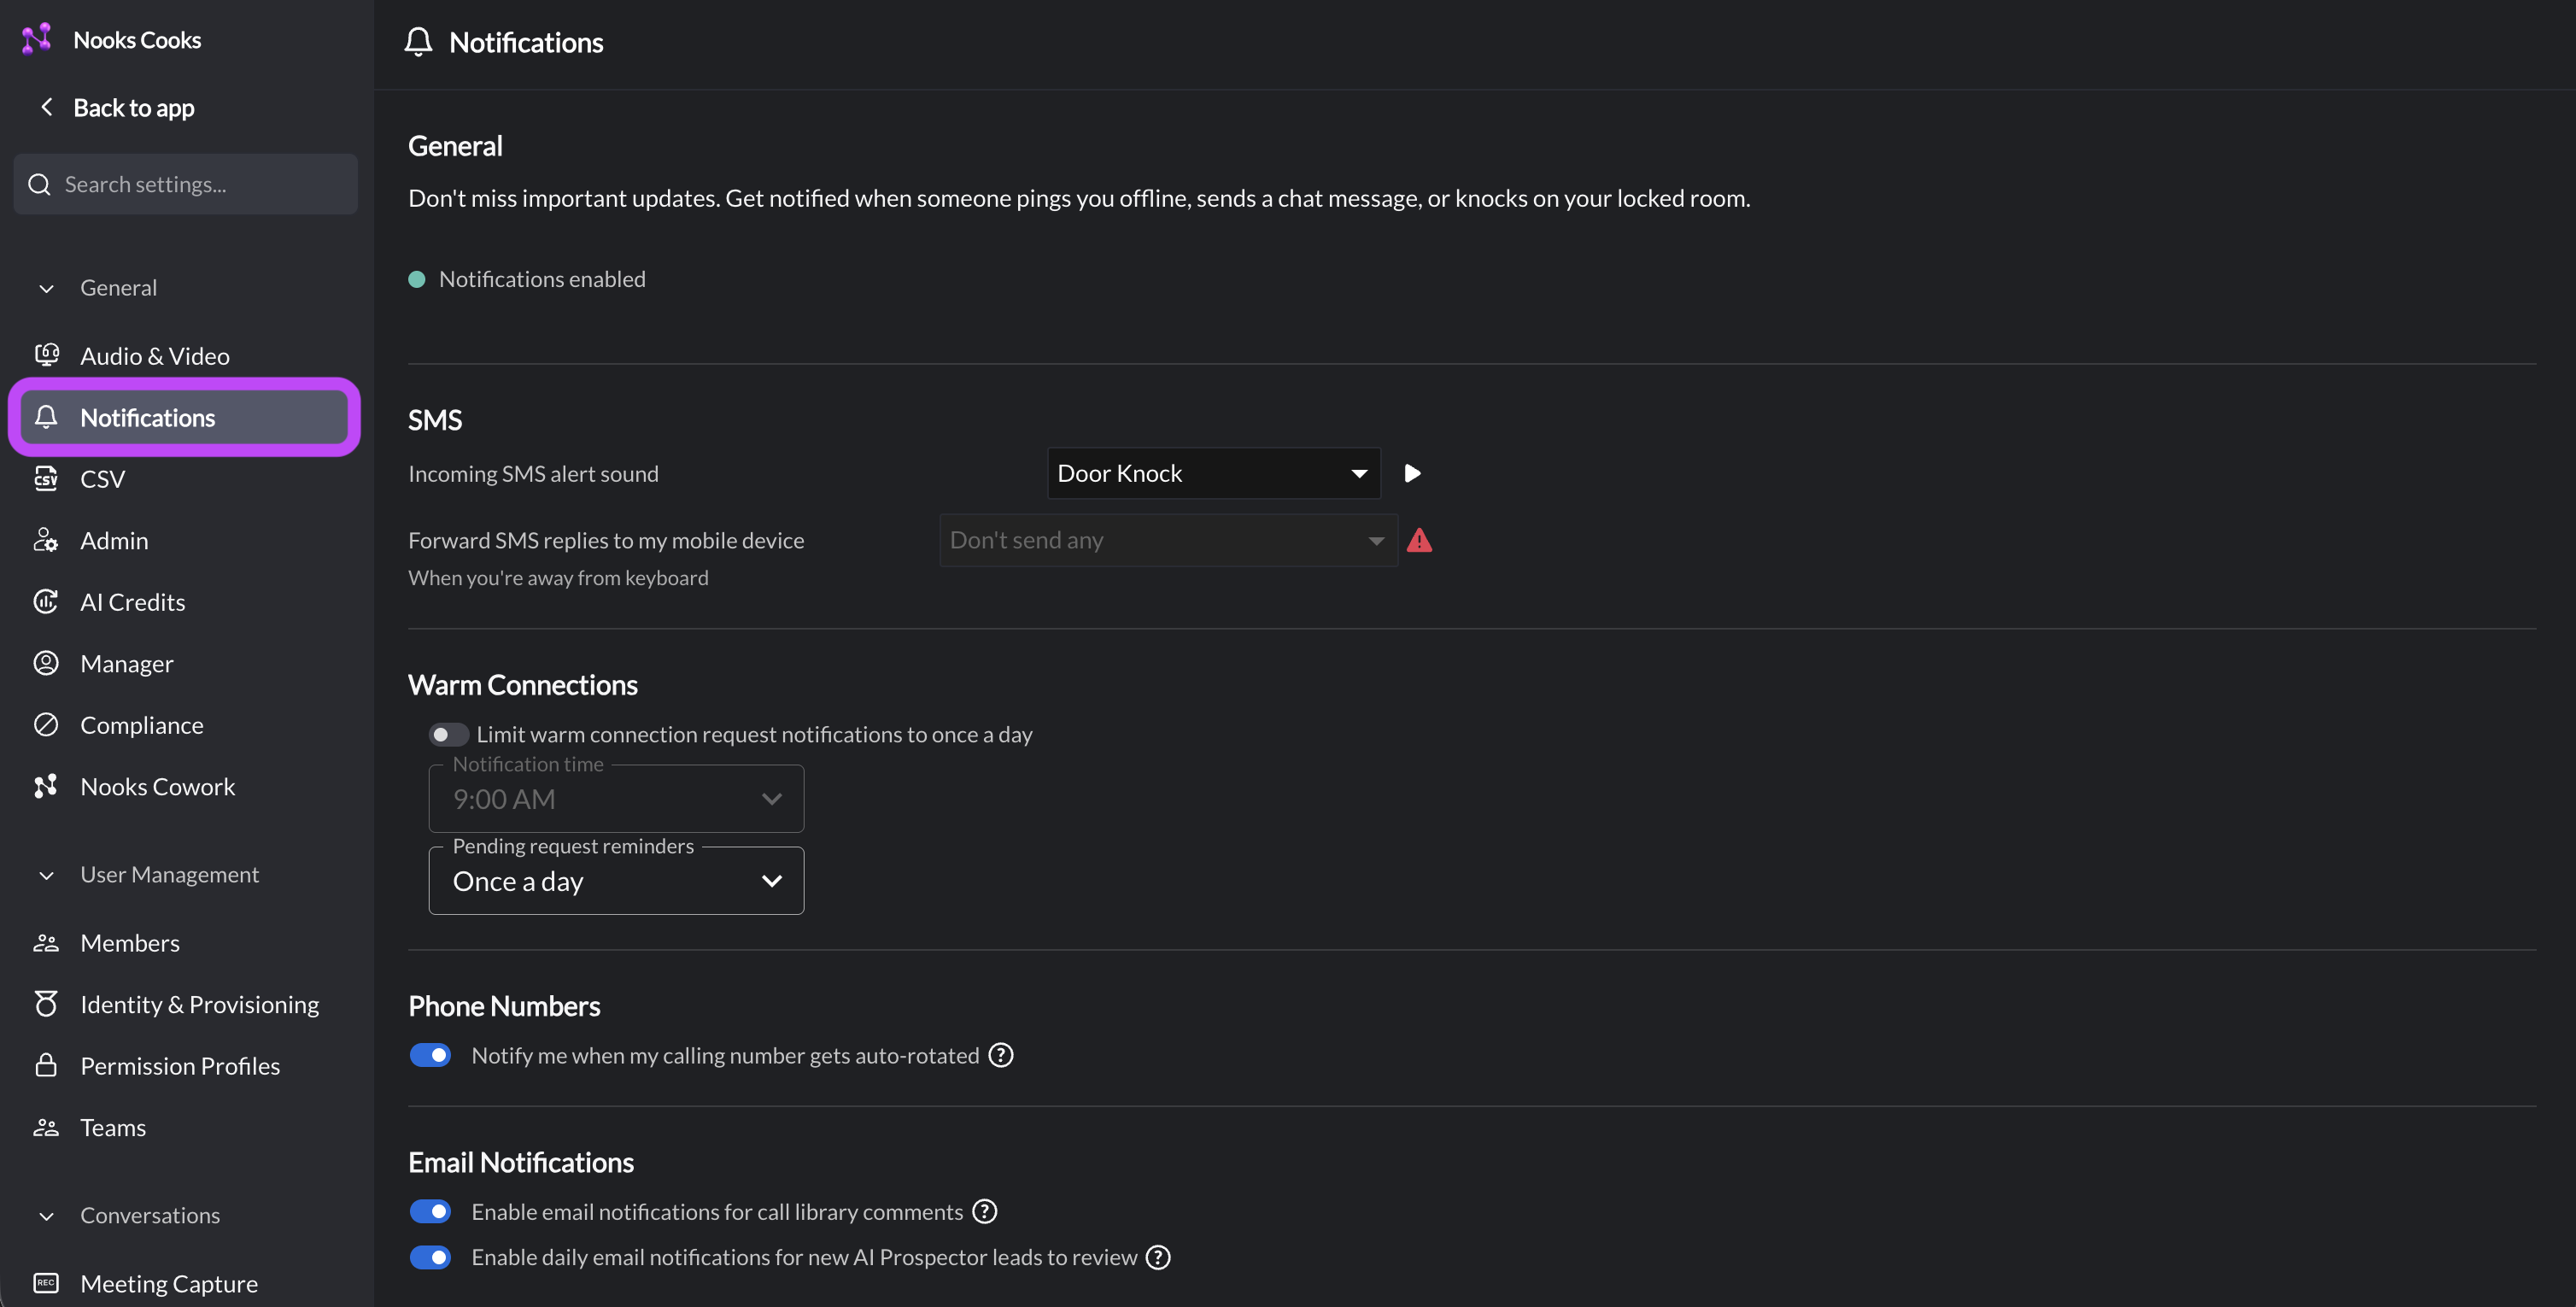
Your notification preferences control which alerts you receive as you work in Nooks, from browser push notifications to email digests.
Task 23: Customize Notification Preferences
You can configure and customize your notification preferences in Nooks.
Go to Settings → All Settings.
Under General, select Notifications.
Configure your notification preferences. If your Workspace is using SMS on Nooks, we particularly recommend setting up your Incoming SMS Alert Sound so that you do not miss any inbound SMS messages.
Phone Number Setup
Before using Nooks to call or send SMS messages to prospects, you need a Nooks phone number.
Task 24: Create Your Nooks Phone Number
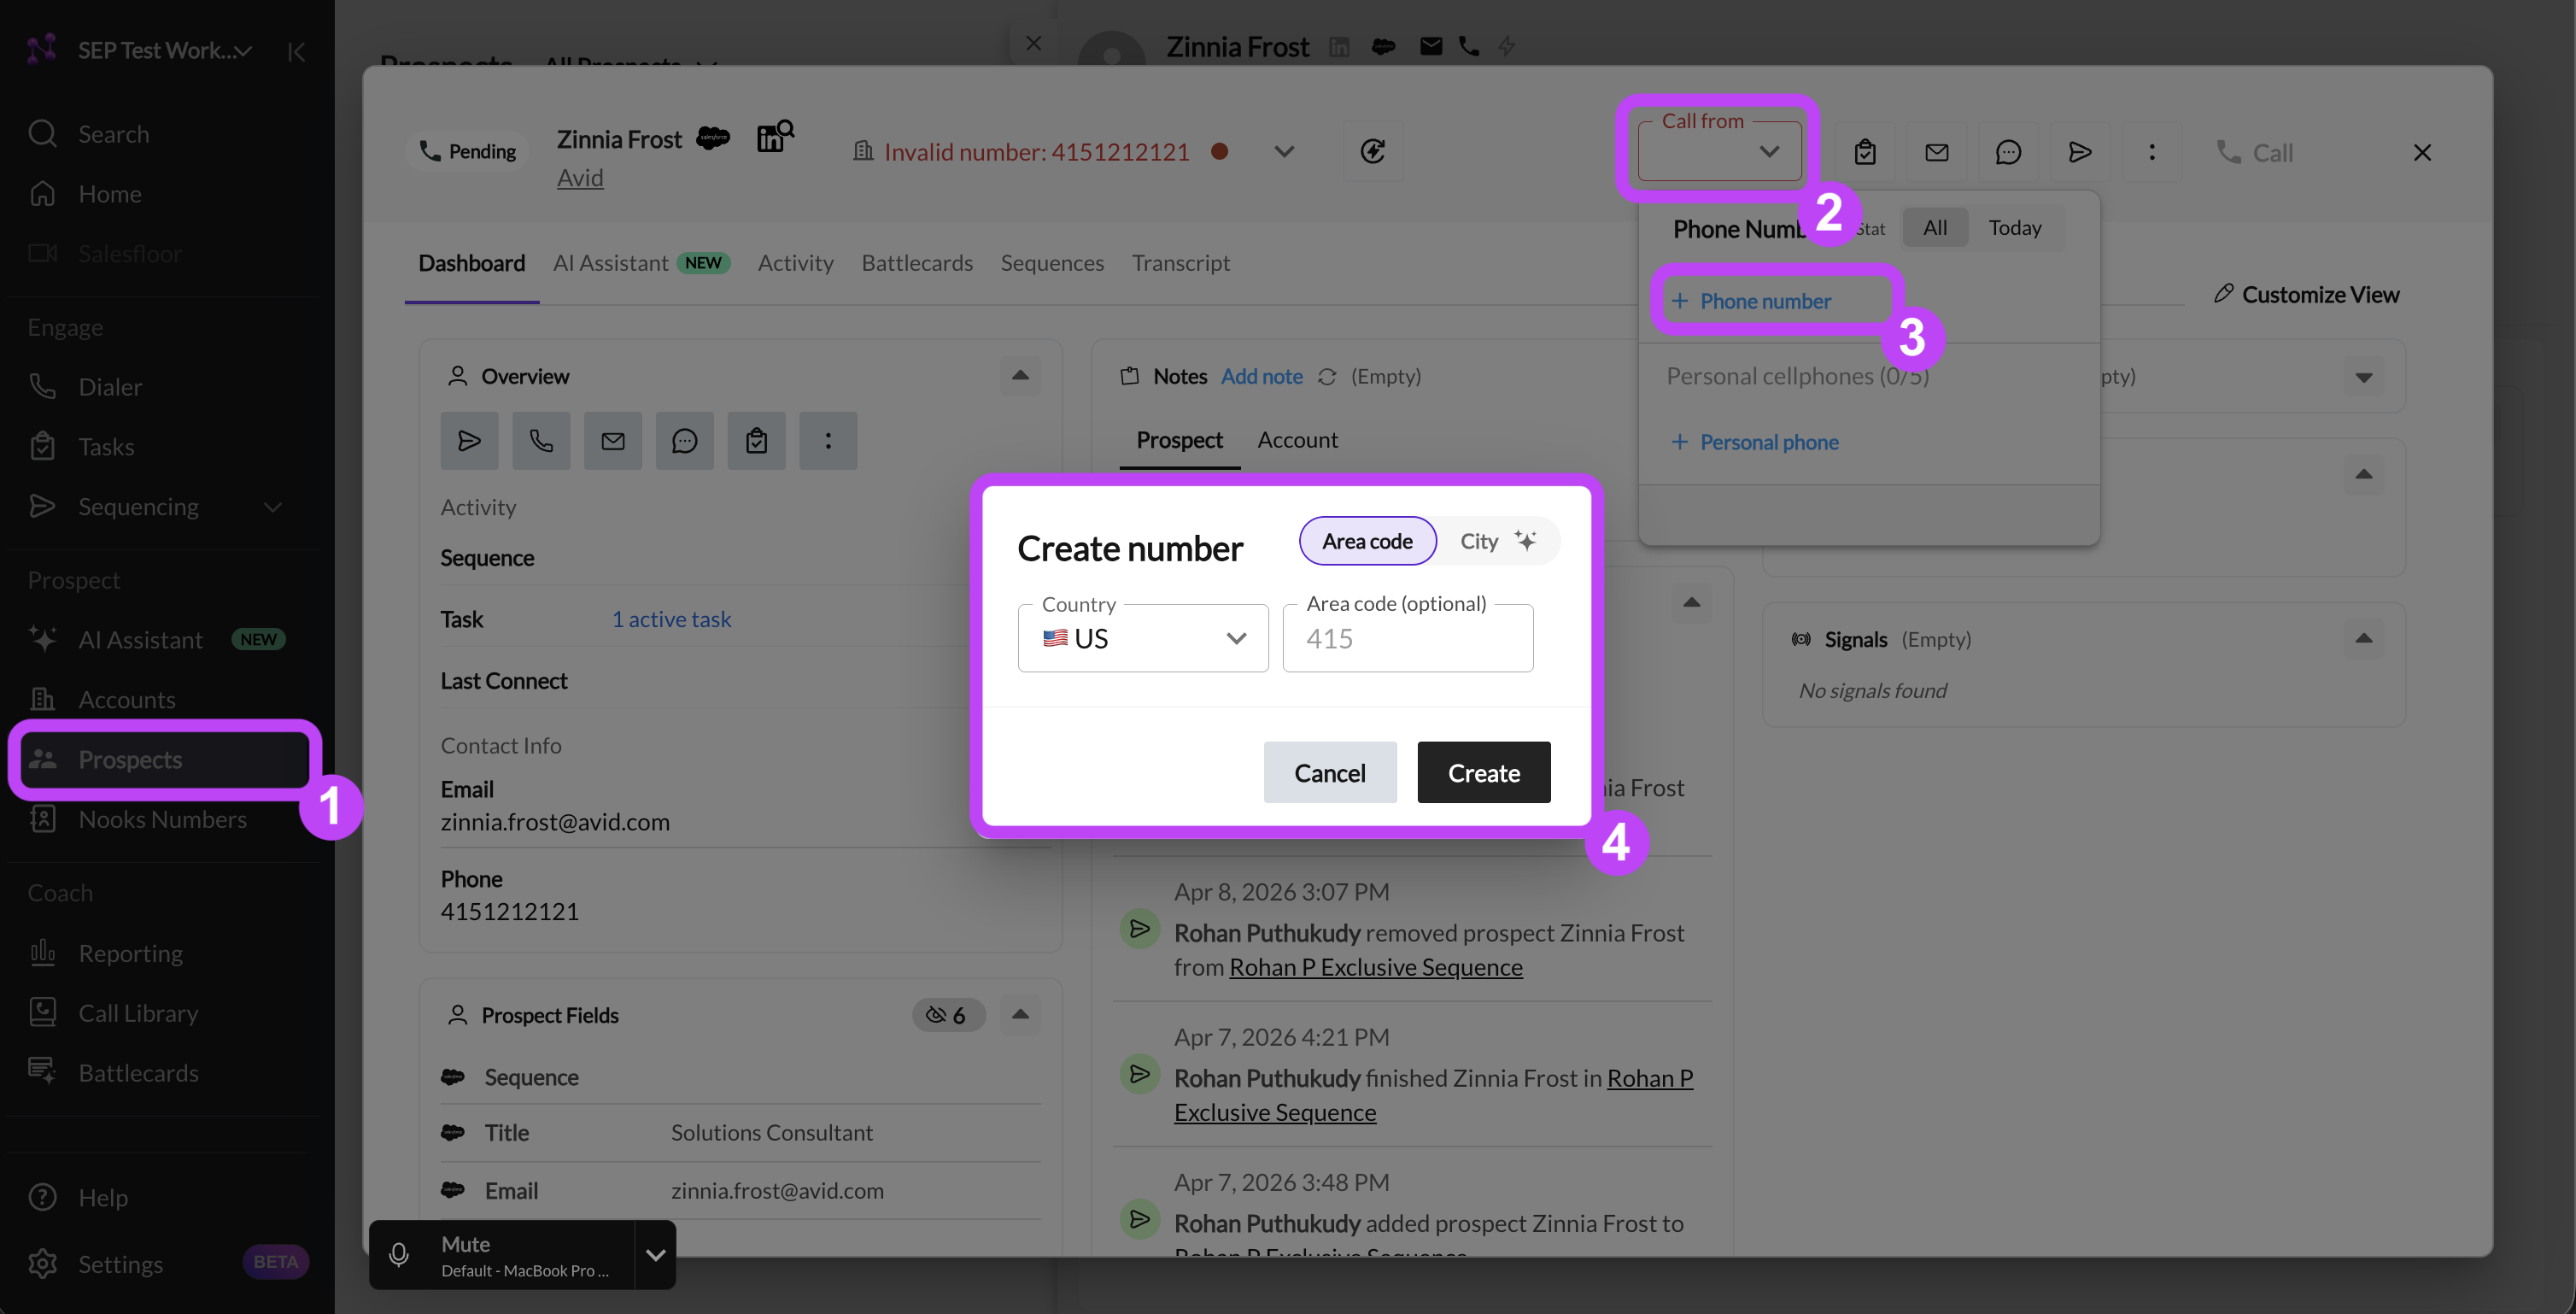
The easiest way to create a Nooks phone number is from a prospect record.
In Nooks, navigate to the Prospects page.
Click on any prospect to open up the Prospect Side Panel on the right side of the screen.
Click the click-to-call (phone) icon under the prospect's name in the Prospect Side Panel.
Click the Call from dropdown menu.
Click the + Phone Number button.
In the Create number pop-up window, enter the area code or city you want a phone number from.
Press Create.
See this guide for more detailed instructions and a video walk through.
Once you've completed those steps, you should be ready to begin using Nooks Sequencing!