Connecting the Zoom Integration to Nooks Meeting
Last updated: August 20, 2026
This guide walks through how to connect Zoom to Nooks so that unique Zoom meeting links are automatically generated whenever you schedule a meeting.
Background
The Zoom integration with Nooks Sequencing eliminates the manual step of adding video conferencing links to calendar invites. With Zoom connected, a unique Zoom meeting link is automatically generated and added to the Location field of every meeting you schedule, whether through a Nooks Booking Link or directly from the Nooks web app. Connecting the integration results in faster bookings, fewer errors, and no more scrambling to add a meeting link before a meeting starts.
How to Connect the Zoom Integration
Before using Zoom for meetings booked through Nooks, each user must connect their Zoom account to Nooks. If your organization requires Zoom Marketplace apps to be approved by an admin, your Zoom admin must first approve Nooks before users can complete the connection.
For Zoom Admins: Approve Nooks in the Zoom App Marketplace
Your team only needs to complete this step if your organization requires admin approval for Zoom Marketplace apps. When this setting is enabled, users cannot add an unapproved app themselves. They may see "Request" instead of "Add" when attempting to authorize their Zoom connection. Skip this section if your organization does not require admin approval for Zoom Marketplace apps.
A Zoom admin at your company can approve Nooks as a Zoom Marketplace App through the following steps.
In App Permissions, enable Approve Use of This App.
Choose whether to approve Nooks for all users on the account or for specific users or user groups, then click Save. More information can be found in this Zoom guide.
Approving Nooks allows the elected users to authorize the Zoom integration themselves. End-users can proceed with the connection steps below.
For End Users: Connect Your Zoom Account to Nooks
Once Nooks has been approved by your Zoom admin, or if your organization does not require Marketplace app approval, you can connect your Zoom account from Nooks.
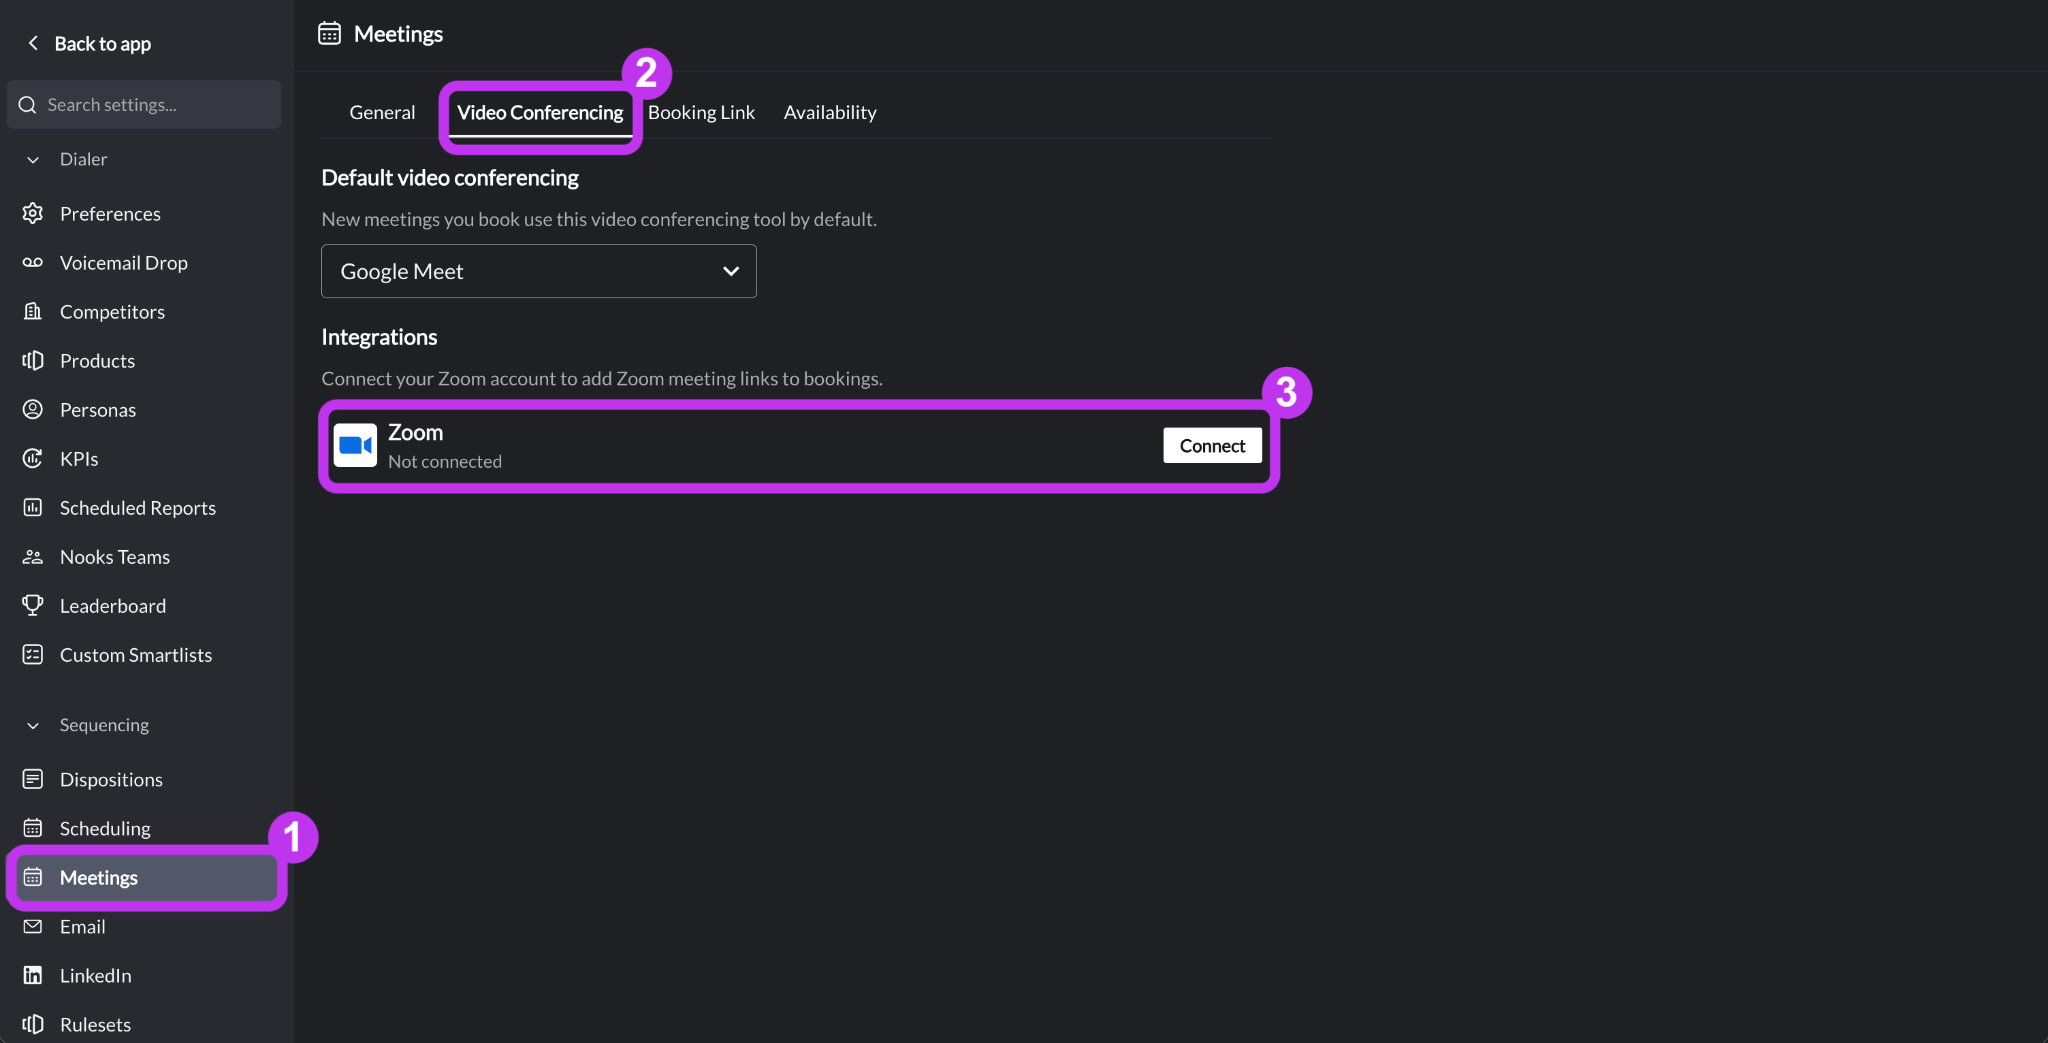
In Nooks, go to Settings → All Settings.
Under Sequencing, select Meetings.
Click into the Video Conferencing tab.
Under Integrations, click Connect next to Zoom. You will be redirected to Zoom.
If you are logged into Zoom, review and authorize the requested permissions. You will be redirected back to Nooks.
If you are not logged into Zoom, log in first, then review and authorize the requested permissions. You will be redirected back to Nooks.
Optionally, click Set as Default to make Zoom your default video conferencing location for all meetings books through Nooks.
How to Use the Zoom Integration
Once connected, Zoom automatically generates a unique booking link for every meeting you schedule through Nooks. The meeting link is added to the Location field of the resulting calendar event. There are two primary methods of booking meetings through Nooks:
Your Nooks Booking Link
The Meetings page in the Nooks app
Adding Zoom to Your Nooks Booking Link
Setting Zoom as your video conferencing tool for your Nooks Booking Link ensures every meeting scheduled through it has a unique Zoom meeting link, without any manual work required.
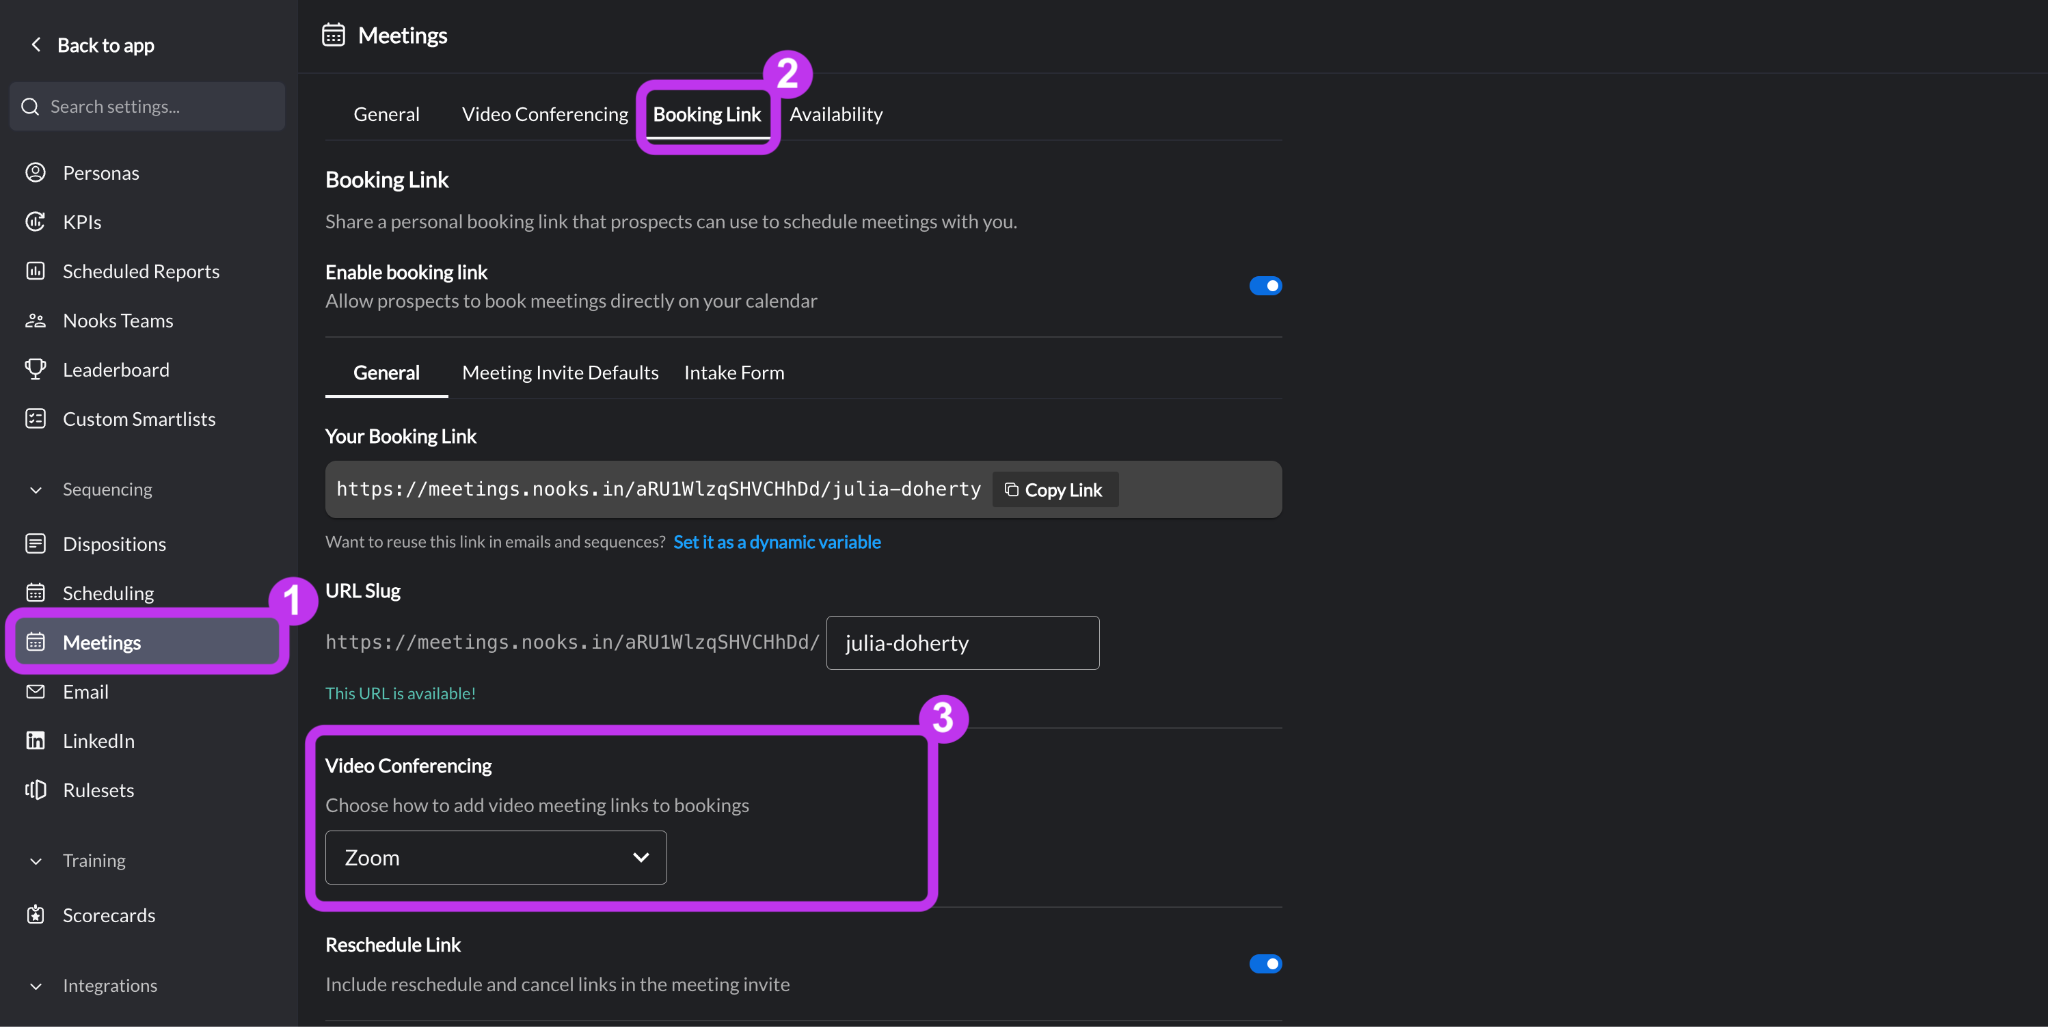
Go to Settings → All Settings.
Under Sequencing, select Meetings.
Click into the Booking Link tab.
In the General subtab, locate the Video Conferencing section, and select Zoom.
Click Save at the bottom of the page.
Adding a Zoom Link to Meetings Booked from the Nooks App
When booking meetings directly from the Nooks web app, you can select Zoom as your video conferencing tool for the event.
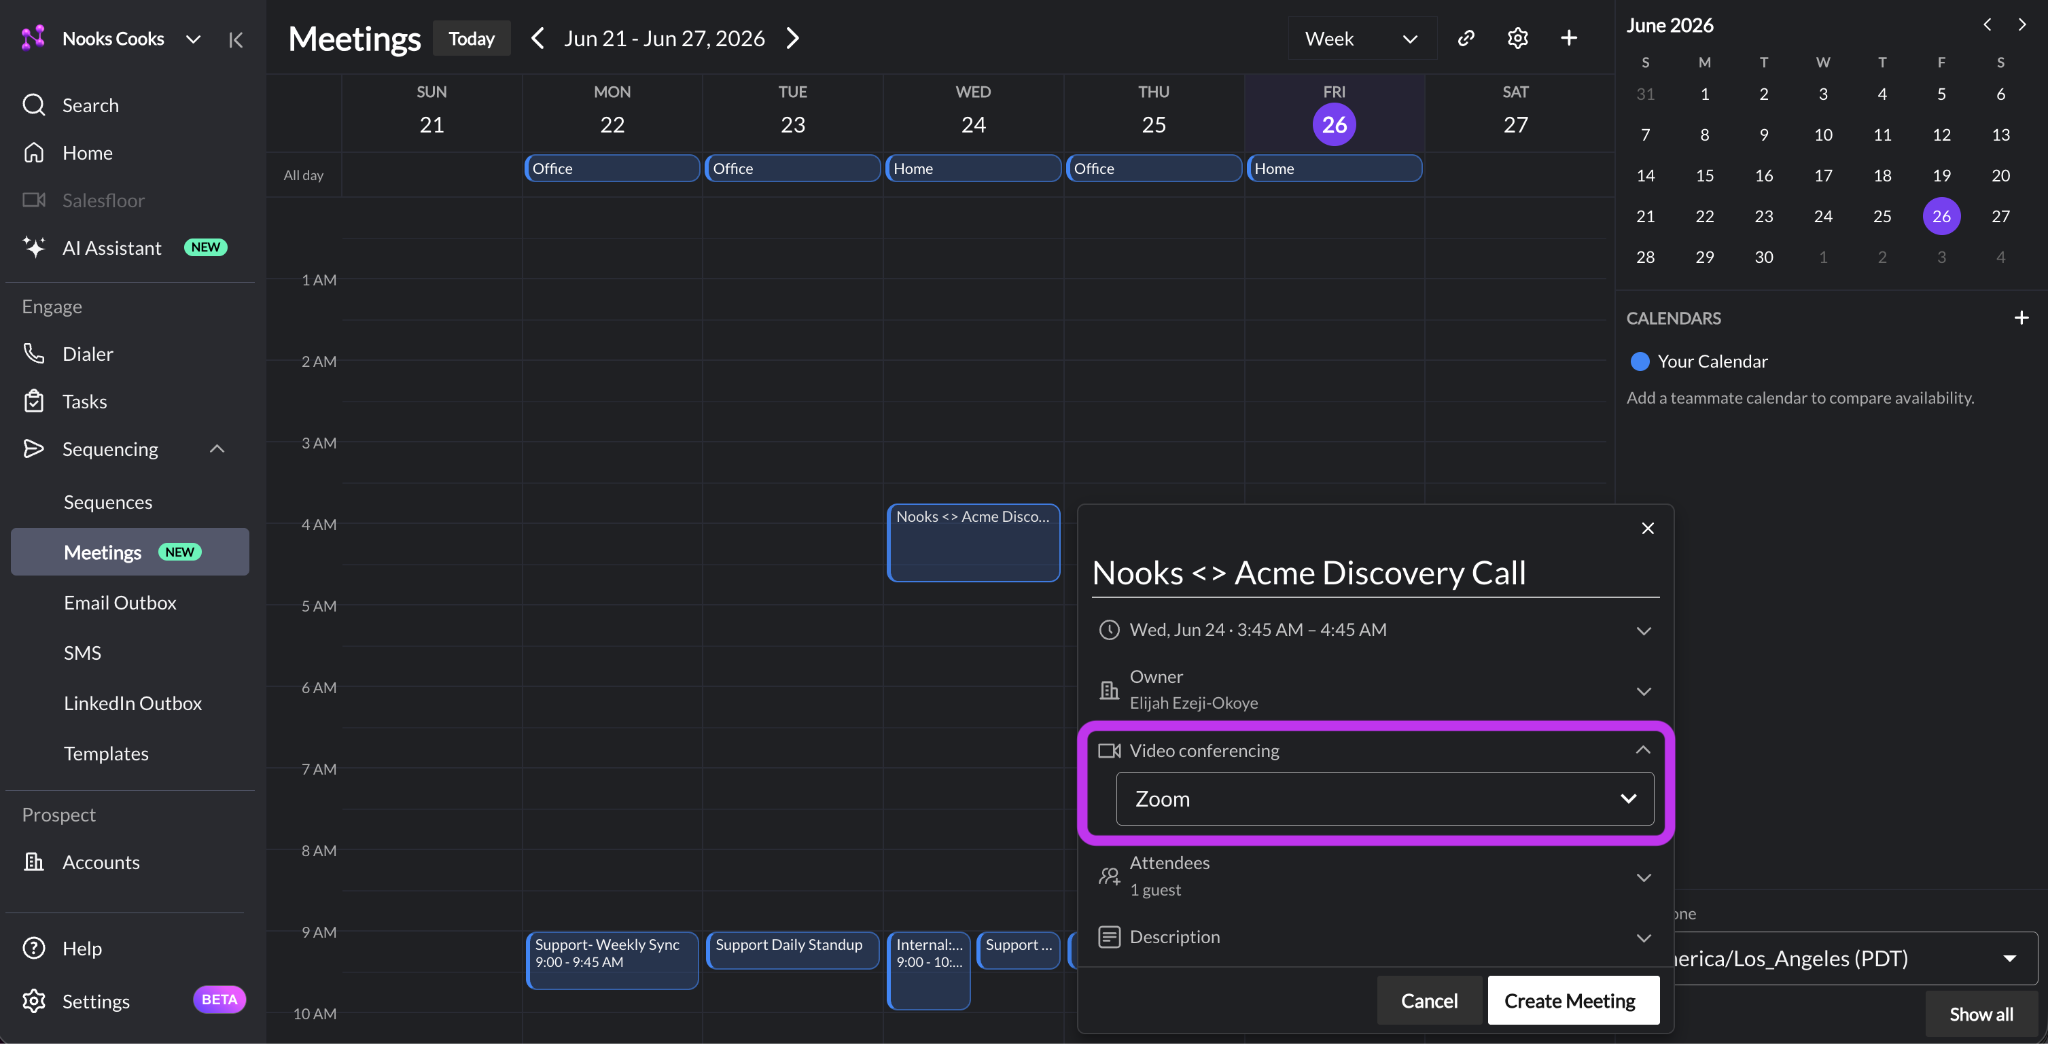
Open the Meetings page from the left-hand navigation menu.
Click and drag on the calendar to set the meeting time.
In the Video Conferencing field, select Zoom.
Complete the remaining event details (e.g., Date/Time, Owner, Attendees, Description).
Click Create Meeting.
Note: Nooks uses the credentials of the user in the Owner field to book the meeting. If that user does not have their calendar or Zoom connected, you will see an error.
How to Disconnect the Zoom Integration
To disconnect the Zoom integration from Nooks, follow the steps below. Once disconnected, Zoom will no longer generate meeting links for new meetings booked through Nooks until you reconnect.
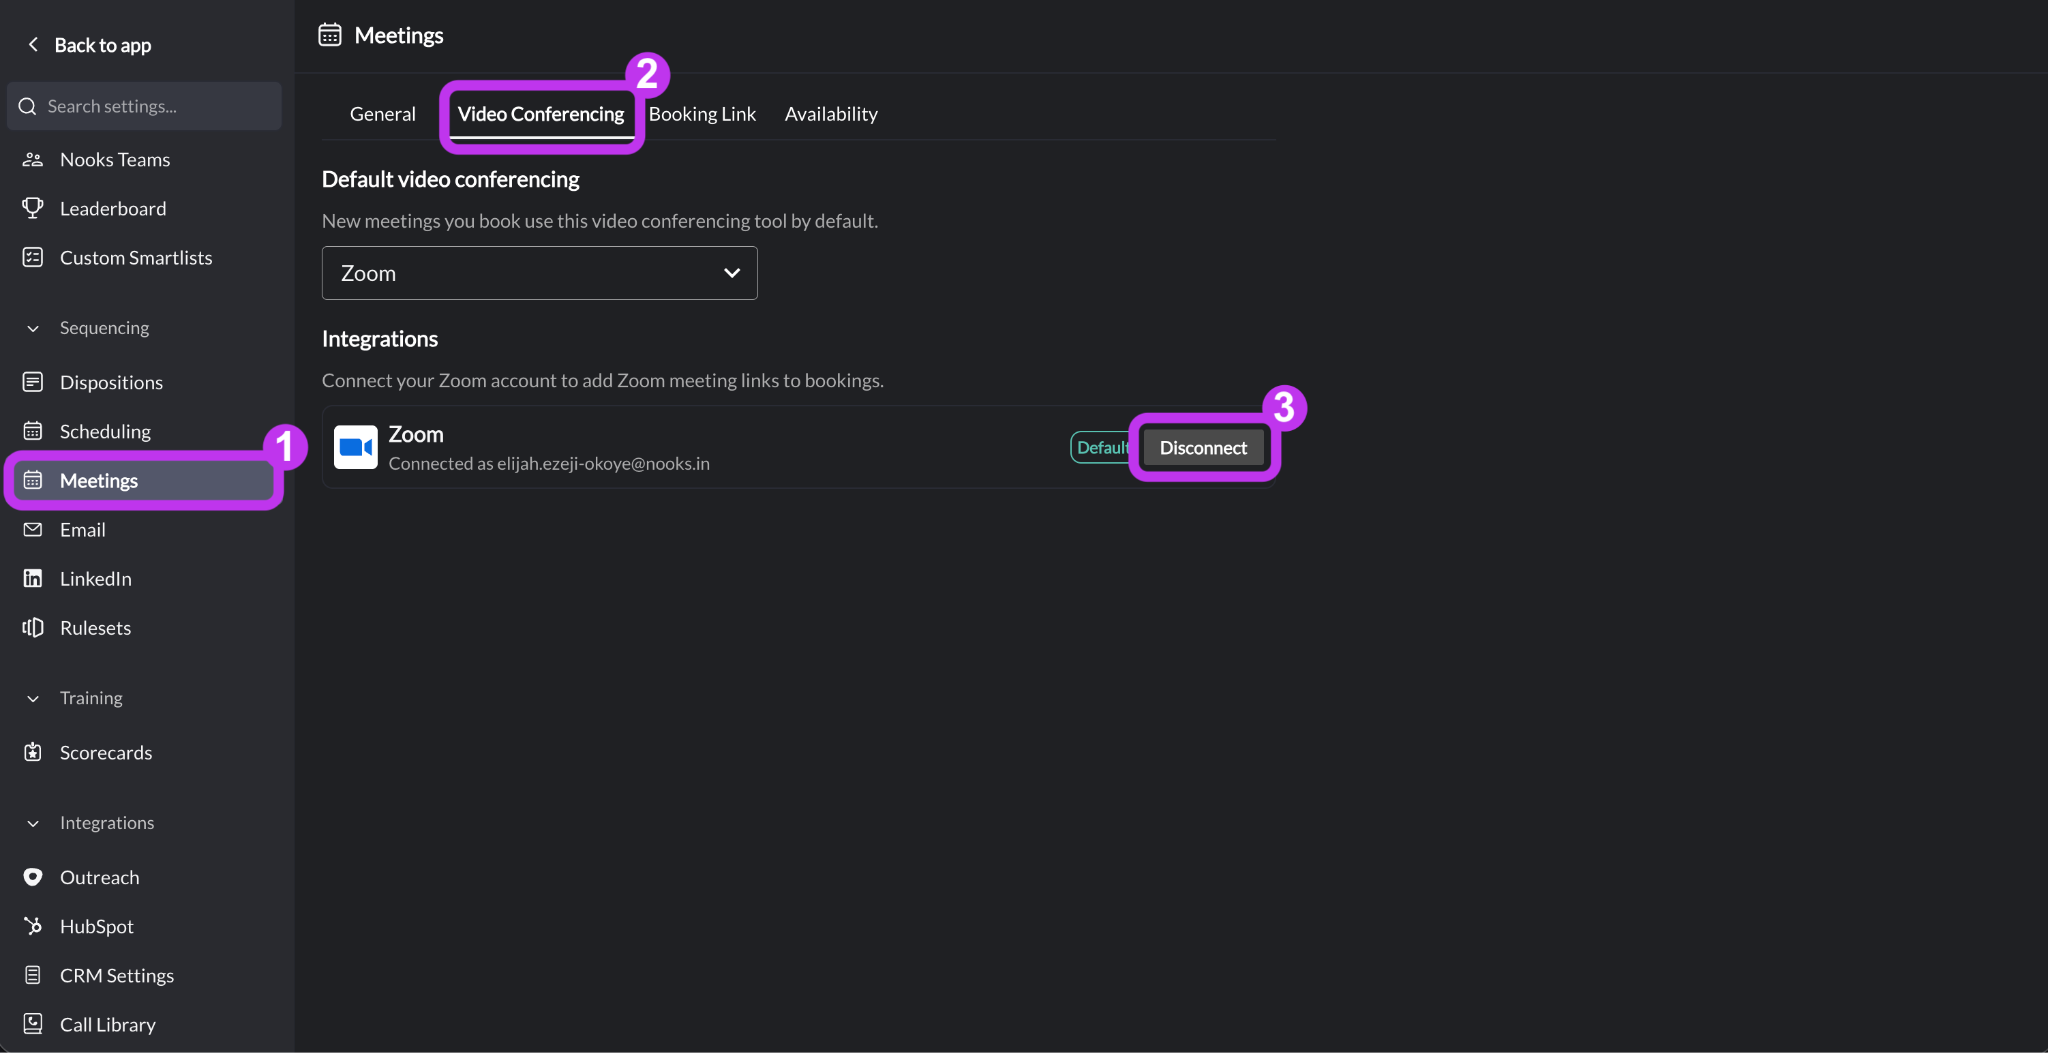
In Nooks, go to Settings → All Settings.
Under Sequencing, select Meetings.
Click into the Video Conferencing tab.
Under Integrations, click Disconnect by Zoom. You will be immediately disconnected from the Zoom integration.
Zoom Permissions Requested
When you authorize the Zoom integration, Zoom requests the following permissions. These permissions allow Nooks to generate and manage meeting links on your behalf.
Permission | Description |
Content | Manage content and information generated in the context of Zoom experiences, which may include audio, video, messages, meeting or chat name, agenda, transcriptions, and responses to polls and Q&A. |
Participants | Manage participants, which may include assigning participants to specific breakout rooms and specifying an interpreter for the session. |
Registration & Scheduling | Manage registration information, which may include scheduling Zoom experiences or adding or deleting registrants. |
Calendars | May include access to calendar of scheduled Zoom meetings and webinars, and related details about those meetings and webinars. |
Content | Content generated in Zoom products, which may include audio, video, messages, transcriptions, feedback, responses to polls and Q&A, and files, and related context, such as invitation details, meeting or chat name, and meeting agenda. |
Functional | Information that is necessary for the app to function properly, which may include your Zoom user ID, session IDs, meeting role, and other basic identifiers and information about your meeting, webinar, or chat. |
Participant Profile & Contact Information | May include name, display name, email address, phone number, user ID, and other profile information. |
Product Usage | Information about how people and their devices interact with Zoom products, which may include when participants join/leave, whether participants sent messages and who they message with, performance data, and other usage information and metrics. |
Profile & Contact Information | May include user name, display name, picture, email address, phone number, job information, stated locale, account, user ID, contact lists added by the account or user (which may include contact information a user imports from a third-party app), and other profile information. |
Registration Information | Information people provide when registering for a Zoom meeting, webinar or recording, which may include name and contact information, responses to registration questions, and other registration information. |
Settings | Preferences and settings, which may include whether a passcode or a waiting room is required, permitted event capacity, screen sharing settings, and other settings and configuration information. |
Settings | Manage preferences and settings on the account or profile using the app, which may include updating meeting and webinar configuration preferences, email notification preferences, and configuring Zoom Phone, Zoom Room, and telephony devices. |
Account Information | May include administrator name, account email address, billing information, and account plan information. |
FAQs
What Zoom license type is required to connect Zoom to Nooks?
The Zoom integration with Nooks is compatible with any Zoom license type.
When would I need to reconnect the Zoom integration?
After connecting the Zoom integration, you should remain connected until you manually disconnect. You should only need to reconnect the Zoom integration if you change your password in Zoom, or if you or your admin removes the Nooks app in Zoom.